Mounting the Switch

Wall Mount

This section provides instructions for wall mounting the switch.

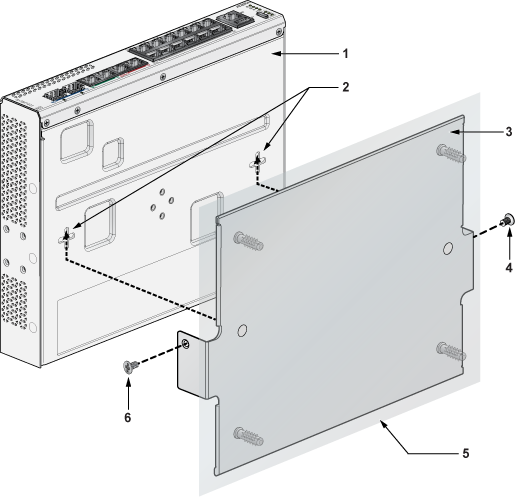
L-Bracket Wall Mount (Default)

This section provides instructions for wall mounting the switch using L-Bracket.

Figure 1. Wall Mounting the Switch using L-Bracket
 

1

L-Bracket

2

Screw M4x25mm

3

Flat head screw M4x6mm

4

Screw anchor M4

5

Flat surface wall

Note: For more information regarding the screw size, refer to Screw Size Details
  1. Position the L-Bracket aligning with the chassis holes on the side of the switch and fix it with M4x6mm flat head screws. The L-Bracket is attached to the chassis.
  2. Attach the remaining L-Bracket on the other side of the chassis and fix it with M4x6mm flat head screws.
  3. Determine the mounting position to attach the switch to the wall.
  4. Drill four holes (two on each side) 7x25mm deep on the wall. Refer to the L-Bracket for detailed hole locations.
  5. Insert M4 screw anchor to the four holes drilled on the wall.
  6. Place the chassis, attached with L-Bracket, on the wall aligning with the mounting holes and secure the device with M4x25mm screws.
  7. Tighten the screws to fix the device firmly to the wall.

3-in-1 Bracket Wall Mount (Optional)

This section provides instructions for wall mounting the switch using a 3-in-1 mounting bracket.

Figure 2. Attaching 3-in-1Bracket to the Wall
 

1

Screw anchor M4

2

Screw M4x25mm

3

Cross hole stud

4

3-in-1 bracket

5

Flat surface wall

Figure 3. Wall Mounting the Switch
 

1

Chassis

2

Cross hole

3

3-in-1 bracket

4

Flat head screw M4x6mm

5

Flat surface wall

6

Flat head screw M4x6mm

Note: For more information regarding the screw size, refer to Screw Size Details
  1. Determine the wall mounting position to attach the device.
  2. Place the 3-in-1 bracket on the wall and mark the mounting holes on the four corners aligning with holes on the 3-in-1 mounting bracket. Figure 2
  3. Fix the 3-in-1 bracket to the wall using the screws.
  4. Attach the switch to the 3-in-1 bracket using the screws and studs. Figure 3
  5. Align 3-in-1 bracket holes with the switch properly as shown in the below image.
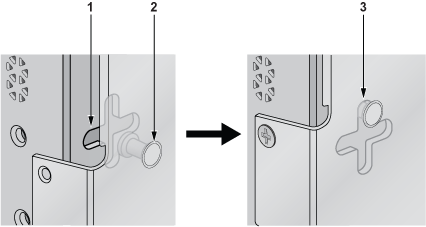
     

    1

    Cross hole

    2

    Cross hole stud

    3

    Aligning stud to the cross hole

  6. Tighten the screws to mount the device firmly to the wall and connect to the power supply.
  7. Place the PSU adapter bracket on the PSU and fix with cable ties around it.
     

    1

    PSU adapter bracket

    2

    Cable ties

  8. Determine the wall mounting position to attach the PSU adapter bracket.
  9. Place the PSU adapter bracket on the wall and mark the mounting holes on the four corners aligning with the mounting bracket.
     

    1

    Screw anchor M4

    2

    Screw M4x25mm

    3

    Flat surface wall

  10. Fix the PSU adapter bracket to the wall using the screws.

Under Table Mount

This section provides instructions for mounting the switch under the table/desk.

L-Bracket Under Table Mount (Default)

This section provides instructions for mounting the switch under the table/desk using L-Bracket.

Figure 4. Under Table Mounting the Switch using L-Bracket
 

1

Flat wooden table

2

L-Bracket

3

Flat head screw M4x6mm

4

Screw M4x25mm

Note: For more information regarding the screw size, refer to Screw Size Details
Note: Ensure that the flat wooden table surface has a minimum thickness of 25mm for under table mounting.
  1. Position the L-Bracket aligning with the chassis holes on the side of the switch and fix it with M4x6mm flat head screws. The L-Bracket is attached to the chassis.
  2. Attach the remaining L-Bracket on the other side of the chassis and fix it with M4x6mm flat head screws.
  3. Determine the mounting position to attach the switch under the table.
  4. Place the chassis, attached with L-Bracket, under the table and secure the device with M4x25mm screws.
  5. Tighten the screws to fix the device firmly under the table.

3-in-1 Bracket Under Table Mount (Optional)

This section provides instructions for mounting the switch under the table/desk using 3-in-1 mounting bracket.

Figure 5. Attaching 3-in-1 Bracket under the Table
 

1

Flat wooden table

2

Screw hole

3

Screw anchor M4

4

3-in-1 bracket

5

Screw M4x25mm

6

Switch

Figure 6. Under Table Mounting the Switch
 

1

Flat wooden table

2

Cross hole

3

3-in-1 bracket

4

Flat head screw M4x6mm

Note: For more information regarding the screw size, refer to Screw Size Details
Note: Ensure that the flat wooden table surface has a minimum thickness of 25mm for under table mounting.
  1. Determine the mounting position to attach the switch under the table.
  2. Place the 3-in-1 bracket under the table and mark the mounting holes on the four corners aligning with holes on the 3-in-1 mounting bracket. Figure 5
  3. Fix the 3-in-1 bracket under the table using the M4x25mm screws on the four corners.
  4. Attach the switch to the 3-in-1 bracket by aligning with the chassis holes.
  5. Tighten the screws to fix the device firmly under the table.

Desktop Mount (Default)

This section provides instructions for mounting the switch on the desktop or any flat surface.

Figure 7. Attaching Rubber Feet to Bottom of Switch
 

1

Rubber feet

Note: Make sure that the device is not stacked and avoid placing anything on the top cover of the device.
  1. Peel the four rubber feet from the master sheet provided in the kit.
  2. Attach the adhesive rubber feet to the four corners on the bottom of the switch.
    The rubber foot prevents the switch from sliding from the table and to protect the table surface.
  3. Place the switch on the desktop or any flat surface with a connecting power supply.

Magnetic Mount (Optional)

This section provides instructions for magnetic mounting the switch. Magnetic mounting is applicable to mount only on metal surfaces.

Figure 8. Magnetic mount
 

1

Rubber Magnet

2

3-in-1 bracket

3

Switch facing downwards

4

Cross hole

5

Flat head screw M4x6mm

Note: For more information regarding the screw size, refer to Screw Size Details
Note: While magnetic mounting the switch, ensure that the front panel is facing sidewards or downwards.Do not mount the switch with front panel facing up.
  1. Attach the switch to the 3-in-1 bracket using the screws provided in the magnetic mount kit.
  2. Tighten the screws to fix the device firmly.
  3. Attach the rubber magnet to the 3-in-1 bracket. The rubber magnet holds the product firmly.
    The size of the rubber magnet is 250mm x 200mm.
  4. Place the device on the flat surface and fix it.

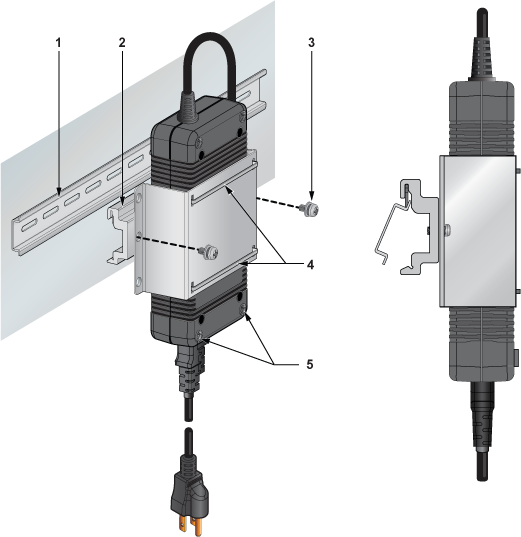
DIN Rail Mount (Optional)

This section provides instructions for mounting the switch using DIN rail.

Figure 9. DIN Rail Mounting
 

1

Chassis

2

DIN mount bracket

3

DIN rail hook

4

Flat head screw M4x6mm

5

DIN rail

Note: For more information regarding the screw size, refer to Screw Size Details
  1. Position the DIN mount bracket on the chassis aligning with the holes and fix it with M4x6mm flat head screws. The DIN mount bracket is attached to the chassis.
  2. Place the DIN rail on the DIN mount bracket by aligning with the DIN rail holder.
  3. Attach the DIN rail to the mounting bracket with the help of DIN rail hook as shown in the below image.
     

    1

    DIN mount bracket

    2

    DIN rail hook

    3

    DIN rail holder

  4. Press the DIN rail holder firmly and rotate the chassis to fit in the device.
  5. Place the PSU adapter bracket on the PSU and fix with cable ties around it.
     

    1

    PSU adapter bracket

    2

    Cable ties

  6. Position the PSU adapter bracket on the DIN mount bracket by aligning with the screw holes and fix it with M4x8mm thread screws. The PSU is attached to the DIN rail.
     

    1

    DIN rail

    2

    DIN mount bracket

    3

    Thread screw M4x8mm

    4

    Cable ties

    5

    PSU rubber pads

1RU Rack Mount (Optional)

This section provides instructions for rack mounting the switch.

To mount the switch in a rack, you need to assemble the mounting brackets to the chassis, and then attach the brackets to the rack posts.

Attaching Mounting Brackets to the Chassis

This section describes the steps to attach mounting brackets to the switch chassis.
Figure 10. Attaching the Mounting Brackets
 

1

Rack

2

Switch

Note: Ensure that there is about 1U rack spacing between the two devices on the rack.
  1. Align the rack mounting brackets with the chassis holes at the front of the switch.
  2. Secure the mounting brackets using the screws provided in the rack mounting kit.

Inserting the Switch into the Rack

This section describes the steps to attach the switch into the rack.
Figure 11. Inserting the Switch into the Rack
 

1

Thread screw M4x6mm

Note: For more information regarding the screw size, refer to Screw Size Details
  1. Place the switch into the rack by aligning the holes of the mounting bracket with the appropriate holes on the chassis.
  2. Secure the switch into the rack using the thread screws provided in the rack mount kit.
  3. Insert the power adapter in the adapter bracket located next to the switch.
     

    1

    Cable ring

    2

    Cable ties

    3

    Power adapter cable

    4

    Power adapter

  4. Connect the power adapter to the switch as shown in the below image.
     

    1

    Cable ring

    2

    Cable ties

  5. Position the rack against the rack posts and mount the rack to the equipment rack.
     

    1

    Screw M4x8mm

    2

    Rack posts

  6. Secure the equipment rack using the screws.
  7. For thermal purposes, make sure that there is 1RU clearance above the rack mount bracket.

Preparation

This section describes the initial setup and preparation for installing the switch.

This chapters contains the followingtopics:

Site Selection

The following criteria should be considered when selecting a site to install the switch:

  • Temperature and Ventilation: For proper ventilation, install the switch where there is ample airflow to the front and back of the switch. The ambient temperature should not go below 0° or exceed 40°C.

    Note: To prevent the switch from overheating, do not operate it in an area where the ambient temperature exceeds 40°C (104°F).
  • Rack Space: Install the switch in a rack or cabinet. The switch height is 1.74". The accessory kit provides mounting brackets and screws required for the installation..

    When mounting the switch in a partially filled rack, load the rack from bottom to top, with the heaviest equipment at the bottom. Load the switch at the bottom if it is the only item in the rack.

  • Power Requirements: Power requirements vary by switch and power supply model. Refer to Table 3 and for information regarding your specific system.

    Note: The power input plug-socket combination must be accessible at all times; it provides the primary method of disconnecting power from the system.
  • Other Requirements: Select a site where liquids or objects cannot fall onto the equipment and foreign objects are not drawn into the ventilation holes. Verify these guidelines are met:

    • Clearance areas to the front and rear panels allow for unrestricted cabling.

    • All front and rear panel indicators can be easily read.

    • Power cords can reach from the power outlet to the connector on the rear panel.

    Note: All power connections must be removed to de-energize the unit.

Tools and Parts Required for Installation

Each switch provides an accessory kit that contains parts that are required to install the switch. In addition to the accessory kit, the following tools and equipment are required to install the switch:

Additional Tools

  • Screwdriver

  • Screws or rack mounting nuts and bolts

Electrostatic Discharge (ESD) Precautions

Observe these guidelines to avoid ESD damage when installing or servicing the switch.

  • Assemble or disassemble equipment only in a static-free work area.

  • Use a conductive work surface (such as an anti-static mat) to dissipate static charge.

  • Wear a conductive wrist strap to dissipate static charge accumulation.

  • Minimize handling of assemblies and components.

  • Keep replacement parts in their original static-free packaging.

  • Remove all plastic, foam, vinyl, paper, and other static-generating materials from the work area.

  • Use tools that do not create ESD.

Specifications


This section lists the specifications of Arista Ethernet Switch (includes CCS-710P-12 and CCS-710P-16P).

Table 1. Switch Specifications (Dimensions and Weights)

Switch

Size (L x W x H)

Weight

CCS-710P-12 (AN1758)

213.36 x 269 x 43.5 mm

(8.4 x 10.59 x 1.7 inches)

2.05 kg (4.51 lbs)

CCS-710P-16P (AN1786)

213.36 x 269 x 43.5 mm

(8.4 x 10.59 x 1.7 inches)

2.27 kg (5.0 lbs)

Table 2. Switch Specifications (Operational and Storage)

Switch

Operating Temperature

Storage Temperature

Operating Altitude

Relative Humidity

Desktop

Hanging / Under Table

CCS-710P-12 (AN1758)

0 to 40°C

(32° to 104°F)

0 to 35°C

(32° to 95°F)

0 to 3,000 meters

(0 to 10,000 feet)

0 to 3,000 meters

(0 to 10,000 feet)

95%

CCS-710P-16P (AN1786)

0 to 40°C

(32° to 104°F)

0 to 35°C

(32° to 95°F)

0 to 3,000 meters

(0 to 10,000 feet)

0 to 3,000 meters

(0 to 10,000 feet)

95%

Table 3. Switch Specifications (Power Ratings)

PSU Model

Power Input

Power Output

PWR-150-ADP

100 - 240 VAC, 2.0 A, 50/60 Hz

150W, 54V

PWR-280-ADP

100 - 240 VAC, 3.9 A, 50/60 Hz

280W, 54V

Table 4. Switch Specifications (PoE Power Budget)

Switch

PSU Model

PoE Power Budget

CCS-710P-12 (AN1758)

PWR-150-ADP

110W

CCS-710P-12 (AN1758)

PWR-280-ADP

240W

CCS-710P-16P (AN1786)

90W PoE PD

40W

CCS-710P-16P (AN1786)

PWR-150-ADP

100W

CCS-710P-16P (AN1786)

PWR-280-ADP

230W

Overview

This Quick Start Guide (QSG) describes the Arista Ethernet Switch of CCS-710P Series.

This chapter contains the following topics:

Scope


This guide is intended for properly trained service personnel and technicians who need to install the following Arista Networks Ethernet Switch.

This includes the following:

  • CCS-710P-12 (AN1758)

  • CCS-710P-16P (AN1786)

Intended Audience


This guide can be referred to any qualified person who wants to install the device.

Note: Only qualified personnel should install, service, or replace this equipment.

Seul le personnel qualifié doit installer, service, ou remplacer cet équipement.

Receiving and Inspecting the Equipment


Upon receiving the switch, inspect the shipping boxes and record any external damage. Retain packing materials if you suspect that part of the shipment is damaged; the carrier may need to inspect them.

If the boxes were not damaged in transit, unpack them carefully. Ensure that you do not discard any accessories that may be packaged in the same box as the main unit.

Inspect the packing list and confirm that you received all listed items. Compare the packing list with your purchase order. Parts Listprovides a list of components included with the switch.

Installation Process


The following tasks are required to install and use the switch:

  1. Select and prepare the installation site.
  2. Assemble the installation tools listed.
  3. Attach the mounting brackets and install the switch in an equipment rack.
  4. Connect the switch to the power source and network devices.
  5. Configure the switch.

Obtaining Technical Assistance


Any customer, partner, reseller or distributor holding a valid Arista Service Contract can obtain technical support in any of the following ways:

  • Email: This email address is being protected from spambots. You need JavaScript enabled to view it.. This is the easiest way to create a new service request.

    Include a detailed description of the problem and the output of “show tech-support”.

  • Web: https://www.arista.com/en/support

    A support case may be created through the support portal on our website. You may also download the most current software and documentation, as well as view FAQs, Knowledge Base articles, Security Advisories, and Field Notices.

  • Phone: +1 866-476-0000 or +1 408-547-5502.

Quick Start Guide
710P Series
Ethernet Switch
Arista Networks

www.arista.com

DOC-05297-01

Headquarters
5453 Great America Parkway
Santa Clara, CA 95054, USA
+1-408 547-5500
www.arista.com
Support
+1-408 547-5502
+1-866 476-0000
This email address is being protected from spambots. You need JavaScript enabled to view it.
Sales
+1-408 547-5501
+1-866 497-0000
This email address is being protected from spambots. You need JavaScript enabled to view it.
© Copyright 2022 Arista Networks, Inc. The information contained herein is subject to change without notice. Arista Networks and the Arista logo are trademarks of Arista Networks, Inc., in the United States and other countries. Other product or service names may be trademarks or service marks of others.