Initial Switch Access
- Zero Touch Provisioning (ZTP) configures the switch without user interaction.
- Manual provisioning configures the switch with commands entered by a user through the CLI.
Zero Touch Provisioning
Zero Touch Provisioning (ZTP) configures a switch without user intervention by downloading a startup configuration file, startup-config, or a boot script from a location specified by a DHCP server. Configuring the Network for ZTP describes network tasks required to set up ZTP.
If the flash memory does not contain a startup-config or zerotouch-config file, the switch enters ZTP mode when it boots . It remains in ZTP mode until you cancel ZTP mode or until the switch retrieves a startup-config or a boot script. After downloading a file through ZTP, the switch reboots again, using the retrieved file.
Security Considerations
The ZTP process cannot distinguish an approved DHCP server from a rogue DHCP server. For secure provisioning, you must ensure that only approved DHCP servers can communicate with the switch until after completing the ZTP process. Arista also recommends validating the EOS image on your ZTP server by confirming that the MD5 checksum matches the MD5 checksum found on the EOS download page of the Arista website.
On a UNIX server, the md5sum command calculates this checksum:
% md5sum EOS.swi
3bac45b96bc820eb1d10c9ee33108a25  EOS.swi
Use this command from the CLI or within the Bash shell of a switch.
switch# bash md5sum /mnt/flash/EOS-4.18.0F.swi
73435f0db3af785011f88743f4c01abd  /mnt/flash/EOS-4.18.0F.swi

switch#[admin@switch ~]$ md5sum /mnt/flash/EOS-4.18.0F.swi
73435f0db3af785011f88743f4c01abd /mnt/flash/EOS-4.18.0F.swi
[admin@switch ~]$- Mount the switch in a permanent location.
- Connect at least one management or Ethernet port to a network that can access the DHCP server and the configuration file.
- Provide power to the switch.
You can monitor the ZTP progress on the console port. The Console Port section provides information for setting up the console port. Canceling Zero Touch Provisioning provides information for monitoring ZTP progress and canceling ZTP mode.
Manual Provisioning
- Use the console port for serial access to the switch. These conditions may
require serial access:
- Management ports do not have assigned IP addresses.
- The network is inoperable.
- Unavailable password for the user's login.
- The password to access the enable mode is not available.
- It uses the Ethernet management ports for out-of-band network management tasks. That port must have IP address before using a management port for the first time.
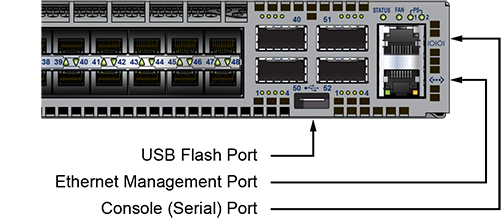
Console Port
The console port is a serial port located on the front of the switch. The Figure 1 section displays the console port on the DCS-7050T-64 switch. Use a serial or RS-232 cable to connect to the console port. The accessory kit also includes an RJ-45 to DB-9 adapter cable connecting to the switch.
Port Settings
- 9600 baud
- no flow control
- 1 stop bit
- no parity bits
- 8 data bits
Admin Username
The initial configuration provides one username, admin, without an assigned password. You can only log into the switch through the console port using the admin username without a password. After assigning a password to the admin username,log into the switch through any port.
The username command modifies a specified username and can be used to create or delete usernames, including admin.
Example
switch(config)# username admin secret pxq123
switch(config)#
When the switch reboots, EOS loses the passwords unless the startup configuration saves the new or altered passwords.
Canceling Zero Touch Provisioning
Zero Touch Provisioning (ZTP) installs a startup-config file from a network location if flash memory does not contain a startup-config or zerotouch-config file when the switch reboots. Canceling ZTP is required if the switch cannot download a startup-config or boot script file.
When the switch boots without a startup-config or zerotouch-config file, EOS displays the following message through the console port:
No startup-config was found.

The device is in Zero Touch Provisioning mode and is attempting to
download the startup-config from a remote system. The device will not
be fully functional until a valid startup-config is downloaded
from a remote system or Zero Touch Provisioning is cancelled. To cancel
Zero Touch Provisioning, login as admin and type 'zerotouch cancel'
at the CLI.

localhost login:
To cancel ZTP mode, log into the switch with the admin password, then enter the zerotouch cancel command. The switch immediately boots without installing a startup-config file.
localhost login: admin
admin
localhost>Apr 15 21:28:21 localhost ZeroTouch: %ZTP-5-DHCP_QUERY: Sending DHCP
request on  [ Ethernet10, Ethernet13, Ethernet14, Ethernet17, Ethernet18,
Ethernet21, E-thernet22, Ethernet23, Ethernet24, Ethernet7, Ethernet8,
Ethernet9, Management1, Management2 ]
Apr 15 21:28:51 localhost ZeroTouch: %ZTP-5-DHCP_QUERY_FAIL: Failed to get a
valid DHCP response
Apr 15 21:28:51 localhost ZeroTouch: %ZTP-5-RETRY: Retrying Zero Touch
Provisioning from the beginning (attempt 1)
Apr 15 21:29:22 localhost ZeroTouch: %ZTP-5-DHCP_QUERY: Sending DHCP request on
[ Ethernet10, Ethernet13, Ethernet14, Ethernet17, Ethernet18, Ethernet21,
Ethernet22, Ethernet23, Ethernet24, Ethernet7, Ethernet8, Ethernet9,
Management1, Management2 ]

localhost>zerotouch cancel
zerotouch cancel
localhost>Apr 15 21:29:39 localhost ZeroTouch: %ZTP-5-CANCEL: Canceling Zero
Touch Provisioning
Apr 15 21:29:39 localhost ZeroTouch: %ZTP-5-RELOAD: Rebooting the system
Broadcast messagStopping sshd: [  OK  ]
watchdog is not running
SysRq : Remount R/O
Restarting system

Aboot 1.9.0-52504.EOS2.0
Press Control-C now to enter the Aboot shell
To avoid entering ZTP mode on subsequent reboots, create a startup-config file described in Step 8 of the Ethernet Management Port.
Ethernet Management Port
Arista switches provide one or more Ethernet management ports for configuring the switch and managing the network out of the band. The Figure 1 section displays the location of the Ethernet management ports on a DCS-7050T-64 switch. Managing the switch requires only one port.
Access the Ethernet management port(s) remotely over a common network or locally through a connected PC. Before you can access the switch through a remote connection, the switch must have an IP address and a static route to the default gateway. Configure a virtual IP address on a modular switch with dual supervisors to access the management port on an active supervisor.
Assigning a Virtual IP Address to Access the Active Ethernet Management Port
This procedure assigns a virtual IP address on modular switches with dual supervisors, which connects to the Ethernet management port of the active supervisor. See the following section to assign a physical IP address to an Ethernet management port.
- Connect a PC or terminal server to the console port. Use the settings listed in Console Port under Port Settings.
- Use the command admin at the login prompt to log into
the switch. Initial login through the console port does not require a
password.
Arista EOS switch login: admin Last login: Fri Apr 9 14:22:18 on Console switch> - Use the command enable at the command prompt to enter
Privileged EXEC mode.
switch> enable switch# - Use the command configure terminal or config to
enter global configuration mode.
switch# configure terminal switch(config)# - Use the command interface management 0
to enter interface configuration mode for the virtual interface
that accesses management port 1 on the currently active
supervisor.
switch(config)# interface management 0 switch(config-if-Ma0)# - Use the command ip address, followed by the desired
address, to assign a virtual IP address to access to the active management port.
This command assigns IP address 10.0.2.5 to management port
0.
switch(config-if-Ma0)# ip address 10.0.2.5/24 - Use the commandexit at both the interface and global configuration
prompts to return to Privileged EXEC
mode.
switch(config-if-Ma0)# exit switch(config)# exit switch# - Use the command write (or copy
running-config startup-config) to save the new
configuration to the startup-config file.
switch# write
switch#
Assigning an IP Address to a Specific Ethernet Management Port
Use the following steps to assign an IP address to a specific Ethernet management port:
- Connect a PC or terminal server to the console port. Use the settings listed in Console Port under Port Settings.
- Use the command admin at the login
prompt to log into the switch. The initial login does not require a
password.
Arista EOS switch login: admin Last login: Fri Apr 9 14:22:18 on Console switch> - Use the command enable at the command
prompt to enter Privileged EXEC mode.
switch> enable switch# - Use the command configure terminal (or
config) to enter Global Configuration Mode.
switch# configure terminal - Use the command interface management 1
to enter Interface Configuration Mode. Use the available management port for
management port
1.
switch(config)# interface management 1 switch(config-if-Ma1)# - Use the command ip address, followed by
the desired address, to assign an IP address to the port. This command assigns
the IP address 10.0.2.8 to management port 1.
switch(config-if-Ma1)# ip address 10.0.2.8/24 - Use the command exit at the Interface and Global
Configuration Mode prompts to return to Privileged EXEC
mode.
switch(config-if-Ma1)# exit switch(config)# exit switch# - Use the command write
(or copy running-config startup-config) to save
the new configuration to the startup-config file.
switch# write
switch#
Configuring a Default Route to the Gateway
Use the following steps to configure a default route to a gateway located at 10.0.2.1.
- Enter global configuration
mode.
switch> enable switch# configure terminal - Create a static route to the gateway with the IP route
command.
switch(config)# ip route 0.0.0.0/0 10.0.2.1 - Save the new
configuration.
switch# write
switch#