Reference Material

Event Definitions

All event data is stored in the Mail messages in a relational database. As Arista and applications process traffic, they create Event objects that add and modify content in the database. Each event has it's class/object with certain fields that modify the database in a certain way.

The list below shows the classes used in the event logging and the attributes of each event object. These can add alerts in Reports or other event handling within Arista.

SpamLogEvent

These events are created by Spam Blocker, and the Database Schema table is updated when an email is scanned.

Attribute Name Type Description getAction
action SpamMessageAction The action getClass
class Class The class name getClientAddr
clientAddr InetAddress The client address getClientPort
clientPort int The client port getMessageId
messageId Long The message ID getPartitionTablePostfix getReceiver
receiver String The receiver getScore
score float The score getSender
sender String The sender getServerAddr
serverAddr InetAddress The server address getServerPort
serverPort int The server port getSmtpMessageEvent
smtpMessageEvent SmtpMessageEvent The parent SMTP message event isSpam
isSpam boolean True if spam, false otherwise getSubject
subject String The subject getTag getTestsString
testsString String The tests string from the spam engine getTimeStamp
timeStamp Timestamp The timestamp getVendorName
vendorName String The application name

SpamSmtpTarpitEvent

These events are created by Spam Blocker and inserted into the Database Schema table when a session is tarpitted.

Attribute Name Type Description getIPAddr
IPAddr InetAddress The IP address getClass
class Class The class name getHostname
hostname String The host name getPartitionTablePostfix getSessionEvent
sessionEvent SessionEvent The session event getSessionId
sessionId Long The session ID getTag getTimeStamp
timeStamp Timestamp The time stamp getVendorName
vendorName String The application name

PrioritizeEvent

The Bandwidth ControlDatabase Schema creates these events and updates the table when a session is prioritized.

Attribute Name Type Description getClass
class Class The class name getPartitionTablePostfix getPriority
priority int The priority getRuleId
ruleId int The rule ID getSessionEvent
sessionEvent SessionEvent The session event getTag getTimeStamp
timeStamp Timestamp The timestamp

VirusFtpEvent

Virus Blocker creates these events and updates the Database Schema table when Virus Blocker scans an FTP transfer.

Attribute Name Type Description getAppName
appName String The name of the application getClass
class Class The class name getClean
clean boolean True if clean, false otherwise getPartitionTablePostfix getSessionEvent
sessionEvent SessionEvent The session event getTag getTimeStamp
timeStamp Timestamp The timestamp getUri
uri String The URI getVirusName
virusName String The virus name, if not clean

VirusHttpEvent

These events are created by Virus Blocker and update the Database Schema table when Virus Blocker scans an HTTP transfer.

Attribute Name Type Description getAppName
appName String The name of the application getClass
class Class The class name getClean
clean boolean True if clean, false otherwise getPartitionTablePostfix getRequestLine
requestLine RequestLine The request line getSessionEvent
sessionEvent SessionEvent The session event getTag getTimeStamp
timeStamp Timestamp The timestamp getVirusName
virusName String The virus name, if not clean

VirusSmtpEvent

Virus Blocker creates these events and updates the Database Schema table when Virus Blocker scans an email.

Attribute Name Type Description getAction
action String The action getAppName
appName String The name of the application getClass
class Class The class name getClean
clean boolean True if clean, false otherwise getMessageId
messageId Long The message ID getPartitionTablePostfix getTag getTimeStamp
timeStamp Timestamp The timestamp getVirusName
virusName String The virus name, if not clean

FirewallEvent

Firewall creates these events, and the Database Schema table is updated when a firewall rule matches a session.

Attribute Name Type Description getBlocked
blocked boolean True if blocked, false otherwise getClass
class Class The class name getFlagged
flagged boolean True if flagged, false otherwise getPartitionTablePostfix getRuleId
ruleId long The rule ID getSessionId
sessionId Long The session ID getTag getTimeStamp
timeStamp Timestamp The timestamp

Day of Week Matcher

A "Day of Week" matcher syntax describes days of the week.

A Day of Week Matcher can be any of the following syntax:

Name Example Description
Any Matcher "any" matches all days of the week
Single Day (English name) "tuesday" matches Tuesday only
Single Day (Digit 1-7) "1" matches Sunday only
List of Time of Day Matchers "monday,2,wednesday" matches Monday, Tuesday, and Wednesday

Group Matcher

Group Matcher syntax describes an user or set of users. This can be used, for example, in Policy Manager or Bandwidth Control rules to match against certain traffic.

Group Matcher can be any of the following:

Name Example Description
Any Matcher [any] matches all groups
None Matcher [none] matches no groups
Groupname mygroup matches the "mygroup" group
Glob Matcher m*p matches the "mygroup" group
List of Group Matchers mygroup1,mygroup2 matches "mygroup1" and "mygroup2"

Glob Matcher

A Glob is a common way to match strings of characters against rules. An Arista glob is similar to the syntax commonly used on Microsoft OSs to match filenames (example: "rm *.exe").

A glob matcher has two special characters: "*" means 0 or more of any characters (excluding return charater) and "?" means exactly 1 of any character (excluding return character).Globs are often used in rules like URL rules and filename rules to match various strings. The left and rights side are implicitly anchored. If you wish to match if a string contains the match you will need to use "*foo*".

Example String Description
String XYZ matches "XYZ" but NOT "xYZ" and NOT "XYZZ"
String with * X*Z matches "XZ" and "XYZ" and "XYYZ" and "XyyyabcZ" but NOT "xYZ" and NOT "XYZA"
String with * X*Z* matches "XZ" and "XYZ" and "XYYZ" and "XyyyabcZ" and "XYZA" but NOT "xYZ"
String with ? X?Z matches "XYZ" and "XyZ" but NOT match "XZ" or "XYYZ"
List of Globs X,Z matches "X" and "Z" but NOT match "Y" or "X,Z"
For those familiar with regular expression you can derive the glob equivalent by doing the following:
  • replace "." with "\." to escape the special meaning of "." in regular expressions.
  • replace "?" with "." to match any character.
  • replace "*" with ".*" to match zero or more characters.
    Note:
    • "*" matches all values except null/unset.
    • "" matches null and nothing else.
    • All glob matching is case insensitive for domains but case sensitive for all other matches.

Int Matcher

Int Matcher syntax describes a integer or set of integers.

This can be used, for example, in firewall or Policy manager rules to match against certain traffic destination ports.

Port Matcher can be any of the following:

Name Example Description
Any any matches all
Single 80 matches that single integer
Greater Than >1234 matches all values greater than 1234
Less Than <1234 matches all values less than 1234
Range 1024-65535 matches all values within the range (inclusive)
List of Int Matchers 80,443,8080-8088 matches all 80, 443, and 8080 through 8088
Note: Floating point numbers are also allowed and applicable in some cases. (example: ">2.5")

IP Matcher

IP Matcher syntax is a that describes an IP address or set of IP addresses. This can be used, for example, in Firewall or Policy Manager rules to match against certain traffic.

IP Matcher can be any of the following:

Name Example Description
Any Matcher any matches all addresses
Single IP 1.2.3.4 matches the single IP address
Range of IPs 1.2.3.4 - 1.2.3.100 matches all the IPs in the range
CIDR range 192.168.1.0/24 matches all the IPs in that subnet
List of IP Matchers 1.2.3.4, 1.2.3.5, 1.2.3.10, 1.2.3.15 matches all the IPs in the list and in that range

User Matcher

User Matcher syntax describes an user or set of users.

This can be used, for example, in Policy Manager or Application Control rules to match against certain traffic.

User Matcher can be any of the following:

Name Example Description
Any Authenticated User [authenticated] matches all identified or authenticated users (excluding null)
Unauthenticated User [unauthenticated] matches all unidentified or unauthenticated users (including null)
Username myuser matches the "myuser" user
Glob Matcher m*r matches the "myuser" user
List of User Matchers myuser1,myuser2 matches "myuser1" and "myuser2"

URL Matcher

The URL Matcher Syntax describes all or part of a website.

Example Matches Does not Match
example.com http://example.com/, http://www.example.com/, http://example.com/foo http://example.net
example.com/bar http://example.com/bar/test.html, http://www.example.com/bar http://example.com/foo
*porn* http://pornsite.com/ http://foobar.com
example???.com/ http://example123.com http://example1.com
example.com/foo http://example.com/foo, http://abc.example.com/foobar http://example.com/

URL Matchers use globs which are describe more in depth in the Glob Matcher.

Important notes:
  • The left side of the rule is anchored with the regular expression "^([a-zA-Z_0-9-]*\.)*". "foo.com" will match only "foo.com" and "abc.foo.com" but not "afoo.com".
  • The right side of the rule is anchored with the regular expression ".*$". "foo.com" will match "foo.com/test.html" because it is actually "foo.com.*$". "foo.com/bar" is "foo.com/bar.*$" which will match "foo.com/bar/baz" and "foo.com/bar2". Also "foo" becomes "foo.*" which will match "foobar.com" and "foo.com".
  • "http://" and "https://" are stripped from the rule.
  • URIs are case-sensitive, but domains are not. The URL Matcher is case sensitive, but domains are converted to lowercase before evaluation because they should not be case sensitive. Any part of the matcher that should match against the domain should be lower case in the rule.
  • "www." is automatically stripped from the rule. This is to prevent the frequent misconfiguration of users adding a block rule for something like "www.pornsite.com" which blocks "www.pornsite.com" but not just "pornsite.com." If you truly desire to only match www.pornsite.com and not pornsite.com then use "*www.pornsite.com" because the "*" will match zero or more characters.
  • Similarly "*." is stripped from the rule for the same reason as above. If you truly want all sub-domains but not the main domain matched, you can accomplish this by doing "*?.foo.com".

Port Forward Troubleshooting Guide

Port forwards can be tricky. Below is a series of suggestions about getting port forwards to work.
  1. Read the What is "Destined Local?".
  2. Verify that the destination host on the inside is using the Untangle as its default gateway. If not, the reply packets won't find their way back to Arista.
  3. Verify that the destination service is reachable from the inside on the IP and port specified in your port forward rule.
  4. Test your (TCP) port forward using 'telnet.' In windows you can run start > run and then you can type telnet 1.2.3.4 123 where 1.2.3.4 is your external IP and 123 is the port your port forward rule matches. If it connects and hangs then the port forward is working. If it fails to connect then your port forward is not working.
  5. Test your rule from the outside. Port forwarding back inside the network has extra complications. First, verify that it works from the outside.
  6. Verify there is a session shown in Reports > Network > Port Forwarded Sessions .
  7. Verify that Arista can connect to the final destination. Use the Connection Test in Troubleshooting' or open the console on Arista and type 'telnet 192.168.1.10 123' where 192.168.1.10 is the internal server you are forwarding to, and 123 is the port. If it connects then Arista can reach the server. If it fails to connect Arista can't reach the server and the port forward will probably not function until this part is working.
  8. For testing, turn off the Firewall and Captive Portal applications if you have them installed. Port forwarded sessions will not connect if they are blocked by an application. If you have many policies, verify which policy is processing the session and make sure you disable the correct apps.
  9. Simplify your port forward rule. Remove extra qualifiers and make it contain as few as possible. For example specify just what port to forward and "Destined Local" and then which server to forward it to. If that works then add the extra qualifiers back one at a time testing each time.
  10. If you are port forwarding port 443 (HTTPS), try moving Untangle administration to another port so port 443 is available to be forwarded.
  11. Remove any Source Address and Source Interface qualifiers - 99% of the time these are misused.
  12. For advanced users, use tcpdump or the Packet Test in troubleshooting to debug and watch the packets. To test with tcpdump run these commands: tcpdump -i eth0 -n "port 123" and tcpdump -i eth1 -n "port 123" - assuming eth0 is your outside interface and eth1 is your inside interface.
  13. Still not working? Post a screenshot of your port forward rule to the forums along with the results from the above tests and ask for help.

Port Forwarding FAQs

Can I specify multiple ports/IPs in one rule?

Absolutely. You can use comma-separated values or hyphen-separated ranges. In the case of IPs you can even use CIDR notation to cover a network space. Keep in mind that NGFW's Debian base limits rules to a maximum of 15 unique values per rule, and that hyphen-separated values count as two values.

My port forward isn't working. Why?

Follow the Port Forward Troubleshooting Guide to see if you can discover the issue.

I setup a port forward for HTTPS (port 443) and it is not working. Why?

Arista and many of the applications use port 443. In order to forward port 443 you need to move Arista off of port 443 to a different port. This can be done in Config > Network > Services .

I setup a port forward to my FTP server and it is working but transfers fail. Why?

FTP has multiple connections. If you setup a port forward for the control session (port 21) then you must also setup a port forward for the transfer sessions. You can do this in multiple ways.
  1. Configure your server to use a range of ports for a transfer, passive ports (i.e., 10000-20000) and configure Arista to forward all of these ports to the FTP server.
  2. Use 1:1 NAT

Can I port forward traffic destined to a specific hostname like 'mywebserver.com' to a specific server?

No. Packets are destined to IPs not hostnames. When a new packet of a new session arrives from 1.2.3.4 port 1234 to 5.6.7.8 port 5678, the port forward rules must decide if and where to forward that session based on the information present in that packet. This decision can only be made using the information known at this time. If the session is forwarded and its an HTTP or HTTPS session and later it successfully connects, the client may request "mywebserver.com/index.html". At this point in theory the hostname is known, however the port forwards must decide where to forward the session long before the hostname is known. Port forwards rules can not see into the future and know which hostname the client may request at the time the client is trying to initiate the session.

However, This can be accomplished for HTTP and HTTPS traffic using | apache as a reverse proxy. This mechanism will accept all HTTP requests and forward/proxy based on the information in the request and proxy all responses from the final server.

Does Untangle support 1:1 (One to One) NAT?

Yes, Read more about how to setup 1:1 NAT.

What is "Destined Local?"

Destined Local is a flag for port forward rules. It matches on traffic destined to the local Arista machine and one of its IPs. This flag is usually used when you want to redirect a port on the Arista Server (and all of its IPs) to another server.

Database Schema

Database Tables

Configuration Backup Events

Column Name Human Name Type Description
time_stamp Timestamp timestamp without time zone The time of the event
success Success boolean The result of the backup (true if the backup succeeded, false otherwise)
description Text detail of the event text Text detail of the event
destination Destination text The location of the backup
event_id Event ID bigint The unique event ID

HTTP Events

Column Name Human Name Type Description
request_id Request ID bigint The HTTP request ID
time_stamp Timestamp timestamp without time zone The time of the event
session_id Session ID bigint The session
client_intf Client Interface smallint The client interface
server_intf Server Interface smallint The server interface
c_client_addr Client-side Client Address inet The client-side client IP address
s_client_addr Server-side Client Address inet The server-side client IP address
c_server_addr Client-side Server Address inet The client-side server IP address
s_server_addr Server-side Server Address inet The server-side server IP address
c_client_port Client-side Client Port integer The client-side client port
s_client_port Server-side Client Port integer The server-side client port
c_server_port Client-side Server Port integer The client-side server port
s_server_port Server-side Server Port integer The server-side server port
client_country Client Country text The client Country
client_latitude Client Latitude real The client Latitude
client_longitude Client Longitude real The client Longitude
server_country Server Country text The server Country
server_latitude Server Latitude real The server Latitude
server_longitude Server Longitude real The server Longitude
policy_id Policy ID smallint The policy
username Username text The username associated with this session
hostname Hostname text The hostname of the local address
method Method character(1) The HTTP method
uri URI text The HTTP URI
host Host text The HTTP host
domain Domain text The HTTP domain (shortened host)
referer Referer text The Referer URL
c2s_content_length Client-to-server Content Length bigint The client-to-server content length
s2c_content_length Server-to-client Content Length bigint The server-to-client content length
s2c_content_type Server-to-client Content Type text The server-to-client content type
s2c_content_filename Server-to-client Content Disposition Filename text The server-to-client content disposition filename
ad_blocker_cookie_ident Ad Blocker Cookie text This name of cookie blocked by Ad Blocker
ad_blocker_action Ad Blocker Action character(1) This action of Ad Blocker on this request
web_filter_reason Reason for action (Web Filter) character(1) This reason Web Filter blocked/flagged this request
web_filter_category_id Web Category (Web Filter) smallint This numeric category according to Web Filter
web_filter_rule_id Web Rule (Web Filter) smallint This numeric rule according to Web Filter
web_filter_blocked Blocked (Web Filter) boolean If Web Filter blocked this request
web_filter_flagged Flagged (Web Filter) boolean If Web Filter flagged this request
virus_blocker_lite_clean Virus Blocker Lite Clean boolean The cleanliness of the file according to Virus Blocker Lite
virus_blocker_lite_name Virus Blocker Lite Name text The name of the malware according to Virus Blocker Lite
virus_blocker_clean Virus Blocker Clean boolean The cleanliness of the file according to Virus Blocker
virus_blocker_name Virus Blocker Name text The name of the malware according to Virus Blocker
threat_prevention_blocked Threat Prevention Blocked boolean If Threat Prevention blocked this request
threat_prevention_flagged Threat Prevention Flagged boolean If Threat Prevention flagged this request
threat_prevention_rule_id Threat Prevention Rule Id integer This numeric rule according to Threat Prevention
threat_prevention_reputation Threat Prevention Reputation smallint This numeric threat reputation
threat_prevention_categories Threat Prevention Categories integer This bitmask of threat categories

Intrusion Prevention Events

Column Name Human Name Type Description
time_stamp Timestamp timestamp without time zone The time of the event
sig_id Signature ID bigint This ID of the rule
gen_id Grouping ID bigint The grouping ID for the rule, The gen_id + sig_id specify the rule's unique identifier
class_id Classtype ID bigint The numeric ID for the classtype
source_addr Source Address inet The source IP address of the packet
source_port Source Port integer The source port of the packet (if applicable)
dest_addr Destination Address inet The destination IP address of the packet
dest_port Destination Port integer The destination port of the packet (if applicable)
protocol Protocol integer The protocol of the packet
blocked Blocked boolean If the packet was blocked/dropped
category Category text The application specific grouping for the signature
classtype Classtype text The generalized threat signature grouping (unrelated to gen_id)
msg Message text The "title" or "description" of the signature
rid Rule ID text The rule id
rule_id Rule ID text The rule id

SMPT Tarpit Events

Column Name Human Name Type Description
time_stamp Timestamp timestamp without time zone The time of the event
ipaddr Client Address inet The client IP address
hostname Hostname text The hostname of the local address
policy_id Policy ID bigint The policy
vendor_name Vendor Name character varying(255) The "vendor name" of the app that logged the event
event_id Event ID bigint The unique event ID

IPsec User Events

Column Name Human Name Type Description
event_id Event ID bigint The unique event ID
time_stamp Timestamp timestamp without time zone The time of the event
connect_stamp Connect Time timestamp without time zone The time the connection started
goodbye_stamp End Time timestamp without time zone The time the connection ended
client_address Client Address text The remote IP address of the client
client_protocol Client Protocol text The protocol the client used to connect
client_username Client Username text The username of the client
net_process Net Process text The PID of the PPP process for L2TP connections or the connection ID for Xauth connections
net_interface Net Interface text The PPP interface for L2TP connections or the client interface for Xauth connections
elapsed_time Elapsed Time text The total time the client was connected
rx_bytes Bytes Received bigint The number of bytes received from the client in this connection
tx_bytes Bytes Sent bigint The number of bytes sent to the client in this connection

IPsec VPN Events

Column Name Human Name Type Description
event_id Event ID bigint The unique event ID
time_stamp Timestamp timestamp without time zone The time of the event
local_address Local Address text The local address of the tunnel
remote_address Remote Address text The remote address of the tunnel
tunnel_description Tunnel Description text The description of the tunnel
event_type Event Type text The type of the event (CONNECT,DISCONNECT)

IPsec Tunnel Stats

Column Name Human Name Type Description
time_stamp Timestamp timestamp without time zone The time of the event
tunnel_name Tunnel Name text The name of the IPsec tunnel
in_bytes In Bytes bigint The number of bytes received during this time frame
out_bytes Out Bytes bigint The number of bytes transmitted during this time frame
event_id Event ID bigint The unique event ID

HTTP Query Events

Column Name Human Name Type Description
event_id Event ID bigint The unique event ID
time_stamp Timestamp timestamp without time zone The time of the event
session_id Session ID bigint The session
client_intf Client Interface smallint The client interface
server_intf Server Interface smallint The server interface
c_client_addr Client-side Client Address inet The client-side client IP address
s_client_addr Server-side Client Address inet The server-side client IP address
c_server_addr Client-side Server Address inet The client-side server IP address
s_server_addr Server-side Server Address inet The server-side server IP address
c_client_port Client-side Client Port integer The client-side client port
s_client_port Server-side Client Port integer The server-side client port
c_server_port Client-side Server Port integer The client-side server port
s_server_port Server-side Server Port integer The server-side server port
policy_id Policy ID bigint The policy
username Username text The username associated with this session
hostname Hostname text The hostname of the local address
request_id Request ID bigint The HTTP request ID
method Method character(1) The HTTP method
uri URI text The HTTP URI
term Search Term text The search term
host Host text The HTTP host
c2s_content_length Client-to-server Content Length bigint The client-to-server content length
s2c_content_length Server-to-client Content Length bigint The server-to-client content length
s2c_content_type Server-to-client Content Type text The server-to-client content type
blocked Blocked boolean If Web Filter blocked this search term
flagged Flagged boolean If Web Filter flagged this search term

Admin Logins

Column Name Human Name Type Description
time_stamp Timestamp timestamp without time zone The time of the event
login Login text The login name
local Local boolean True if it is a login attempt through a local process
client_addr Client Address inet The client IP address
succeeded Succeeded boolean True if the login succeeded, false otherwise
reason Reason character(1) The reason for the login (if applicable)

Sessions

Column Name Human Name Type Description
session_id Session ID bigint The session
time_stamp Timestamp timestamp without time zone The time of the event
end_time End Time timestamp without time zone The time the session ended
bypassed Bypassed boolean True if the session was bypassed, false otherwise
entitled Entitled boolean True if the session is entitled to premium functionality
protocol Protocol smallint The IP protocol of session
icmp_type ICMP Type smallint The ICMP type of session if ICMP
hostname Hostname text The hostname of the local address
username Username text The username associated with this session
policy_id Policy ID smallint The policy
policy_rule_id Policy Rule ID smallint The ID of the matching policy rule (0 means none)
local_addr Local Address inet The IP address of the local participant
remote_addr Remote Address inet The IP address of the remote participant
c_client_addr Client-side Client Address inet The client-side client IP address
c_server_addr Client-side Server Address inet The client-side server IP address
c_server_port Client-side Server Port integer The client-side server port
c_client_port Client-side Client Port integer The client-side client port
s_client_addr Server-side Client Address inet The server-side client IP address
s_server_addr Server-side Server Address inet The server-side server IP address
s_server_port Server-side Server Port integer The server-side server port
s_client_port Server-side Client Port integer The server-side client port
client_intf Client Interface smallint The client interface
server_intf Server Interface smallint The server interface
client_country Client Country text The client Country
client_latitude Client Latitude real The client Latitude
client_longitude Client Longitude real The client Longitude
server_country Server Country text The server Country
server_latitude Server Latitude real The server Latitude
server_longitude Server Longitude real The server Longitude
c2p_bytes From-Client Bytes bigint The number of bytes the client sent to Arista (client-to-pipeline)
p2c_bytes To-Client Bytes bigint The number of bytesArista sent to client (pipeline-to-client)
s2p_bytes From-Server Bytes bigint The number of bytes the server sent to Arista (client-to-pipeline)
p2s_bytes To-Server Bytes bigint The number of bytes Arista sent to server (pipeline-to-client)
filter_prefix Filter Block text The network filter that blocked the connection (filter,shield,invalid)
firewall_blocked Firewall Blocked boolean True if Firewall blocked the session, false otherwise
firewall_flagged Firewall Flagged boolean True if Firewall flagged the session, false otherwise
firewall_rule_index Firewall Rule ID integer The matching rule in Firewall (if any)
threat_prevention_blocked Threat Prevention Blocked boolean If Threat Prevention blocked
threat_prevention_flagged Threat Prevention Flagged boolean If Threat Prevention flagged
threat_prevention_reason Threat Prevention Reason character(1) Threat Prevention reason
threat_prevention_rule_id Threat Prevention Rule Id integer Numeric rule id of Threat Prevention
threat_prevention_client_reputation Threat Prevention Client Reputation smallint Numeric client reputation of Threat Prevention
threat_prevention_client_categories Threat Prevention Client Categories integer Bitmask client categories of Threat Prevention
threat_prevention_server_reputation Threat Prevention Server Reputation smallint Numeric server reputation of Threat Prevention
threat_prevention_server_categories Threat Prevention Server Categories integer Bitmask server categories of Threat Prevention
application_control_lite_protocol Application Control Lite Protocol text The application protocol according to Application Control Lite
application_control_lite_blocked Application Control Lite Blocked boolean True if Application Control Lite blocked the session
captive_portal_blocked Captive Portal Blocked boolean True if Captive Portal blocked the session
captive_portal_rule_index Captive Portal Rule ID integer The matching rule in Captive Portal (if any)
application_control_application Application Control Application text The application according to Application Control
application_control_protochain Application Control Protochain text The protochain according to Application Control
application_control_category Application Control Category text The category according to Application Control
application_control_blocked Application Control Blocked boolean True if Application Control blocked the session
application_control_flagged Application Control Flagged boolean True if Application Control flagged the session
application_control_confidence Application Control Confidence integer True if Application Control confidence of this session's identification
application_control_ruleid Application Control Rule ID integer The matching rule in Application Control (if any)
application_control_detail Application Control Detail text The text detail from the Application Control engine
bandwidth_control_priority Bandwidth Control Priority integer The priority given to this session
bandwidth_control_rule Bandwidth Control Rule ID integer The matching rule in Bandwidth Control rule (if any)
ssl_inspector_ruleid SSL Inspector Rule ID integer The matching rule in SSL Inspector rule (if any)
ssl_inspector_status SSL Inspector Status text The status/action of the SSL session (INSPECTED, IGNORED, BLOCKED, UNTRUSTED, ABANDONED)
ssl_inspector_detail SSL Inspector Detail text Additional text detail about the SSL connection (SNI, IP Address)
tags Tags text The tags on this session

Session Minutes

Column Name Human Name Type Description
session_id Session ID bigint The session
time_stamp Timestamp timestamp without time zone The time of the event
c2s_bytes From-Client Bytes bigint The number of bytes the client sent
s2c_bytes From-Server Bytes bigint The number of bytes the server sent
start_time Start Time timestamp without time zone The start time of the session
end_time End Time timestamp without time zone The time the session ended
bypassed Bypassed boolean True if the session was bypassed, false otherwise
entitled Entitled boolean True if the session is entitled to premium functionality
protocol Protocol smallint The IP protocol of session
icmp_type ICMP Type smallint The ICMP type of session if ICMP
hostname Hostname text The hostname of the local address
username Username text The username associated with this session
policy_id Policy ID smallint The policy
policy_rule_id Policy Rule ID smallint The ID of the matching policy rule (0 means none)
local_addr Local Address inet The IP address of the local participant
remote_addr Remote Address inet The IP address of the remote participant
c_client_addr Client-side Client Address inet The client-side client IP address
c_server_addr Client-side Server Address inet The client-side server IP address
c_server_port Client-side Server Port integer The client-side server port
c_client_port Client-side Client Port integer The client-side client port
s_client_addr Server-side Client Address inet The server-side client IP address
s_server_addr Server-side Server Address inet The server-side server IP address
s_server_port Server-side Server Port integer The server-side server port
s_client_port Server-side Client Port integer The server-side client port
client_intf Client Interface smallint The client interface
server_intf Server Interface smallint The server interface
client_country Client Country text The client Country
client_latitude Client Latitude real The client Latitude
client_longitude Client Longitude real The client Longitude
server_country Server Country text The server Country
server_latitude Server Latitude real The server Latitude
server_longitude Server Longitude real The server Longitude
filter_prefix Filter Block text The network filter that blocked the connection (filter,shield,invalid)
firewall_blocked Firewall Blocked boolean True if Firewall blocked the session, false otherwise
firewall_flagged Firewall Flagged boolean True if Firewall flagged the session, false otherwise
firewall_rule_index Firewall Rule ID integer The matching rule in Firewall (if any)
threat_prevention_blocked Threat Prevention Blocked boolean If Threat Prevention blocked
threat_prevention_flagged Threat Prevention Flagged boolean If Threat Prevention flagged
threat_prevention_reason Threat Prevention Reason character(1) Threat Prevention reason
threat_prevention_rule_id Threat Prevention Rule Id integer Numeric rule id of Threat Prevention
threat_prevention_client_reputation Threat Prevention Client Reputation smallint Numeric client reputation of Threat Prevention
threat_prevention_client_categories Threat Prevention Client Categories integer Bitmask client categories of Threat Prevention
threat_prevention_server_reputation Threat Prevention Server Reputation smallint Numeric server reputation of Threat Prevention
threat_prevention_server_categories Threat Prevention Server Categories integer Bitmask server categories of Threat Prevention
application_control_lite_protocol Application Control Lite Protocol text The application protocol according to Application Control Lite
application_control_lite_blocked Application Control Lite Blocked boolean True if Application Control Lite blocked the session
captive_portal_blocked Captive Portal Blocked boolean True if Captive Portal blocked the session
captive_portal_rule_index Captive Portal Rule ID integer The matching rule in Captive Portal (if any)
application_control_application Application Control Application text The application according to Application Control
application_control_protochain Application Control Protochain text The protochain according to Application Control
application_control_category Application Control Category text The category according to Application Control
application_control_blocked Application Control Blocked boolean True if Application Control blocked the session
application_control_flagged Application Control Flagged boolean True if Application Control flagged the session
application_control_confidence Application Control Confidence integer True if Application Control confidence of this session's identification
application_control_ruleid Application Control Rule ID integer The matching rule in Application Control (if any)
application_control_detail Application Control Detail text The text detail from the Application Control engine
bandwidth_control_priority Bandwidth Control Priority integer The priority given to this session
bandwidth_control_rule Bandwidth Control Rule ID integer The matching rule in Bandwidth Control rule (if any)
ssl_inspector_ruleid SSL Inspector Rule ID integer The matching rule in SSL Inspector rule (if any)
ssl_inspector_status SSL Inspector Status text The status/action of the SSL session (INSPECTED, IGNORED, BLOCKED, UNTRUSTED, ABANDONED)
ssl_inspector_detail SSL Inspector Detail text Additional text detail about the SSL connection (SNI, IP Address)
tags Tags text The tags on this session

Quotas

Column Name Human Name Type Description
time_stamp Timestamp timestamp without time zone The time of the event
entity Entity text The IP entity given the quota (address/username)
action Action integer The action (1=Quota Given, 2=Quota Exceeded)
size Size bigint The size of the quota
reason Reason text The reason for the action

Host Table Updates

Column Name Human Name Type Description
address Address inet The IP address of the host
key Key text The key being updated
value Value text The new value for the key
old_value Old Value text The old value for the key
time_stamp Timestamp timestamp without time zone The time of the event

Device Table Updates

Column Name Human Name Type Description
mac_address MAC Address text The MAC address of the device
key Key text The key being updated
value Value text The new value for the key
old_value Old Value text The old value for the key
time_stamp Timestamp timestamp without time zone The time of the event

User Table Updates

Column Name Human Name Type Description
username Username text The username
key Key text The key being updated
value Value text The new value for the key
old_value Old Value text The old value for the key
time_stamp Timestamp timestamp without time zone The time of the event

Alerts

Column Name Human Name Type Description
time_stamp Timestamp timestamp without time zone The time of the event
description Text detail of the event text The description from the alert rule.
summary_text Summary Text text The summary text of the alert
json JSON Text text The summary JSON representation of the event causing the alert

Settings Changes

Column Name Human Name Type Description
time_stamp Timestamp timestamp without time zone The time of the event
settings_file Settings File text The name of the file changed
username Username text The username logged in at the time of the change
hostname Hostname text The remote hostname

Web cache stats

Column Name Human Name Type Description
time_stamp Timestamp timestamp without time zone The time of the event
hits Hits bigint The number of cache hits during this time frame
misses Misses bigint The number of cache misses during this time frame
bypasses Bypasses bigint The number of cache user bypasses during this time frame
systems System bypasses bigint The number of cache system bypasses during this time frame
hit_bytes Hit Bytes bigint The number of bytes saved from cache hits
miss_bytes Miss Bytes bigint The number of bytes not saved from cache misses
event_id Event ID bigint The unique event ID

Server events

Column Name Human Name Type Description
time_stamp Timestamp timestamp without time zone The time of the event
load_1 CPU load (1-min) numeric(6,2) The 1-minute CPU load
load_5 CPU load (5-min) numeric(6,2) The 5-minute CPU load
load_15 CPU load (15-min) numeric(6,2) The 15-minute CPU load
cpu_user CPU User Utilization numeric(6,3) The user CPU percent utilization
cpu_system CPU System Utilization numeric(6,3) The system CPU percent utilization
mem_total Total Memory bigint The total bytes of memory
mem_free Memory Free bigint The number of free bytes of memory
disk_total Disk Size bigint The total disk size in bytes
disk_free Disk Free bigint The free disk space in bytes
swap_total Swap Size bigint The total swap size in bytes
swap_free Swap Free bigint The free disk swap in bytes
active_hosts Active Hosts integer The number of active hosts

Interface stat events

Column Name Human Name Type Description
time_stamp Timestamp timestamp without time zone The time of the event
interface_id Interface ID integer The interface ID
rx_rate Rx Rate double precision The RX rate (bytes/s)
rx_bytes Bytes Received bigint The number of bytes received from the client in this connection
tx_rate Tx Rate double precision The TX rate (bytes/s)
tx_bytes Bytes Sent bigint The number of bytes sent to the client in this connection

Mail messages

Column Name Human Name Type Description
time_stamp Timestamp timestamp without time zone The time of the event
session_id Session ID bigint The session
client_intf Client Interface smallint The client interface
server_intf Server Interface smallint The server interface
c_client_addr Client-side Client Address inet The client-side client IP address
s_client_addr Server-side Client Address inet The server-side client IP address
c_server_addr Client-side Server Address inet The client-side server IP address
s_server_addr Server-side Server Address inet The server-side server IP address
c_client_port Client-side Client Port integer The client-side client port
s_client_port Server-side Client Port integer The server-side client port
c_server_port Client-side Server Port integer The client-side server port
s_server_port Server-side Server Port integer The server-side server port
policy_id Policy ID bigint The policy
username Username text The username associated with this session
msg_id Message ID bigint The message ID
subject Subject text The email subject
hostname Hostname text The hostname of the local address
event_id Event ID bigint The unique event ID
sender Sender text The address of the sender
receiver Receiver text The address of the receiver
virus_blocker_lite_clean Virus Blocker Lite Clean boolean The cleanliness of the file according to Virus Blocker Lite
virus_blocker_lite_name Virus Blocker Lite Name text The name of the malware according to Virus Blocker Lite
virus_blocker_clean Virus Blocker Clean boolean The cleanliness of the file according to Virus Blocker
virus_blocker_name Virus Blocker Name text The name of the malware according to Virus Blocker
spam_blocker_lite_score Spam Blocker Lite Score real The score of the email according to Spam Blocker Lite
spam_blocker_lite_is_spam Spam Blocker Lite Spam boolean The spam status of the email according to Spam Blocker Lite
spam_blocker_lite_tests_string Spam Blocker Lite Tests text The tess results for Spam Blocker Lite
spam_blocker_lite_action Spam Blocker Lite Action character(1) The action taken by Spam Blocker Lite
spam_blocker_score Spam Blocker Score real The score of the email according to Spam Blocker
spam_blocker_is_spam Spam Blocker Spam boolean The spam status of the email according to Spam Blocker
spam_blocker_tests_string Spam Blocker Tests text The tess results for Spam Blocker
spam_blocker_action Spam Blocker Action character(1) The action taken by Spam Blocker
phish_blocker_score Phish Blocker Score real The score of the email according to Phish Blocker
phish_blocker_is_spam Phish Blocker Phish boolean The phish status of the email according to Phish Blocker
phish_blocker_tests_string Phish Blocker Tests text The tess results for Phish Blocker
phish_blocker_action Phish Blocker Action character(1) The action taken by Phish Blocker

Mail addresses

Column Name Human Name Type Description
time_stamp Timestamp timestamp without time zone The time of the event
session_id Session ID bigint The session
client_intf Client Interface smallint The client interface
server_intf Server Interface smallint The server interface
c_client_addr Client-side Client Address inet The client-side client IP address
s_client_addr Server-side Client Address inet The server-side client IP address
c_server_addr Client-side Server Address inet The client-side server IP address
s_server_addr Server-side Server Address inet The server-side server IP address
c_client_port Client-side Client Port integer The client-side client port
s_client_port Server-side Client Port integer The server-side client port
c_server_port Client-side Server Port integer The client-side server port
s_server_port Server-side Server Port integer The server-side server port
policy_id Policy ID bigint The policy
username Username text The username associated with this session
msg_id Message ID bigint The message ID
subject Subject text The email subject
addr Address text The address of this event
addr_name Address Name text The name for this address
addr_kind Address Kind character(1) The type for this address (F=From, T=To, C=CC, G=Envelope From, B=Envelope To, X=Unknown)
hostname Hostname text The hostname of the local address
event_id Event ID bigint The unique event ID
sender Sender text The address of the sender
virus_blocker_lite_clean Virus Blocker Lite Clean boolean The cleanliness of the file according to Virus Blocker Lite
virus_blocker_lite_name Virus Blocker Lite Name text The name of the malware according to Virus Blocker Lite
virus_blocker_clean Virus Blocker Clean boolean The cleanliness of the file according to Virus Blocker
virus_blocker_name Virus Blocker Name text The name of the malware according to Virus Blocker
spam_blocker_lite_score Spam Blocker Lite Score real The score of the email according to Spam Blocker Lite
spam_blocker_lite_is_spam Spam Blocker Lite Spam boolean The spam status of the email according to Spam Blocker Lite
spam_blocker_lite_action Spam Blocker Lite Action character(1) The action taken by Spam Blocker Lite
spam_blocker_lite_tests_string Spam Blocker Lite Tests text The tess results for Spam Blocker Lite
spam_blocker_score Spam Blocker Score real The score of the email according to Spam Blocker
spam_blocker_is_spam Spam Blocker Spam boolean The spam status of the email according to Spam Blocker
spam_blocker_action Spam Blocker Action character(1) The action taken by Spam Blocker
spam_blocker_tests_string Spam Blocker Tests text The tess results for Spam Blocker
phish_blocker_score Phish Blocker Score real The score of the email according to Phish Blocker
phish_blocker_is_spam Phish Blocker Phish boolean The phish status of the email according to Phish Blocker
phish_blocker_tests_string Phish Blocker Tests text The tess results for Phish Blocker
phish_blocker_action Phish Blocker Action character(1) The action taken by Phish Blocker

FTP events

Column Name Human Name Type Description
event_id Event ID bigint The unique event ID
time_stamp Timestamp timestamp without time zone The time of the event
session_id Session ID bigint The session
client_intf Client Interface smallint The client interface
server_intf Server Interface smallint The server interface
c_client_addr Client-side Client Address inet The client-side client IP address
s_client_addr Server-side Client Address inet The server-side client IP address
c_server_addr Client-side Server Address inet The client-side server IP address
s_server_addr Server-side Server Address inet The server-side server IP address
policy_id Policy ID bigint The policy
username Username text The username associated with this session
hostname Hostname text The hostname of the local address
request_id Request ID bigint The FTP request ID
method Method character(1) The FTP method
uri URI text The FTP URI
virus_blocker_lite_clean Virus Blocker Lite Clean boolean The cleanliness of the file according to Virus Blocker Lite
virus_blocker_lite_name Virus Blocker Lite Name text The name of the malware according to Virus Blocker Lite
virus_blocker_clean Virus Blocker Clean boolean The cleanliness of the file according to Virus Blocker
virus_blocker_name Virus Blocker Name text The name of the malware according to Virus Blocker

Tunnel VPN events

Column Name Human Name Type Description
event_id Event ID bigint The unique event ID
time_stamp Timestamp timestamp without time zone The time of the event
tunnel_name Tunnel Name text The name the tunnel
server_address Server IP Address text The address of the remote server
local_address Local Address text The local address assigned the client
event_type Event Type text The type of the event (CONNECT,DISCONNECT)

Tunnel VPN stats

Column Name Human Name Type Description
time_stamp Timestamp timestamp without time zone The time of the event
tunnel_name Tunnel Name text The name of the Tunnel VPN tunnel
in_bytes In Bytes bigint The number of bytes received during this time frame
out_bytes Out Bytes bigint The number of bytes transmitted during this time frame
event_id Event ID bigint The unique event ID

WAN failover test events

Column Name Human Name Type Description
time_stamp Timestamp timestamp without time zone The time of the event
interface_id Interface ID integer This interface ID
name Interface Name text This name of the interface
description Text detail of the event text The description from the test rule
success Success boolean The result of the test (true if the test succeeded, false otherwise)
event_id Event ID bigint The unique event ID

WAN failover action events

Column Name Human Name Type Description
time_stamp Timestamp timestamp without time zone The time of the event
interface_id Interface ID integer This interface ID
action Action text This action (CONNECTED,DISCONNECTED)
os_name Interface O/S Name text This O/S name of the interface
name Interface Name text This name of the interface
event_id Event ID bigint The unique event ID

Directory connector login events

Column Name Human Name Type Description
time_stamp Timestamp timestamp without time zone The time of the event
login_name Login Name text The login name
domain Domain text The AD domain
type Type text The type of event (I=Login,U=Update,O=Logout)
client_addr Client Address inet The client IP address
login_type Login Type text The login type

Captive portal user events

Column Name Human Name Type Description
time_stamp Timestamp timestamp without time zone The time of the event
policy_id Policy ID bigint The policy
event_id Event ID bigint The unique event ID
login_name Login Name text The login username
event_info Event Type text The type of event (LOGIN, FAILED, TIMEOUT, INACTIVE, USER_LOGOUT, ADMIN_LOGOUT)
auth_type Authorization Type text The authorization type for this event
client_addr Client Address text The remote IP address of the client

OpenVPN stats

Column Name Human Name Type Description
time_stamp Timestamp timestamp without time zone The time of the event
start_time Start Time timestamp without time zone The time the OpenVPN session started
end_time End Time timestamp without time zone The time the OpenVPN session ended
rx_bytes Bytes Received bigint The total bytes received from the client during this session
tx_bytes Bytes Sent bigint The total bytes sent to the client during this session
remote_address Remote Address inet The remote IP address of the client
pool_address Pool Address inet The pool IP address of the client
remote_port Remote Port integer The remote port of the client
client_name Client Name text The name of the client
event_id Event ID bigint The unique event ID

OpenVPN events

Column Name Human Name Type Description
time_stamp Timestamp timestamp without time zone The time of the event
remote_address Remote Address inet The remote IP address of the client
pool_address Pool Address inet The pool IP address of the client
client_name Client Name text The name of the client
type Type text The type of the event (CONNECT,DISCONNECT)

Rules

Rules are used frequently in Arista and many other firewalls. Rules are very powerful, but can sometimes be difficult to configure.

This documentation discusses how rules work and gives some basic examples and some common mistakes to avoid. Many applications use rules like NG Firewall Rule Syntax, Captive Portal, Bandwidth Control, etc. All of these rules essentially share the same logic.

Basics

Rules are configured by the user to categorize and act upon traffic. For example,NG Firewall Rule Syntax uses rules to determine whether to block or pass traffic.Bandwidth Control uses rules to determine how to prioritize a session.

Rules are evaluated in order from top to bottom against sessions (not packets!). If a rule matches then the action from that rule is performed and no more rules are evaluated. If no matching rule is found the behavior is defined by the application, which is usually doing nothing.

This is similar to other firewalls. Arista rules are quick rules which means the first match is always used. Unlike some other firewalls, Arista evaluates against sessions, not packets. This means that the Source Address will be the initiator of the session and the Destination Address will be the server address the client is connecting to, and the same is true for Source Port and Destination Port.

Each rule has several properties:
  • An enable checkbox
  • A name/description
  • A set of conditions
  • An action or set of actions

Rule Anatomy


The enable checkbox determines if the rule is evaluated. If the enable checkbox is not checked, the rule is simply skipped.

The description is for the user to document what the rule does. It is highly suggested to give the rule a meaningful name. Trying to troubleshoot a set of rules all named "[no description]" can be extremely difficult.

The set of conditions is the description of the traffic that should match the rule. If all of the conditions are true for the given session then the rules matches. This is discussed in more details in the next section.

The action or set of actions configures what action is performed if the rule matches. This is dependent on the application. For example, in NG Firewall User Guide it determines whether to block or pass the session and additionally if it should be flagged.

Conditions

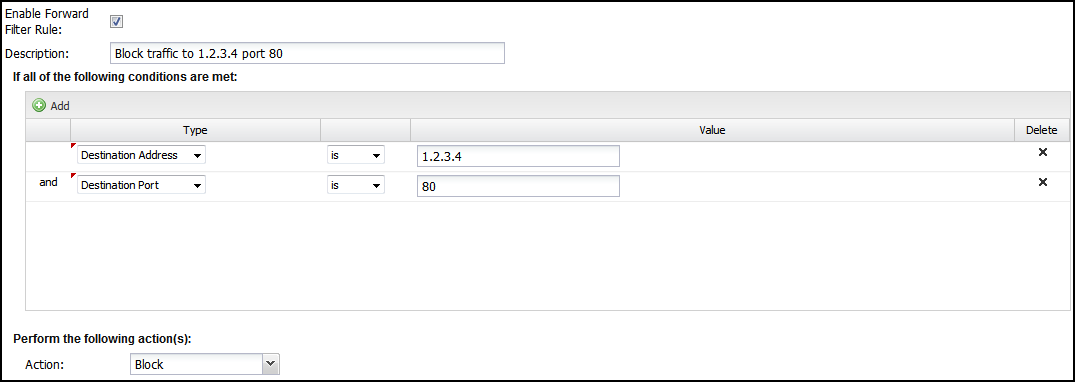
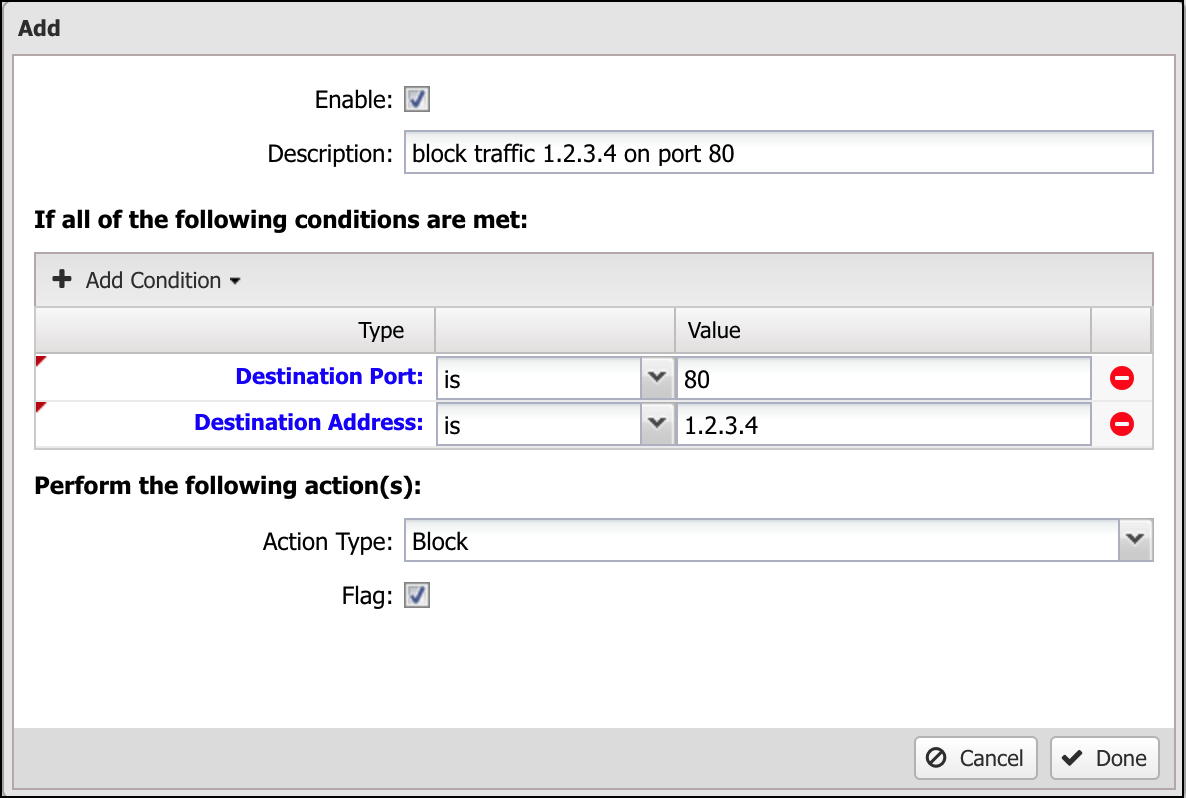
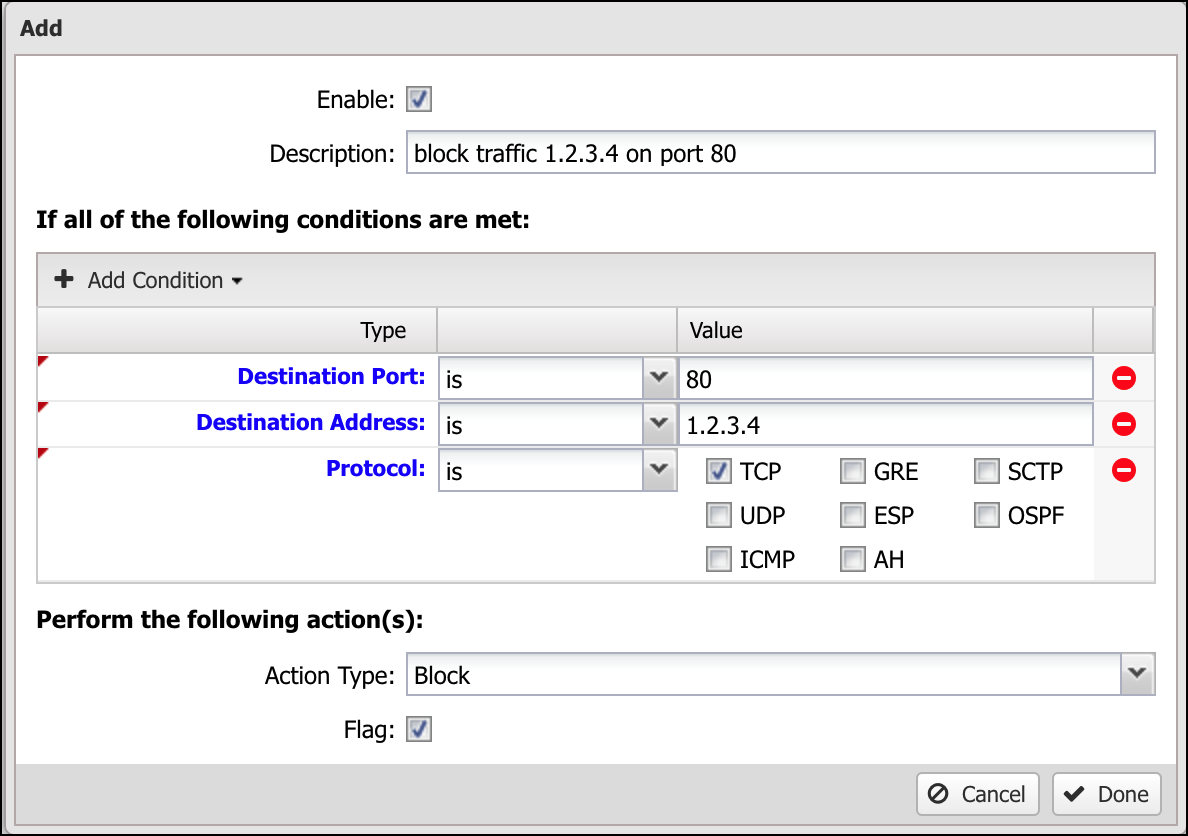
Conditions define which sessions will match the rule. If and only if all of the conditions match, the rule is considered a match. Conditions can also be inverted by selecting "is NOT" in the dropdown, effectively inverting when it matches. Destination Port "is NOT" "80" matches on all ports except port 80.

Lets take a simple example: We want to block TCP traffic to port 80 on a server. There is a web service running on that server that you don't want to allow access to. First, create a rule and check the enable checkbox and give it a reasonably descriptive name like "blocking TCP port 80 to serverX." Now you will need to add some conditions that match only the traffic you want to block. So in this example will add:
  • Protocol is TCP
  • Destination Address is 1.2.3.4 (The IP address of the server)
  • Destination Port is 80

Finally, set the action to block and flag, and click Done and Apply. Since all conditions must be true this rule will block TCP traffic to 1.2.3.4 port 80 only and nothing else.


There are many conditions available to carefully define precise sets of traffic. The following table defines the list of conditions.

Each condition has several properties:
  • Name - The Name of the condition.
  • Syntax - The accepted Syntax of the condition. If editing through the UI, some conditions have custom editors to help you craft conditions, others are just a text field.
  • Availability - The Availability is the availability of that matcher at various times. Some conditions, like Destination Address, are always known and can always be used to match. Other conditions, like Application Control: Application, are only known after the session is created and some data flows and Application Control is able to identify the application. These type conditions are 'deep session' conditions because they are not able to be evaluated at session creation time, only after some data flows. As such they are not available in rules that are evaluated at session creation time, like NG Firewall User Guide and Captive Portal.
  • Reliability - The Reliability is a "reliability" of that condition. True means it is 100% reliable. False means it is 99% or less reliable. For example, some conditions, like Destination Port, are always known and thus matching on Destination Port is 100% reliable. Other conditions, like Client Hostname, only match if the hostname for the client hostname is known. Hostname is determined through many ways, including DNS and DHCP. If all of these methods fail then it is entirely possible that the hostname of a server is "foo" but Arista has not been able to determine this and as such a Client Hostname is "foo" condition will not match. This column is there purely as a warning that users in these cases must be aware of when conditions might deliver false negatives.
    Table 1. Condition List
    Name Syntax Function Availability Reliability
    Destination Address IP Matcher Matches if value matches the Destination/Server Address of the session. (after NAT/port forwarding) all True
    Destination Port Int Matcher Matches if value matches the Destination/Server Port of the session. (after NAT/port forwarding) all True
    Destination Interface checkboxes Matches if value matches the Destination/Server Interface of the session. (after routing/port forwarding) all True
    Destined Local boolean Matches if the session is destined to one ofArista's IP addresses. all True
    Source Address IP Matcher Matches if value matches the Source/Client Address of the session. (before NAT/port forwarding) all True
    Source Port NG Firewall Rule Syntax Matches if value matches the Source/Client Port of the session. (before NAT/port forwarding) hidden True
    Source Interface checkboxes Matches if value matches the Source/Client Interface of the session. (before routing/port forwarding) all True
    Protocol checkboxes Matches if value matches the Protocol of the session. all True
    Tagged Glob Matcher Matches if session is tagged with matching tag all True
    Client Tagged Glob Matcher Matches if client of the session is tagged with matching tag all True
    Server Tagged Glob Matcher Matches if server of the session is tagged with matching tag all True
    Username User Matcher Matches if value matches the username associated with the Client IP in the Host table. all False
    Host Hostname Glob Matcher Matches if value matches the hostname associated with the Local Address in the Host table. all False
    Client Hostname Glob Matcher Matches if value matches the hostname associated with the Client IP in the Host table. all False
    Server Hostname Glob Matcher Matches if value matches the hostname associated with the Server IP in the Host table. all False
    Client MAC Address Glob Matcher Matches if value matches the MAC address associated with the Client IP in the ARP table. all False
    Server MAC Address Glob Matcher Matches if value matches the MAC address associated with the Server IP in the ARP table. all False
    Client MAC Vendor Glob Matcher Matches if value matches the device manufacturer. This is identified using the Client IP's MAC address in the ARP table and OUI Lookup. all False
    Server MAC Vendor Glob Matcher Matches if value matches the device manufacturer. This is identified using the Server IP's MAC address in the ARP table and OUI Lookup. all False
    Host has no Quota boolean Matches if the local address has no quota all True
    User has no Quota boolean Matches if the username has no quota all True
    Client has no Quota boolean Matches if the client has no quota hidden True
    Server has no Quota boolean Matches if the server has no quota hidden True
    Host has Exceeded Quota boolean Matches if the local address has exceeded their quota all True
    User has Exceeded Quota boolean Matches if the user has exceeded their quota all True
    Client has Exceeded Quota boolean Matches if the client has exceeded their quota hidden True
    Server has Exceeded Quota boolean Matches if the server has exceeded their quota hidden True
    Host Quota Attainment Int Matcher Matches the local address quota used to quota size ratio (">1" means over quota, ">.5" means over 50% used, etc) all True
    User Quota Attainment Int Matcher Matches the username quota used to quota size ratio (">1" means over quota, ">.5" means over 50% used, etc) all True
    Client Quota Attainment Int Matcher Matches the client quota used to quota size ratio (">1" means over quota, ">.5" means over 50% used, etc) hidden True
    Server Quota Attainment Int Matcher Matches the server quota used to quota size ratio (">1" means over quota, ">.5" means over 50% used. etc) hidden True
    HTTP: Hostname Glob Matcher Matches if the value matches the hostname specified in the HTTP session deep sessions False
    HTTP: Referrer Glob Matcher Matches if the value matches the referrer string specified in the HTTP header deep sessions False
    HTTP: URI Glob Matcher Matches if the value matches the latest URI specified in the HTTP session deep sessions False
    HTTP: URL URL Matcher Matches if the value matches the latest URL (hostname+URI) specified in the HTTP session deep sessions False
    HTTP: Content Type Glob Matcher Matches the content-type of the latest content in the HTTP session deep sessions False
    HTTP: Content Length Int Matcher Matches if Int Matcher matches the content length specified in the latest HTTP response deep sessions False
    HTTP: Request Method Glob Matcher Matches if the value matches the HTTP request method of the requested URL. Standard request methods include GET, POST, HEAD, OPTIONS, PUT, DELETE, TRACE, and CONNECT. deep sessions False
    HTTP: Request File Path Glob Matcher Matches if the value matches the entire file path of the requested URL. This is everything including and after the first slash character following the host name or address. (e.g. /some/location/mypage.html) deep sessions False
    HTTP: Request File Name Glob Matcher Matches if the value matches the file name of the requested URL. This is everything after the final slash character of the request. (e.g. mypage.html) deep sessions False
    HTTP: Request File Extension Glob Matcher Matches if the value matches the file extension of the requested URL. This is everything after following the dot after the final slash character of the request. (e.g. html) deep sessions False
    HTTP: Response Content Type Glob Matcher Matches if the value matches the content or MIME type reported in the server response. deep sessions False
    HTTP: Response File Name Glob Matcher Matches if the value matches the file name returned in the server response. deep sessions False
    HTTP: Response File Extension Glob Matcher Matches if the value matches the file extension returned in the server response. This is everything after (but not including) the final dot of the file name. deep sessions False
    HTTP: Client User Agent Glob Matcher Matches if the value matches the User Agent string for the client in the Host table all False
    Application Control: Application Glob Matcher Matches if the value matches the Application determined by Application Control deep sessions False
    Application Control: Category Glob Matcher Matches if the value matches the Category of the Application determined by Application Control deep sessions False
    Application Control: Protochain Glob Matcher Matches if the value matches the Protochain determined by Application Control deep sessions False
    Application Control: Detail Glob Matcher Matches if the value matches the Detail of the Application determined by Application Control deep sessions False
    Application Control: Confidence Int Matcher Matches if Int Matcher matches the confidence rating determined by Application Control deep sessions False
    Application Control: Productivity Int Matcher Matches if Int Matcher matches the productivity rating determined by Application Control deep sessions False
    Application Control: Risk Int Matcher Matches if Int Matcher matches the risk rating determined by Application Control deep sessions False
    Application Control Lite: Signature Glob Matcher Matches if the value matches the Signature determined by Application Control Lite deep sessions False
    Application Control Lite: Category Glob Matcher Matches if the value matches the Category of the Signature determined by Application Control Lite deep sessions False
    Application Control Lite: Description Glob Matcher Matches if the value matches the Description of the Signature determined by Application Control Lite deep sessions False
    Web Filter: Category Glob Matcher Matches if the value matches the Category determined by Web Filter deep sessions False
    Web Filter: Category Description Glob Matcher Matches if the value matches the Description of the Category determined by Web Filter deep sessions False
    Web Filter: Site is Flagged boolean Matches if the latest request in this session was flagged by Web Filter deep sessions False
    Directory Connector: User in Group Group Matcher Matches if the username associated with the client in the Host Table is in the specified group(s) all False
    SSL Inspector: SNI Host Name Glob Matcher Matches if the value matches the Server Name Indication (SNI) host name included by the client in the initial session request. deep sessions False
    SSL Inspector: Certificate Subject Glob Matcher Matches if the value matches the Subject DN in the SSL certificate received from the external server. all False
    SSL Inspector: Certificate Issuer Glob Matcher Matches if the value matches the Issuer DN in the SSL certificate received from the external server. all False
    Time of Day Time and Date Formatting Matches times of day. all True
    Day of Week Day of Week Matcher Matches days of the week. all True
    Remote Host Country Glob Matcher Matches if value matches the country associated with the remote IP. all False
    Client Country Glob Matcher Matches if value matches the country associated with the Client IP. all False
    Server Country Glob Matcher Matches if value matches the country associated with the Server IP. all False

Order

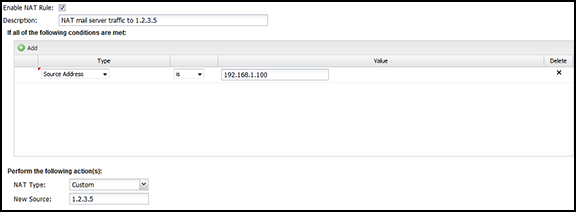
As discussed above, the order of rules is very important. Often users want to do very complex tasks that can be difficult or impossible with a single rule. In these cases, multiple rules is useful. For example, assume you want to use Firewall to block all traffic to a server (1.2.3.4) except port 80 traffic or from the admin IP (192.168.1.100) to RDP (port 3389).

Doing this in one rule would be difficult (actually impossible in this case), but it is quite easy using several rules: First, create a rule to just block all traffic to the server IP, 1.2.3.4. Above that rule create a rule that passes all traffic from the admin IP, 192.168.1.100, to the server IP where Destination Port == "3389", and another rule that passes all traffic to 1.2.3.4 with Destination Port == "80." This set of three rules does exactly what we describe above and effects no other traffic.


Common Mistakes

This is a list of common mistakes to avoid.
  • Conditions must ALL match
    In order for a rule to match, ALL conditions must match. In some cases you may want to add a rule that just passes all traffic to and from an IP. Users sometimes will create a pass rule with two conditions:
    • Destination Address is "1.2.3.4"
    • Source Address is "1.2.3.4"

    This rule will never match anything because it will only match traffic where the destination address is 1.2.3.4 AND the source address is 1.2.3.4 (a session destined to itself). If you want to match when the destination address is 1.2.3.4 OR the source address is 1.2.3.4, then you must create two separate rules, one for the destination address and one for the source address.

  • Rule Order

    Occasionally, you will add a rule and not understand why it is not working as intended. Often we find that there was a rule above that was matching the session before the desired rule. For example, just adding a rule to the bottom often isn't sufficient, you must find the appropriate place in your ruleset to place the new rule.

    To do so simply logically evaluate the rules in your head starting at the top to find the appropriate place for your rule. Also use the event log to run several tests to see how the session was handled in the event log and adjust your ruleset accordingly.

NG Firewall Rule Syntax

About NG Firewall Rule Syntax

Throughout the NG Firewall Server Administrative Interface, Administrators must enter information about their network and web locations. In some cases the values entered can be exact, and in others the text entered indicates a range of values.

The following describe common syntaxes to describe IPs, ports, strings, URLs, etc. The Policy Manager documentation describes which syntax is used for which fields.

IP Matcher

IP Matcher syntax is a that describes an IP address or set of IP addresses. This can be used, for example, in NG Firewall User Guide or Policy Manager rules to match against certain traffic.

IP Matcher can be any of the following:

Name Example Description
Any Matcher any matches all addresses
Single IP 1.2.3.4 matches the single IP address
Range of IPs 1.2.3.4-1.2.3.100 matches all the IPs in the range
CIDR range 192.168.1.0/24 matches all the IPs in that subnet
List of IP Matchers 1.2.3.4, 1.2.3.5, 1.2.3.10 - 1.2.3.15 matches all the IPs in the list and in that range

Port Matcher

Int Matcher syntax is a that describes a integer or set of integers. This can be used, for example, in NG Firewall User Guide or Policy Manager rules to match against certain traffic destination ports.

Port Matcher can be any of the following:

Name Example Description
Any any matches all
Single 80 matches that single integer
Greater Than >1234 matches all values greater than 1234
Less Than <1234 matches all values less than 1234
Range 1024-65535 matches all values within the range (inclusive)
List of Int Matchers 80, 443, 8080-8088 matches all 80, 443, and 8080 through 8088
Note: Floating point numbers are also allowed and apply in some cases. (example: ">2.5")

URL Matcher

The URL Matcher Syntax describes all or part of a website.

Example Matches Does not Match
example.com http://example.com/, http://www.example.com/, http://example.com/foo http://example.net
example.com/bar http://example.com/bar/test.html, http://www.example.com/bar http://example.com/foo
*porn* http://pornsite.com/ http://foobar.com
example???.com/ http://example123.com http://example1.com
example.com/foo http://example.com/foo, http://abc.example.com/foobar http://example.com/

URL Matchers use globs which are describe more in depth in the Glob Matcher.

Note:
  • The left side of the rule is anchored with the regular expression "^([a-zA-Z_0-9-]*\.)*". "foo.com" will match only "foo.com" and "abc.foo.com" but not "afoo.com".
  • The right side of the rule is anchored with the regular expression ".*$". "foo.com" will match "foo.com/test.html" because it is actually "foo.com.*$". "foo.com/bar" is "foo.com/bar.*$" which will match "foo.com/bar/baz" and "foo.com/bar2". Also "foo" becomes "foo.*" which will match "foobar.com" and "foo.com"
  • "http://" and "https://" are stripped from the rule.
  • URIs are case-sensitive, but domains are not. The URL Matcher is case sensitive, but domains are converted to lowercase before evaluation because they should not be case sensitive. Any part of the matcher that should match against the domain should be lower case in the rule.
  • "www." is automatically stripped from the rule. This is to prevent the frequent misconfiguration of users adding a block rule for something like "www.pornsite.com" which blocks "www.pornsite.com" but not just "pornsite.com." If you truly desire to only match www.pornsite.com and not pornsite.com then use "*www.pornsite.com" because the "*" will match zero or more characters.
  • Similarly "*." is stripped from the rule for the same reason as above. If you truly want all sub-domains but not the main domain matched, you can accomplish this by doing "*?.foo.com".

User Matcher

User Matcher syntax describes an user or set of users. This can be used, for example, in Policy Manager or About Bandwidth Control rules to match against certain traffic.

User Matcher can be any of the following:

Name Example Description
Any Authenticated User [authenticated] matches all identified or authenticated users (excluding null)
Unauthenticated User [unauthenticated] matches all unidentified or unauthenticated users (including null)
Username myuser matches the "myuser" user
Glob Matcher m*r matches the "myuser" user
List of User Matchers myuser1,myuser2 matches "myuser1" and "myuser2"

Group Matcher

Group Matcher syntax is a that describes an user or set of users. This can be used, for example, in Policy Manager or Bandwidth Control rules to match against certain traffic.

Group Matcher can be any of the following:

Name Example Description
Any Matcher [any] matches all groups
None Matcher [none] matches no groups
Groupname mygroup matches the "mygroup" group
Glob Matcher m*p matches the "mygroup" group
List of Group Matchers mygroup1,mygroup2 matches "mygroup1" and "mygroup2"

Glob Matcher

A Glob is a common way to match strings of characters against rules. An Arista glob is similar to the syntax commonly used on Microsoft OSs to match filenames (example: "rm *.exe").

A glob matcher has two special characters: "*" means 0 or more of any characters (excluding return character) and "?" means exactly 1 of any character (excluding return character).

Example String Description
String XYZ matches "XYZ" but NOT "xYZ" and NOT "XYZZ"
String with * X*Z matches "XZ" and "XYZ" and "XYYZ" and "XyyyabcZ" but NOT "xYZ" and NOT "XYZA"
String with * X*Z* matches "XZ" and "XYZ" and "XYYZ" and "XyyyabcZ" and "XYZA" but NOT "xYZ"
String with ? X?Z matches "XYZ" and "XyZ" but NOT match "XZ" or "XYYZ"
List of Globs X,Z matches "X" and "Z" but NOT match "Y" or "X,Z"

Globs are often used in rules like URL rules and filename rules to match various strings. The left and rights side are implicitly anchored. If you wish to match if a string contains the match you will need to use "*foo*".

For those familiar with regular expression you can derive the glob equivalent by doing the following:
  • replace "." with "\." to escape the special meaning of "." in regular expressions.
  • replace "?" with "." to match any character.
  • replace "*" with ".*" to match zero or more characters.
Note:
  • "*" matches all values except null/unset.
  • "" matches null and nothing else.
  • All glob matching is case insensitive for domains but case sensitive for all other matches.

Time of Day Matcher

Day of Week Matcher.

Day of Week Matcher

A "Day of Week" matcher is a syntax used to describe days of the week.

A Day of Week Matcher can be any of the following syntax:

Name Example Description
Any Matcher "any" matches all days of the week
Single Day (English name) "tuesday" matches Tuesday only
Single Day (Digit 1-7) "1" matches Sunday only
List of Time of Day Matchers "monday, 2, wednesday" matches Monday, Tuesday, and Wednesday

Time and Date Formatting

Format Description Example
d Day of the month, 2 digits with leading zeros 01 to 31
D A short textual representation of the day of the week Mon to Sun
j Day of the month without leading zeros 1 to 31
l A full textual representation of the day of the week Sunday to Saturday
N ISO-8601 numeric representation of the day of the week 1 (for Monday) through 7 (for Sunday)
S English ordinal suffix for the day of the month, 2 characters. Works well with j st, nd, rd or th
w Numeric representation of the day of the week 0 (for Sunday) to 6 (for Saturday)
z The day of the year (starting from 0) 0 to 364 (365 in leap years)
W ISO-8601 week number of year, weeks starting on Monday 01 to 53
F A full textual representation of a month, such as January or March January to December
m Numeric representation of a month, with leading zeros 01 to 12
M A short textual representation of a month Jan to Dec
n Numeric representation of a month, without leading zeros 1 to 12
t Number of days in the given month 28 to 31
L Whether it's a leap year 1 if it is a leap year, 0 otherwise.
o ISO-8601 year number (identical to (Y), but if the ISO week number (W) belongs to the previous or next year, that year is used instead) Examples: 1998 or 2004
Y A full numeric representation of a year, 4 digits Examples: 1999 or 2003
y A two digit representation of a year Examples: 99 or 03
a Lowercase Ante meridiem and Post meridiem am or pm
A Uppercase Ante meridiem and Post meridiem AM or PM
g 12-hour format of an hour without leading zeros 1 to 12
G 24-hour format of an hour without leading zeros 0 to 23
h 12-hour format of an hour with leading zeros 01 to 12
H 24-hour format of an hour with leading zeros 00 to 23
i Minutes, with leading zeros 00 to 59
s Seconds, with leading zeros 00 to 59
u Decimal fraction of a second Examples:(minimum 1 digit, arbitrary number of digits allowed) 001 (i.e. 0.001s) or 100 (i.e. 0.100s) or 999 (i.e. 0.999s) or 999876543210 (i.e. 0.999876543210s)
O Difference to Greenwich time (GMT) in hours and minutes Example: +1030
P Difference to Greenwich time (GMT) with colon between hours and minutes Example: -08:00
T Timezone abbreviation of the machine running the code Examples: EST, MDT, PDT ...
Z Timezone offset in seconds (negative if west of UTC, positive if east) -43200 to 50400
c ISO 8601 date represented as the local time with an offset to UTC appended.
Note:
  1. If unspecified, the month / day defaults to the current month / day, the time defaults to midnight, while the timezone defaults to the browser's timezone. If a time is specified, it must include both hours and minutes. The "T" delimiter, seconds, milliseconds and timezone are optional.
  2. The decimal fraction of a second, if specified, must contain at least 1 digit (there is no limit to the maximum number of digits allowed), and may be delimited by either a '.' or a ',' Refer to the examples on the right for the various levels of date-time granularity which are supported.
Examples:1991 or 1992-10 or 1993-09-20 or 1994-08-19T16:20+01:00 or 1995-07-18T17:21:28-02:00 or 1996-06-17T18:22:29.98765+03:00 or 1997-05-16T19:23:30,12345-0400 or 1998-04-15T20:24:31.2468Z or 1999-03-14T20:24:32Z or 2000-02-13T21:25:33 2001-01-12 22:26:34
C An ISO date string as implemented by the native Date object's Date to ISO String method. This outputs the numeric part with *UTC* hour and minute values, and indicates this by appending the `'Z'` timezone identifier. 1962-06-17T09:21:34.125Z
U Seconds since the Unix Epoch (January 1 1970 00:00:00 GMT) 1193432466 or -2138434463
MS Microsoft AJAX serialized dates \/Date(1238606590509)\/ (i.e. UTC milliseconds since epoch) or \/Date(1238606590509+0800)\/
time A javascript millisecond timestamp 1350024476440
timestamp A UNIX timestamp (same as U) 1350024866

NG Firewall Additional Apps

This section discusses the following topics:

Configuration Backup

NG Firewall's Configuration Backup enables you to recover from hardware failures and disasters. Configuration backup is also used to replicate configuration across multiple deployments of the NG Firewall. If installed and enabled, Configuration Backup automatically backs up your configuration on a daily basis to Dashboard and as a secondary option to Google Drive.

Prerequisites

  • To use Configuration Backup you must have the ETM Dashboard Organization, which is available as an à la carte item.
  • To view the status of backups you need the Reports app.
  • To access your backups your appliance must be connected to your ETM Dashboard Organization account. To verify that NG Firewall is connected to ETM Dashboard, refer to the Support screen.
  • To backup to Google Drive, a Google account must be authenticated using Directory Connector.

Installing the Configuration Backup App

To enable automatic backup, you must first install the Configuration Backup app.
  1. In the NG Firewall administration, click Apps in the menu at the top of the screen.
  2. Verify if the Configuration Backup app is installed. If not, follow the steps below to install the app.
  3. Click Install Apps.
  4. Click the Configuration Backup app.
  5. Click Back to Apps and wait for the app to finish the installation.
Configuring automatic backup
  1. In the Apps screen, click the Configuration Backup app to configure backups.
  2. Toggle the Power switch to enable or disable automatic backups.

  3. Click the Cloud tab.
  4. Review the Daily Backup setting and modify the Hour and Minute if necessary based on when you want the daily backup to occur.
  5. Click Backup now if you want to initiate an immediate backup.

Configuring a Secondary Backup using Google Drive

You can use Google Drive as a secondary backup option. Before configuring backups to Google drive, you must connect Google your account to the NG Firewall. To configure backup to Google Drive:
  1. Go to the Google Connector tab.
  2. Check Enable upload to Google Drive:
  3. Confirm the name of your Google Drive Directory.
  4. Click Save.

Viewing Backup Activity

To view backup activities such as the most recent backup or potential failures, click Reports in the top menu or click one of the predefined reports in the Status screen.

Restoring a Backup Using ETM Dashboard

To restore a backup from ETM Dashboard:
  1. Log in to Dashboard with your account.
  2. Click Appliances in the top menu.
  3. Select an appliance from the Appliances list.
  4. Locate the Cloud Backups panel and select a backup based on the timestamp.
  5. Click Download.
  6. Click Yes to confirm.

Restoring a Backup in Google Drive


To restore a backup from Google Drive:
  1. Log in to your Google account.
  2. Go to your Google Drive and locate the directory used by NG Firewall (e.g. Configuration Backups).
  3. Select the backup file and click Download from the menu.
  4. Log in to your NG Firewall.
  5. Go to config > System > Restore .
  6. Choose a Restore Option.
  7. Click Restore from File and select your backup file.

Related Topics

Restore

Configuration Backup Reports

The Reports tab provides a view of all reports and events for Configuration Backup.

Reports

This applications reports can be accessed via the Reports tab at the top or the Reports tab within the settings. All pre-defined reports will be listed along with any custom reports that have been created.

Reports can be searched and further defined using the time selectors and the Conditions window at the bottom of the page. The data used in the report can be obtained on the Current Data window on the right.

Table 1. Pre-Defined Report Queries
Report Entry Description
Configuration Backup Summary A summary of configuration backup actions.
Backup Usage (all) The amount of successes and failures of configuration backup over time.
Backup Usage (success) The amount of successful configuration backups over time.
Backup Usage (failed) The amount of failed configuration backups over time.
Backup Events All Configuration Backup events.

Related Topics

ETM Dashboard Organization

Your ETM Dashboard account may be invited to other ETM Dashboard accounts and permitted to manage Edge Threat Management appliances or subscriptions owned by the inviting account. This additional account access is called an Organization.

Live Support

Live Support entitles users with access to the Edge Threat Management support team via phone and email.

To learn more about this service, visit the Support page. Live Support includes Configuration Backup.

Support

The Support Portal button opens our ticketing system, which is also reachable at Support Portal. You can also email us directly to This email address is being protected from spambots. You need JavaScript enabled to view it. which will automatically create a support ticket.

Please include as much information as possible when filing a ticket, and please remember that a Live Support subscription is required to work directly with the support team. We will be unable to escalate free customer issues to the engineering team.

Support Information lists information that helps Edge Threat Management Support verify your license and identify your box:
  • UID: The unique identifier number for your NG Firewall. This number is generated during the install process.
  • Build: The exact build version your NG Firewall is running.

Related Topics

NG Firewall Protect Apps

Firewall

Firewall provides traditional firewall functionality, blocking and/or flagging traffic based on rules.

The term "Firewall" has grown to encompass many functionalities and meanings. It is often used interchangeably with router, gateway, and Unified Threat Management (UTM). Even the NG Firewall is a "next-gen" firewall. There are also host-based firewalls that run on the local host computer.

The "Firewall" app is a traditional firewall used to block and/or flag TCP and UDP sessions passing through the NG Firewall using rules. The Firewall app provides the same functionality as the traditional "firewall" - the ability to use rules to control which computers communicate on a network.

Settings

This section discusses the different settings and configuration options available for Firewalls.

Status

This displays the current status and some statistics.

Figure 1. Apps Firewall Status

Rules

The Rules tab allows you to specify rules for blocking, Passing, or Flagging traffic that crosses the NG Firewall.

The Rules documentation describes how rules work and how they are configured. The Firewall uses rules to determine whether to block/pass a specific session and whether it is flagged. Flagging a session marks it in the logs for review in the event logs or reports but has no direct effect on network traffic.

Typically, the NG Firewall is installed as a NAT/gateway device or behind another NAT/gateway device in bridge mode. In this scenario, all inbound sessions are blocked by NAT except for those explicitly allowed with port forwards. Because of this, the Firewall does not block anything by default. It is up to you to decide the best fit for your network, whether you only want to block specific ports or block everything and allow only a few services.

Rule Actions
  • Pass: Allows the traffic that matches the rule to flow.
  • Block: Blocks the traffic that matches the rule.

Additionally, a session can be flagged. If the Flag is checked, the event is flagged in the event log for easier viewing. The flag is always enabled if the action is blocked.

Figure 2. Apps Firewall Rules

Firewall Reports

The Reports tab provides a view of all reports and events for all traffic handled by Firewall.

Reports

This application's reports can be accessed via the Reports tab at the top or the Reports tab within the settings. All pre-defined reports and custom reports created will be listed.

Reports can be searched and further defined using the time selectors and the Conditions window at the bottom of the page. The data used in the report can be obtained on the Current Data window on the right.

Pre-defined Report Queries

Report Entry Description
Firewall Summary A summary of firewall actions.
Scanned Sessions The amount of scanned, flagged, and blocked sessions over time.
Top Scanned Hostnames The number of scanned session grouped by hostname.
Top Flagged Hostnames The number of flagged session grouped by hostname.
Top Blocked Hostnames The number of blocked sessions grouped by hostname.
Top Scanned Clients The number of scanned session grouped by client.
Top Flagged Clients The number of flagged session grouped by client.
Top Blocked Clients The number of blocked session grouped by client.
Top Scanned Usernames The number of scanned session grouped by username.
Top Flagged Usernames The number of flagged session grouped by username.
Top Blocked Usernames The number of blocked session grouped by username.
Top Scanned Server Ports The number of scanned session grouped by server (destination) port.
Top Flagged Server Ports The number of flagged session grouped by server (destination) port.
Top Blocked Server Ports The number of blocked session grouped by server (destination) port.
All Events All events scanned by Firewall App.
Flagged Events Events flagged by Firewall App.
Blocked Events Events blocked by Firewall App.

The tables queried to render these reports:

Related Topics

Intrusion Prevention

Intrusion Prevention is an Intrusion Detection system that detects malicious activity on your network.

Intrusion Prevention uses signatures to detect malicious activity, drawing upon a known attack pattern database. If a session matches a signature, its enabled action directs Intrusion Prevention to Log (records the incident but does not stop the activity) or Block (records the incident and does stop the activity).

There is tremendous diversity between networks, and it is possible for a signature to correctly identify malicious activity on one network and incorrectly match legitimate traffic on another. Logging all matching signatures can make it difficult to monitor Intrusion Prevention effectively, and blocking can disrupt legitimate traffic, causing your network to appear broken. Therefore, it is legitimate for there to be many signatures set as disabled or not active in Intrusion Prevention. You are advised to use the recommended actions specified by the signature database providers.

The database contains over 40,000 signatures, making managing signatures difficult. Rules are used to configure groups of signatures based on matching various attributes. A condition can match an attribute, such as a class type. All signatures that match are configured in Intrusion Prevention according to the rule action. Any signature not matched by a rule is Disabled. A default set of rules based on system memory is enabled by default.

The signature database is automatically updated several times a week. New and updated rules are configured according to the rules.

The Intrusion Prevention All Events log records all detected activity for enabled signatures. You should review this log daily.

Note: Intrusion Prevention installs but is off by default.
Note: Intrusion Prevention can be memory intensive and requires at least 2GB of RAM. The amount used combines the number of enabled signatures and the amount of traffic that goes through your system.

Settings

When To Scan

Intrusion Prevention can be run before or after other network processing. Which option depends largely on your reasons for using Intrusion Prevention.

When other Network Processing is selected (the default), IPS sees all traffic, even if it will subsequently be dropped by the firewall. This means IPS will see much malicious activity, such as port scans and intrusion attempts on the public IP addresses on almost all networks, even though that traffic will ultimately be dropped. The advantage of this approach is that Intrusion Prevention sees and logs everything, providing the most complete picture. The disadvantage is that it usually logs so much that the Intrusion Prevention event log quickly becomes ignored because it logs thousands of events daily, which is normal.

IPS only scans traffic passing through the firewall when other Network Processing is selected. For most networks where an NG firewall is running with a public IP and doing NAT and only port forwarding select or no traffic at all, this will be extremely different from scanning "prerouting." The advantage of this mode is that IPS will only scan/log on traffic that is entering your network and, therefore, ignores a lot of the standard "noise" from incoming port scans and vulnerability scans that just get dropped at the firewall and logs only on traffic that should potentially concern the administrator. Another advantage is that it fully allows bypass traffic to work as expected. The disadvantage of this mode is that it provides a less complete picture of activity on the public interface, and it no longer logs attempts that just get dropped.

Status

The Status tab shows the following information:
  • Memory Usage: The amount of system memory the IPS engine uses compared to your installed system memory.
  • Metrics: The number of blocked, logged, and scanned sessions.
  • Overview: Signatures and Signature Updates.
    1. Signatures: Total number of signatures available and the number set for Log, Block, Disabled.
    2. Updates: The last time the signature database was updated and the last time a check was performed. Database updates do not occur on each check.
      Figure 3. Apps Intrusion-Prevention Status

Rules

Rules allow you to control which signatures are enabled (and their actions) or disabled. For each signature, the rules are evaluated in order, and the action from the first matching rule is used to determine the status of that signature. The Intrusion Prevention rules are the mechanism that determines which signatures are enabled and what their associated actions are. These rules have no impact on network traffic and are not evaluated against packets, sessions, or network traffic in any manner.

Any signature not matched by any rule is disabled.

The Rules documentation describes how rules generally work and how they are configured. The major difference between the Intrusion Prevention and Conditions List is that.

At the bottom of the tab, a status bar indicates the number of signatures affected by the currently defined rules.

When adding or editing a rule, the bottom of the edit window will show how many signatures are affected by the conditions as you build the rule.

Figure 4. Apps Intrusion-Prevention Rules

Rule Conditions

Conditions define which signatures will match the rule. If and only all conditions match, the rule is considered a match.

The following conditions are specific to Intrusion Prevention rules:

Name Syntax Function
Signature identifier Numeric Matches if the value matches the exact or partial signature identifier.
Group identifier Numeric Matches if the value matches the exact or partial group identifier.
Category Checkbox Matches if the value is in one of the checked categories.
Classtype Checkbox Matches if the value is in one of the checked classtypes.
Message Text Matches if the value matches the exact or partial signature subject message.
Protocol Checkbox Matches if the value is in one of the checked protocols.
Source Address Text Matches if the value matches the exact or partial source address.
Source Port Text Matches if the value matches the exact or partial source port.
Destination Address Text Matches if the value matches the exact or partial destination address.
Destination Port Text Matches if the value matches the exact or partial destination port.
Signature Text Matches if the value matches the exact or any part of the entire signature.
Custom Boolean Matches if the value is a custom signature.
Recommended Action Select Matches if the value is a signature's recommended action.
System Memory Numeric Matches if system memory matches this value.

Rule Actions

When all conditions are met, signatures will be configured into Intrusion Prevention as follows:

Action Function
Recommended Each signature will use its specific Recommended Action. If that Recommended Action is disabled, it will not be enabled.
Enable Log Each signature will be enabled to log.
Enable Block if Recommended is Enabled Only if the signature's Recommended Action is Log will the signature be configured for Block. Use this for "wide" condition matches like classtype.
Enable Block Each signature will be enabled to block. Use this for "narrow" matches like sid and gid.
Disable Each signature will be disabled and not used by Intrusion Prevention.
Whitelist Each signature's Source and/or Destination networks will be modified to exclude networks defined by the selected variables.

Signatures

The Signature tab shows the entire database of signatures, both the defaults set provided as well as any custom signatures you may add.

Figure 5. Apps Intrusion-Prevention Signatures

Navigation

By default, signatures are grouped by classtype, and you can expand the groups to view the individual signatures.

To better find specific signatures, you can use the Filter to select signature fields and the match you're looking for. The grid view will change to show those signatures matching the filter.

If your filter returned one or more matches, you can create a rule from the filter by clicking Create Rule.

Mousing over a grid cell will show appropriate information related to that cell. For example, if you mouse over the Rule Action cell, you'll see which rule is affecting this signature.

Custom Signatures

You may create and maintain your signatures, but most use the default database.

If you want to add custom signatures you can do so either by clicking Add.

Alternatively, if you want to create a new custom signature on an existing signature, you can click Copy then edit that copy.

Note: Don't be tempted to copy a signature to change its Recommended Action. Create a Rule instead!

Variables

This tab provides administrators access to Suricata variables. These variables are used in rules to specify criteria for the source and destination of a packet.

Suricata's most important variable is $HOME_NET. $HOME_NET defines the network or networks you are trying to protect - it is computer automatically based on your network configuration - it includes all local networks (including aliases). Under nearly every circumstance, you will want to leave these values as-is.

Using the Add button, custom variables can be added. Adding variables may be used by users who are adding their own rules. This should only be attempted by advanced users with a strong knowledge of Suricata signature creation.

Figure 6. Apps Intrusion-Prevention Variables

Bypass Rules

Bypass rules enable you to configure traffic that should not be scanned by Intrusion Prevention. The Rules documentation describes how rules generally work and how they are configured.

Figure 7. Apps Intrusion-Prevention Bypass-Rules

Updates

The signature database is checked automatically every night. Updates are typically released 2-3 times a week. The signature database does not affect custom signatures. New signatures will be integrated into Intrusion Prevention according to defined rules.

All Events

The All Events report shows all enabled signature matches found by Intrusion Prevention.

If there are signatures that are currently set to an action of Log and you determine the signature should be blocked, you can click the Block button on the far right. The Block button is disabled for any signature that is already blocked.

Figure 8. Reports Cat Intrusion-prevention Rep All-events

Intrusion Prevention Reports

The Reports tab provides a view of all reports and events for all traffic handled by Intrusion Prevention.

Reports

This application's reports can be accessed via the Reports tab at the top or the Reports tab within the settings. All pre-defined reports will be listed along with any custom reports that have been created.

Reports can be searched and further defined using the time selectors and the Conditions window at the bottom of the page. The data used in the report can be obtained on the Current Data window on the right.

Table 1. Pre-defined Report Queries
Report Entry Description
Intrusion Prevention Summary A summary of intrusion detection and prevention actions.
Intrusion Detection (all) The amount of detected and blocked intrusions over time.
Intrusion Detection (logged) The amount of detected intrusions over time.
Intrusion Detection (blocked)

The amount of blocked intrusions over time.

Top Rules (all) The number of intrusions detevted by rule.
Top Rules (logged) The number of intrusions logged by rule.
Top Rules (blocked) The number of intrusions blocked by rule.
Top Signatures (all) The number of intrusions detected by signature.
Top Signatures (logged) The number of intrusions logged by signature.
Top Signatures (blocked) The number of intrusions blocked by signature.
Top Classtypes (all) The number of intrusions detected by classtype.
Top Classtypes (logged) The number of intrusions logged by classtype.
Top Classtypes (blocked) The number of intrusions blocked by classtype.
Top Categories (all) The number of intrusions detected by category.
Top Categories (logged) The number of intrusions logged by category.
Top Categories (blocked) The number of intrusions blocked by category.
Top Source IP Addresses (all) The number of intrusions detected by source IP address.
Top Source IP Addresses (logged) The number of intrusions logged by source IP address.
Top Source IP Addresses (blocked) The number of intrusions blocked by source IP address.
Top Source Ports (all) The number of intrusions detected by source port.
Top Source Ports (logged) The number of intrusions logged by source port.
Top Source Ports (blocked) The number of intrusions blocked by source port.
Top Destination IP Addresses (all) The number of intrusions detected by destination IP address.
Top Destination IP Addresses (logged) The number of intrusions logged by destination IP address.
Top Destination IP Addresses (blocked) The number of intrusions blocked by destination IP address.
Top Destination Ports (all) The number of intrusions detected by destination port.
Top Destination Ports (logged) The number of intrusions logged by destination port.
Top Destination Ports (blocked) The number of intrusions blocked by destination port.
Top Protocols (all) The number of intrusions detected by protocol.
Top Protocols (logged) The number of intrusions logged by protocol.
Top Protocols (blocked) The number of intrusions blocked by protocol.
All Events All sessions scanned by Intrusion Prevention.
Logged Events All sessions matching Intrusion Prevention signatures and logged.
Blocked Events All sessions matching Intrusion Prevention signatures are blocked.

The tables queried to render these reports:

Related Topics

Phish Blocker

Phish Blocker protects users from phishing attacks over email (SMTP). It inspects emails for fraudulent emails, also known as phish. A phishing email attempts to acquire sensitive information such as passwords and credit card details by masquerading as a trustworthy person or business in an official electronic communication, such as an email.


Settings

This section discusses the different settings and configuration options available for Phish Blocker.

Status

This displays the current status and some statistics.


Email

These settings apply only to the scanned SMTP messages.
  • Scan SMTP: This enables or disables SMTP scanning.
  • Action: The action was taken regarding the message if the spam score is high enough.

If set to Mark, "[Phish]..." will be prepended to the email subject line and delivered. If set to Pass, the message will be delivered as originally sent. The drop will inform the sending server the mail was successfully delivered, but the NG Firewall will drop the mail, so it is never delivered. Quarantine will send the mail to users' email quarantine for them to release or delete as they see fit. For more information, refer to Quarantine.


Phish Blocker Reports

The Reports tab provides a view of all reports and events for all traffic handled by Phish Blocker.

Reports

This applications reports can be accessed via the Reports tab at the top or the Reports tab within the settings. All pre-defined reports will be listed along with any custom reports that have been created.

Reports can be searched and further defined using the time selectors and the Conditions window at the bottom of the page. The data used in the report can be obtained on the Current Data window on the right.

Table 2. Pre-defined Report Queries:
Report Entry Description
Phish Blocker Summary A summary of phish blocking actions for email activity.
Email Usage (all) The amount of scanned, clean, and phish email over time.
Email Usage (scanned) The amount of scanned email over time.
Email Usage (clean) The amount of clean email over time.
Email Usage (phish) The amount of phish email over time.
Phish Ratio The ratio of phish (true) to ham (false)
Top Phish Recipients The number of email addresses with phish.
Top Phish Sender Addresses The number of IP addresses sending phish.
All Email Events All email sessions are scanned by Phish Blocker.
All Phish Events All email sessions are detected as phishing attempts.
Quarantined Events All email sessions are detected as phishing attempts and quarantined.
The tables queried to render these reports:

Related Topics

Threat Prevention

Threat Prevention blocks potentially harmful traffic from entering or exiting the network. This app can prevent cyber attacks on your servers (e.g., web, VoIP, and email). It is also useful to prevent data loss if users mistakenly try to connect to a phishing site or other malicious host.


Threat Prevention uses Threat Intelligence technology managed by Webroot BrightCloud®. Webroot BrightCloud® assesses each IP address and provides it a reputation score—the reputation score results from running an IP address through BrightCloud’s sensor network. The Sensor Network analyzes the IP address based on real-time Global Threat Databases that are kept up to date with new and emerging threats. The Threat Prevention app queries the BrightCloud® service, requesting the reputation score and historical data of each IP address or URL. The session may be blocked Based on the IP address or URL rating. The Threat Prevention app default blocks sessions with a "High Risk" rating. IP addresses or URLs rated as High Risk may be associated with the following types of attacks:
  • Spam Sources - IP addresses involved in tunneling spam messages through a proxy, anomalous SMTP activities, and forum spam activities.
  • Windows Exploits - IP addresses that distribute malware, shell code, rootkits, worms, or viruses on Windows platforms.
  • Web Attacks - IP addresses using cross-site scripting, iFrame injection, SQL injection, cross-domain injection, or domain password brute force attacks to target vulnerabilities on a web server.
  • Botnets - IP addresses acting as Botnet Command and Control (C&C) centers and infected zombie machines controlled by the C&C servers.
  • Denial of Service - The Denial of Service category includes DOS, DDOS, anomalous sync flood, and anomalous traffic detection.
  • Scanners - IP addresses involved in unauthorized reconnaissance activities such as probing, host scanning, port scanning, and brute force login attempts.
  • Phishing - IP addresses hosting phishing sites and sites related to fraudulent activities.
  • TOR Proxy - IP addresses acting as exit nodes for the TOR Network. Exit nodes are the last point along the proxy chain and directly connect to the originator’s intended destination.
  • Proxy - IP addresses providing proxy services, including VPN and open web proxy services.
  • Mobile Threats - Denial of service, packet sniffing, address impersonation, and session hijacking.

Settings

This section discusses the different settings and configuration options available for Threat Prevention.

Status

The Status screen shows the running state of Threat Prevention and relevant metrics, such as the number of blocked sessions and high-risk threats.

Figure 9. Threat Prevention Status

Threats

You can review the threshold for IP Addresses and URL Threats in the Threats tab. The recommended and default Reputation Threshold is "High Risk." "High Risk" is the only setting that should be deployed without reviewing and understanding the implications on network traffic. 'Suspicious" will block significantly more network traffic than "High Risk" will block.

Figure 10. Threat Prevention Threats

Pass Sites

The Pass Sites tab allows you to specify IP Addresses or URLs to exclude from Threat Prevention lookups to ensure they are permitted by this app.

Figure 11. Threat Prevention Pass Sites

Rules

The Rules tab allows you to specify rules for blocking, Passing, or Flagging traffic that crosses the NG Firewall.

The Rules describe how rules work and how they are configured. Threat Prevention uses rules to determine to block/pass the specific session and if the session is flagged. Flagging a session marks it in the logs for review in the event logs or reports, but has no direct effect on the network traffic.

In addition to all the common rule types, four are unique to Threat Prevention, and these can be useful for making exceptions to the general *Reputation Threshold* setting.
  • Client address reputation: The reputation value of a source IP address returned by the Webroot BrightCloud® service. This applies to incoming connections from the Internet to open services on your network.
  • Server address reputation: The reputation value of a destination IP address returned by the Webroot BrightCloud® service. This applies to outgoing connections to the Internet from hosts on your network.
  • Client address category: The reputation category of a source IP address returned by the Webroot BrightCloud® service. This applies to incoming connections from the Internet to open services on your network.
  • Server address category: The reputation category of a destination IP address returned by the Webroot BrightCloud® service. This applies to outgoing connections to the Internet from hosts on your network.

Rule Actions

  • Pass: Allows the traffic that matches the rule to flow.
  • Block: Blocks the traffic that matches the rule.

Additionally, a session can be flagged. If the flag is checked, the event is flagged for easier viewing in the event log. The flag is always enabled if the action is blocked.

Figure 12. Threat Prevention Rules

Threat Lookup

Threat Lookup enables you to get threat information from an IP address or URL. This is useful for validating afterward or confirming the reputation and other details of the IP address or URL in advance. Enter an IP Address or URL in the input field and click Search to get information.

Figure 13. Threat Prevention Threat Lookup

Threat Results

Result Description
Address/URL The IP Address or URL you requested to search.
Country The country where the IP Address or URL originates.
Popularity The popularity of the IP Address or URL is based on the volume of lookups.
Recent Threat Count The number of recent occurrences in which the IP Address or URL has been associated with a threat.
Age The amount of time since the IP Address or URL was first noticed.
Reputation The IP Address or URL's reputation is determined by the Webroot BrightCloud reputation service.
Details A description of the Reputation value.

Advanced

The Advanced section enables you to configure additional Threat Prevention options.
Custom block page URL:

Set an external location to redirect users when denied access to a web site by Threat Prevention. This is useful if you want your server to process the denial differently than the built-in denial options.

Enabling this option will only redirect internal/outbound traffic to your custom page. It will not function to redirect external/inbound traffic (such as Port Forwarded traffic).

Block Options:
Close connection for blocked HTTPS sessions without redirecting to the block page If enabled, secure sites blocked by Threat Prevention do not redirect the user to a denial page and close the connection without any notice to the user. This is useful when you are not using SSL Inspector, and the server's root certificate is not installed on the client device.
Figure 14. Threat Prevention Advanced

Threat Prevention Reports

This applications reports can be accessed via the Reports tab at the top or the Reports tab within the settings. All pre-defined reports will be listed along with any custom reports that have been created.

Reports

Reports can be searched and further defined using the time selectors and the Condition window at the bottom of the page. The data used in the report can be obtained on the Current Data window on the right.

Pre-defined report queries:

Report Entry Description
Web Traffic Summary A summary of web Threat Prevention actions.
Non-Web Traffic Summary A summary of non-web Threat Prevention actions.
Web Top Scanned Threats The number of web scanned sessions to servers grouped by threat reputation.
Web Top Blocked Threats The number of web blocked sessions to servers grouped by threats reputation.
Web Top Scanned Categories The number of other scanned sessions to servers grouped by threat.
Web Top Blocked Categories The number of web sessions blocked grouped by threat.
Web Top Blocked Countries Top blocked web sessions to servers grouped by country.
Web Top Scanned Hosts The number of web scanned sessions grouped by server.
Web Top Blocked Hosts The number of web blocked session grouped by client.
Non-Web Top Scanned Threats (by client) The number of non-web scanned sessions from clients grouped by threat reputation.
Non-Web Top Blocked Threats (by client) The number of non-web blocked sessions from clients grouped by threat reputation.
Non-Web Top Scanned Threats (by server) The number of non-web scanned sessions to servers grouped by threat reputation.
Non-Web Top Blocked Threats (by server) The number of non-web blocked sessions to servers grouped by threat reputation.
Non-Web Top Scanned Categories (by client) The number of non-web scanned sessions from clients grouped by threat.
Non-Web Top Blocked Categories (by client) The number of non-web blocked sessions from clients grouped by threat.
Non-Web Top Scanned Categories (by server) The number of non-web scanned sessions to servers grouped by threat.
Non-Web Top Blocked Categories (by server) The number of non-web blocked sessions to servers grouped by threat.
Non-Web Top Blocked Countries (by client) Top non-web blocked sessions from clients grouped by country.
Non-Web Top Blocked Countries (by server) Top non-web blocked sessions to servers grouped by threat.
Non-Web Top Scanned Clients The number of non-web scanned session grouped by client.
Non-Web Top Blocked Clients The number of non-web blocked session grouped by client.
Non-Web Top Scanned Servers The number of non-web scanned sessions grouped by server.
Non-Web Top Blocked Server The number of non-web blocked session grouped by client.
All Web Events Shows all scanned web requests.
Blocked Web Events Shows all blocked web requests.
Non-Web All Events All non-web events are scanned by Threat Prevention.
Non-Web Blocked Events Non-web events are blocked by Threat Prevention.
The tables queried to render these reports:

Virus Blocker

Virus Blocker transparently scans your HTTP, FTP, and SMTP traffic to protect your network from viruses, trojans, and other malware. It scans within archives such as zip, rar, tar, gzip, bzip2 (and more).


As files are downloaded onto the network, Virus Blocker scans downloads using many technologies:
  1. It will collect metadata about the file and query the NG Firewall threat intelligence database for information about the file based on its fingerprint.
  2. A local scan using Bitdefender's signature database will run on the server while the cloud lookup is performed.
  3. A heuristic scan looks for suspicious patterns in executable files.
  4. Dynamic analysis is performed by evaluating code in an emulator and looking for malicious activity.

If the download fails any of the above tests, it is considered malware, and the download is blocked.

Settings

This section discusses the different settings and configuration options for virus scanners.

Status

This displays the current status and some statistics.

Figure 15. Virus Blocker Status

Scan Options

Scan options configure what network traffic and content to scan.
  • Scan HTTP: This turns HTTP scanning on or off.
  • Scan SMTP: This option enables the scanning of SMTP message attachments.
  • Action: If a virus is found, the selected action will be taken on a message.
  • Setting Action to Remove Infection will remove the infected attachment and wrap the original email for delivery to the intended recipient. If set to Pass Message, the original message will be wrapped and delivered with the attachment intact. In both cases, the subject line is prepended with "[VIRUS]." Block will block the message from being delivered.
  • Scan FTP: This turns scanning of FTP downloads on or off.
    Figure 16. Virus Blocker Scan Options

Pass Sites

This section allows you to specify sites that are not scanned. The list uses the Glob Matcher syntax.

Note: Use caution when adding sites to this list!
For each protocol, the behavior is as follows:
  • HTTP0: Match the HTTP Host header.
  • FTP: Match the server IP address or domain address (if a reverse DNS address exists).
  • Email: Match the client or server IP address or domain address (if a reverse DNS address exists).
    Figure 17. Virus Blocker Pass Sites

Advanced

Advanced settings can tune specific behavior of virus blockers.

The first option is to turn certain scanners on/off. When a virus blocker scans a file, it is scanned by multiple engines, a local antivirus engine, and the cloud ScoutIQ™ engine.

Using all available engines is recommended.

Figure 18. Virus Blocker Advanced

File Extensions

File extensions configure which HTTP files will be scanned. The defaults are the recommended values. However, in some cases, you may want to add or remove certain file extensions.

An understsanding of security tradeoffs and pragmatism is essential before changing these settings. Unlike other URL-based scanning of other apps like Web Filter, Virus Blocker runs an in-depth analysis of the file, including signatures, heuristics, and emulation. Unlike host-based antivirus, the gateway is a unique resource shared among the whole network, and it cannot scan on-exec as it does not know what the client plans to execute. Scanning is expensive, and turning on certain extensions (like .png files) can damage the network. Analyzing reports to see how many scans are being done and if those resources are being spent on worthwhile scan resources is a good exercise. It is common to see millions of scans of some application update.

MIME Types

Similar to file extensions, this lists the MIME types to be scanned, regardless of extension. The same logic and warnings apply here as well.

Virus Blocker Reports

The Reports tab provides a view of all reports and events for all traffic handled by Virus Blocker.

Reports

This application's reports can be accessed via the Reports tab at the top or the Reports tab within the settings. All pre-defined reports and custom reports created will be listed.

Reports can be searched and further defined using the time selectors and the Conditions window at the bottom of the page. The data used in the report can be obtained on the Current Data window on the right.

Pre-defined report queries:

Report Entry Description
Virus Blocker Web Summary A summary of virus blocking actions for web activity.
Virus Blocker FTP Summary A summary of virus blocking actions for FTP activity.
Virus Blocker Email Summary A summary of virus blocking actions for Email activity.
Web Usage (all) The amount of scanned and blocked web requests over time.
Web Usage (scanned) The amount of scanned web requests over time.
Web Usage (blocked) The amount of blocked web requests over time.
Web Top Blocked Viruses The top web virus is blocked.
Web Top Blocked Clients The top web clients by blocked virus count.
Web Top Blocked Sites The top web sites by blocked virus count.
Web Top Scanned Sites The top web sites by scan count.
FTP Usage (all) The amount of scanned and blocked FTP requests over time.
FTP Usage (scanned) The amount of scanned FTP requests over time.
FTP Usage (blocked) The amount of blocked FTP requests over time.
FTP Top Blocked Viruses The number of blocked viruses by FTP activity.
FTP Top Blocked Clients The number of clients with blocked viruses by FTP activity.
FTP Top Blocked Sites The number of clients with blocked viruses by FTP activity.
Email Usage (all) The amount of scanned and blocked email over time.
Email Usage (scanned) The amount of scanned email over time.
Email Usage (blocked) The amount of blocked email over time.
Email Top Blocked Viruses The number of blocked viruses by Email activity.
Email Top Blocked Clients The number of clients with blocked viruses by Email activity.
Email Top Blocked Sites The number of clients with blocked viruses by Email activity.
Scanned Web Events All HTTP sessions scanned by Virus Blocker.
Infected Web Events Infected HTTP sessions are blocked by Virus Blocker.
Clean Web Events Scanned HTTP sessions are marked clean.
Scanned Email Events All email sessions scanned by Virus Blocker.
Infected Email Events Infected email sessions are blocked by Virus Blocker.
Clean Email Events Scanned email sessions are marked clean.
Scanned FTP Events All FTP sessions scanned by Virus Blocker.
Infected FTP Events Infected FTP sessions are blocked by Virus Blocker.
Clean FTP Events Scanned FTP sessions are marked clean.
The tables queried to render these reports:

Related Topics

Virus Blocker Lite

Virus Blocker Lite transparently scans your HTTP, FTP, and SMTP traffic to protect your network from viruses, trojans, and other malware. It scans within archives such as zip, rar, tar, gzip, bzip2 (and more).

Virus Blocker Lite is based on an open-source virus scanner, Clam AV. Clam AV is well-known for its speed and accuracy.

Settings

This section discusses the different settings and configuration options available for the virus scanners.

Status

This displays the current status and some statistics.


Scan Options

Scan options configure what network traffic and content to scan.
  • Scan HTTP: This turns HTTP scanning on or off.
  • Scan SMTP: This option enables the scanning of SMTP message attachments.
  • Action: If a virus is found, the selected action will be taken on a message.
    1. Setting Action to Remove Infection will remove the infected attachment and wrap the original email for delivery to the intended recipient.
    2. If set to Pass Message, the original message will be wrapped and delivered with the attachment intact.
      Note: The subject line is prepended with [VIRUS] in both cases.
    3. Block will block the message from being delivered.
    4. Scan FTP: This turns scanning of FTP downloads on or off.

Pass Sites

This section allows you to specify sites that are not scanned. The list uses the Glob Matcher syntax.

Note: Use caution when adding sites to this list!
For each protocol, the behavior is as follows:
  • HTTP: Match the HTTP Host header.
  • FTP: Match the server IP address or domain address (if a reverse DNS address exists).
  • Email: Match the client or server IP address or domain address (if a reverse DNS address exists).

Advanced

Advanced settings can tune specific behavior of virus blockers.

The first option is to turn certain scanners on/off. When a virus blocker scans a file, it is scanned by multiple engines, a local antivirus engine, and the cloud ScoutIQ™ engine.

Using all available engines is recommended.


File Extensions

File extensions configure which HTTP files will be scanned. The defaults are the recommended values. However, in some cases, you may want to add or remove certain file extensions.

An understanding of security tradeoffs and pragmatism is essential before changing these settings. Unlike other URL-based scanning of other apps like Web Filter, Virus Blocker runs an in-depth analysis of the file, including signatures, heuristics, and emulation. Unlike host-based antivirus, the gateway is a unique resource shared among the whole network. Furthermore, unlike host-based antivirus, it cannot scan-on-exec as it has no knowledge of what the client plans to execute. Scanning is expensive, and turning on certain extensions (like .png files) can damage the network. Analyzing reports to see how many scans are being done and if those resources are being spent on worthwhile scan resources is a good exercise. It is common to see millions of scans of some application's update.

MIME Types

This is similar to file extensions, but it lists the MIME types to be scanned regardless of extension. The same logic and warnings apply here as well.

Virus Blocker Lite Reports

The Reports tab provides a view of all reports and events for all traffic handled by Virus Blocker Lite.

Reports

This applications reports can be accessed via the Reports tab at the top or the Reports tab within the settings. All pre-defined reports will be listed along with any custom reports that have been created.

Reports can be searched and further defined using the time selectors and the Conditions window at the bottom of the page. The data used in the report can be obtained on the Current Data window on the right.

Table 3. Pre-Defined Report Queries
Report Entry Description
Virus Blocker Lite Web Summary A summary of virus blocking actions for web activity.
Virus Blocker Lite FTP Summary A summary of virus blocking actions for FTP activity.
Virus Blocker Lite Email Summary A summary of virus blocking actions for Email activity.
Web Usage (all) The amount of scanned and blocked web requests over time.
Web Usage (scanned) The amount of scanned web requests over time.
Web Usage (blocked) The amount of blocked web requests over time.
Web Top Blocked Viruses The top web virus is blocked.
Web Top Blocked Clients The top web clients by blocked virus count.
Web Top Blocked Sites The top web sites by blocked virus count.
Web Top Scanned Sites The top web sites by scan count.
FTP Usage (all) The amount of scanned and blocked FTP requests over time.
FTP Usage (scanned) The amount of scanned FTP requests over time.
FTP Usage (blocked) The amount of blocked FTP requests over time.
FTP Top Blocked Viruses The number of clients with blocked viruses by FTP activity.
FTP Top Blocked Clients The number of clients with blocked viruses by FTP activity.
FTP Top Blocked Sites The number of clients with blocked viruses by FTP activity.
Email Usage (all) The amount of scanned and blocked email over time.
Email Usage (scanned) The amount of scanned email over time.
Email Usage (blocked) The amount of blocked email over time.
Email Top Blocked Viruses The number of blocked viruses by Email activity.
Email Top Blocked Clients The number of clients with blocked viruses by Email activity.
Email Top Blocked Sites The number of clients with blocked viruses by Email activity.
Scanned Web Events All HTTP sessions are scanned by Virus Blocker Lite.
Infected Web Events Infected HTTP sessions are blocked by Virus Blocker Lite.
Clean Web Events Scanned HTTP sessions are marked clean.
Scanned Email Events All email sessions are scanned by Virus Blocker Lite.
Infected Email Events Infected email sessions are blocked by Virus Blocker Lite.
Clean Email Events Scanned email sessions are marked clean.
Scanned FTP Events All FTP sessions are scanned by Virus Blocker Lite.
Infected FTP Events Infected FTP sessions are blocked by Virus Blocker Lite.
Clean FTP Events Scanned FTP sessions are marked clean.
The tables queried to render these reports:

Related Topics

Virus Blockers Common

This section discusses the different settings and configuration options available for the virus scanners.

Status

This displays the current status and some statistics.


Scan Options

Scan options configure what network traffic and content to scan.
  • Scan HTTP: This turns HTTP scanning on or off.
  • Scan SMTP: This option See rule description. The scanning of SMTP message attachments.
  • Action: If a virus is found, the selected action will be taken on a message.
    • Setting Action to Remove Infection will remove the infected attachment and wrap the original email for delivery to the intended recipient. If set to Pass Message, the original message will be wrapped and delivered with the attachment intact. In both cases, the subject line is prepended with "[VIRUS]." Block will block the message from being delivered.
  • Scan FTP: This turns scanning of FTP downloads on or off.

Pass Sites

This section allows you to specify sites that are not scanned. The list uses the Glob Matcher syntax.

Note: Use caution when adding sites to this list!
For each protocol, the behavior is as follows:
  • HTTP: Match the HTTP Host header.
  • FTP: Match the server IP address or domain address (if a reverse DNS address exists).
  • Email: Match the client or server IP address or domain address (if a reverse DNS address exists).

Advanced

Advanced settings can tune specific behavior of virus blockers.

The first option is to turn certain scanners on/off. When a virus blocker scans a file, it is scanned by multiple engines, a local antivirus engine, and the cloud ScoutIQ™ engine.

Using all available engines is recommended.


File Extensions

File extensions configure which HTTP files will be scanned. The defaults are the recommended values. However, in some cases, you may want to add or remove certain file extensions.

An understanding of security tradeoffs and pragmatism is essential before changing these settings. Unlike the other URL-based scanning of other apps like Web Filter, Virus Blocker runs in depth analysis of the file, including signatures, heuristics, and emulation. Unlike host-based antivirus, the gateway is a unique resource shared among the whole network, andit has no ability to scan-on-exec as it has no knowledge of what the client plans to execute, unlike host-based antivirus. Scanning is expensive, and turning on certain extensions (like .png files) can cripple the network. Analyzing reports to see how many scans are being done and if those resources are being spent on worthwhile scan resources is a good exercise. It is not uncommon to see millions of scans of some application's update.

MIME Types

Similar to file extensions, but this lists the MIME types to be scanned, regardless of extension. The same logic and warnings apply here as well.

NG Firewall Filter Apps

Ad Blocker

Ad Blocker allows you to block most advertising content delivered to users on web pages that they request.

Ad Blocker uses downloadable filter subscriptions from various sources, containing lists of websites and extensions typically used to deliver advertising.

Warning: Ad Blocker is similar to browser plugins that block ads (like AdBlockPlus Ghostery). Like those plugins, blocking ads and tracking can sometimes interfere with the proper functioning of online websites or media. However, Ad Blocker blocks the gateway, and the browser user cannot see that something has been blocked. It does not have any way to temporarily disable or bypass blocking if it interferes with the proper functioning of online services. As such, Ad Blocker can cause issues, and the browser user has no recourse. Running Ad Blocker can impose administrative overhead dealing with issues and is ideal for some environments (small sites, homes, enthusiasts, etc.) but is not recommended for others like schools, businesses, and large sites.
Warning: With the increasing adoption of SSL, ad blockers can do very little without SSL inspection, but running SSL inspection is not ideal for many organizations.
Warning: When the update button is pressed, it pulls new signatures directly from third-party sources. We have not tested any future updates and can not guarantee they will work correctly. Updates may interfere with the proper functioning of websites and potentially cause massive problems.
Warning: Unlike other apps, Ad Blocker is off by default after installation. Only enable Ad Blocker once you read the above warnings.

Settings

This section discusses the different settings and configuration options available for Ad Blocker.

Status

This displays the current status and some statistics.

Options

If Block Ads is enabled, then Ad Blocker will block web requests that it determines are for advertisements. It will return an HTTP 403 permission denied to the client that requests the ad.

If Block Tracking & Ad Cookies is enabled, Ad Blocker will block cookies used for advertising or behavior tracking purposes.

The Update button will update the ad filter signatures.

Warning: When the update button is pressed, it pulls new signatures directly from 3rd party sources. We have not tested any future updates and can not guarantee any future updates will work correctly. Updates may interfere with the proper functioning of websites and potentially cause massive problems.

Ad Filters

Ad Blocker's Standard Filters list will populate with many entries to match common ad serving strings. This list can not be modified, but you can enable or disable the rules here. You are free to add to and edit rules in the User Defined Filters tab, as you see fit - simply click Add and enter a description to match. Be careful when selecting blocking criteria, as you may block much more content than planned if your criteria are not carefully specified.

Cookie Filters

The Standard Cookie Filters list is populated with entries to match common cookie domains. This list can not be modified, but you can enable or disable the rules here. You can add to and edit rules in the User Defined Cookie Filters tab as you see fit.

Pass Lists

Pass Lists are used to pass content that would have otherwise been blocked. This can be useful for "unblocking" sitesyou don't want blocked or allowing certain users special privileges.
  • Passed Sites: Any domains you add to the Passed Sites list will allow ads and cookies, even if blocked by an existing filter - just add the domain and save. Unchecking the pass option will block ads as if the entry was not present.
  • Passed Client IPs: If you add an IP to this list, Ad Blocker will not block any ads or cookies from that IP. Just add the IP and save. Unchecking the pass option will have the block/pass lists affect the user as if they were not entered into the Passed Client IPs list.

Ad Blocker Reports

The Reports tab provides a view of all reports and events for all traffic handled by Ad Blocker.

Reports

You can access this application via the Reports tab at the top or the Reports tab within the settings. All pre-defined reports and custom reports created will be listed.

Reports can be searched and further defined using the time selectors and the Conditions window at the bottom of the page. The data used in the report can be obtained on the Current Data window on the right.

Pre-defined report queries:

Report Entry Description
Ad Blocker Summary A summary of ad blocker actions.
Ads Blocked The amount of detected and blocked ads over time.
Top Blocked Ad Sites The number of blocked ads grouped by website.
All Ad Events All HTTP requests are scanned by Ad Blocker.
Blocked Ad Events HTTP requests blocked by Ad Blocker.
Blocked Cookie Events Requests blocked by cookie filters.
The tables queried to render these reports:

Related Topics

Application Control

Application Control leverages the Network Application Visibility Library (NAVL) from Procera Networks https://www.sandvine.com/ to perform deep packet (DPI) and deep flow (DFI) inspection of network traffic. This allows the server to accurately identify thousands of today's common applications such as Social Networking, P2P, Instant Messaging, Video Streaming, File Sharing, Enterprise Applications, Web 2.0, and much more.


About Application Control

For most common applications, you can go to the list on the Applications tab and check Block for anything you want to stop. Then, Application Control will take care of the rest. You can use the Rules tab to create custom rules that target more complex traffic patterns if you need more control.

How It Works

Application Control feeds each chunk of data to a classification engine as it passes through the application. The classification engine continues to analyze the traffic flow and keeps properties of the session, such as the Application property. Each time the classification of the Application property is updated, the Applications settings are checked to see if that application is allowed. The data is blocked If the application is configured to be blocked in the settings. If not, the process continues until the session reaches a fully classified state, where the classification engine believes no more session classification is possible. At this point, the Rules are evaluated, and the session is ultimately blocked or passed based on the rules you've configured.

Settings

This section describes the different settings and configuration options available for Application Control.

Status

The Status tab displays a summary of traffic and configuration information. The Traffic Statistics section displays the total number of sessions that have been scanned and the number of those that were allowed, flagged, or blocked. The Application Statistics section shows you the total number of applications that can be detected by the application, along with the number of those protocols that will be flagged and/or blocked. Rules Statistics allows you to quickly see how many custom rules you have configured and how many of those rules are active.

Figure 1. Application Control Status

Applications

The Applications tab is the primary and preferred way for using Application Control to manage network traffic. Find the application you want to target and use the block and flag checkboxes as appropriate. You can sort the list on any of the columns displayed, which should help you find and manage the protocols you want to target. Check Block to stop these applications or Flag to allow them, silently filing them as violations in the Application Control Reports. Use the following definitions to set up the Applications tab for your organization:
  • Application: The unique identifier for the application.
  • Block: Enable this checkbox to block/reset this application's sessions. For TCP, this will actively reset the connection. The packet will be dropped for UDP, and the session will be killed.
  • Tarpit: Enable this checkbox to block/tarpit sessions of this application. For TCP, this makes it appear to both the client and the server that the other party is receiving the data, but it is not responsive. It silently drops the data. For UDP, it is identical in behavior to block, except the connection is kept open so that the next packet will be dropped instead of recategorized as a new session.
  • Flag: Enable the checkbox to flag the traffic. It will be flagged as a violation in Application Control Reports.
  • Name: The standard name for the application.
  • Category: A fairly general and high-level category for the application.
  • Productivity: Productivity is best thought of as an index value between 1 and 5 that rates the potential for each application to improve or increase the overall productivity of your network users, assuming, of course, that listening to music and playing online games is not in their job description. So, applications with a low Productivity index (e.g., MySpace, Hulu, Zynga Games) can be expected to hurt productivity. Items with a high value (e.g., Active Directory or Network File System) are critical for maintaining or improving productivity.
  • Risk: Risk is another index value between 1 and 5 that rates the potential for each protocol or application to allow nasty stuff onto your network. The higher the risk index, the greater the chance of letting in something that could be dangerous or destructive. So low-risk items (e.g., Active Directory, Oracle, LDAP) are generally no cause for concern, while applications rated with a high risk (e.g., BitTorrent, Pando, Usenet) increase the possibility you'll find yourself spending long nights deleting pirated software and cleaning up viruses and other exploits that find their way into your infrastructure.
  • Description: This section provides a more detailed description of each application on the list. In some cases, the description is much larger than will fit within the grid column, so you can click any description to see a pop-up window with the full text displayed.
    Figure 2. Application Control Applications

Rules

If the traffic you need to manage can't be handled via the Applications tab, you can create custom rules to analyze and control traffic based on more complex patterns and conditions. For each session, the rules are only evaluated once after the classification engine has completed an analysis of the traffic. The rules are then evaluated in order until the first match is found; at this point, the configured action will be performed. If there are no matches, the session will be tagged as allowed, the traffic will flow unimpeded, and no further analysis of that traffic will occur.

Note: These rules are evaluated when the classification engine has completed all analyses, which usually occurs after a few packets have passed. This means the rules are useful because enough has been learned about the session that was not known at the session creation time to have powerful rules, such as HTTP or protocol/application information. If the full classification is not completed after 15 chunks of data, then the rules are evaluated given the current information.

If an application is blocked or tarpitted in the Applications tab, it will be blocked immediately when identified before the engine has completed the analysis. In this case, the rules will have NO EFFECT because the sessions are blocked before the rules are evaluated.

Application Control Rules are a very powerful feature for controlling application usage. However, understanding how and when the rules are evaluated is essential for their use.

Figure 3. Application Control Rules


Anatomy of a Rule

An Application Control Rule is a standard rule documented in the Rules documentation. We'll use one of the default rule entries for Ultrasurf to help explain how Rules work. This is exactly the kind of traffic the Rules engine created to seek and destroy. For this particular rule, the objective is to block all traffic that:
  1. Uses port 443.
  2. Looks like valid HTTPS traffic.
  3. Don't use a valid SSL certificate.
To accomplish this, we created four matches:
  1. The first matcher makes sure the rule only looks at TCP traffic.
  2. The second causes the rule to only look at traffic with a destination port 443.
  3. The third matcher is where the real magic starts. In this case, we created a Glob matcher that looks for the /SSL tag anywhere in the Application Control/ProtoChain. (Don't worry, we'll cover globs and chains below!)
  4. The fourth matcher is the frosting on the cake. We tell the rule to look at the Application Control/Detail parameter. This is where the server name from the SSL certificate will be located when an SSL-encrypted session is detected. In this case, we left the Value field empty since we're looking for cases where there is no valid certificate.

Application Detail

The Detail field will contain different types of [#Is there a list of session properties? | information] depending on the protocols detected during session classification. The Detail field will be empty for matcher conditions other than those listed below.

Matcher Detail Contents Example
Application: FBOOKAPP The name of the Facebook Application that is being accessed. wordswithfriends
Application: HTTP The contents of the Content-Type header in the session data coming from the server. image/jpg
ProtoChain: */SSL* The server name extracted from the SSL certificate used to encrypt the session. www.gmail.com
Actions
  • Allow: Allow the traffic.
  • Block: When this option is selected, traffic in both directions will be silently dropped, but the session will remain active.

Application Control Reports

The Reports tab provides a view of all reports and events for all traffic handled by Application Control.

Reports

This application's reports can be accessed via the Reports tab at the top or the Reports tab within the settings. All pre-defined reports will be listed along with any custom reports that have been created.

Reports can be searched and further defined using the time selectors and the Conditions window at the bottom of the page. The data used in the report can be obtained on the Current Data window on the right.

Pre-defined report queries:

Report Entry Description
Application Control Summary A summary of Application Control actions.
Top Applications Usage The amount of bandwidth per top application.
Scanned Sessions (all) The amount of scanned, flagged, and blocked sessions over time.
Scanned Sessions (flagged) The amount of flagged, and blocked sessions over time.
Scanned Sessions (blocked) The amount of flagged, and blocked sessions over time.
Top Categories (by sessions) The number of sessions grouped by category.
Top Applications (by sessions) The number of sessions grouped by application.
Top Applications (by size) The number of bytes grouped by application.
Top Flagged Applications The number of flagged sessions grouped by application.
Top Blocked Applications The number of blocked sessions grouped by application.
Top Flagged Hostnames The number of flagged sessions grouped by hostname.
Top Blocked Hostnames The number of blocked sessions grouped by hostname.
Top Flagged Clients The number of flagged sessions grouped by client.
Top Blocked Clients The number of blocked sessions grouped by client.
Top Flagged Usernames The number of flagged sessions grouped by username.
Top Blocked Usernames The number of blocked sessions grouped by username.
Classified Sessions All sessions matching an application control signature.
Flagged Sessions All sessions matching an application control signature and flagged.
Blocked Sessions All sessions matching an application control signature and blocked.
All Sessions All sessions scanned by Application Control.
The tables queried to render these reports:

Application Control Lite

Application Control Lite scans sessions for the specified signatures and will log and/or block sessions based on their content. Many applications can be hard to block based on port, as modern applications will find and use open ports automatically. Application Control Lite provides a basic functionality to block sessions based on the content (data) in the session.

Settings

This section reviews the different settings and configuration options for Application Control Lite.

Status

The Status tab will show you current information on signatures- Available, Logged, and Blocked.


Signatures

The Signatures tab shows the list of current signatures. Signatures are regular expressions written to match known protocols as accurately as possible.

As the early data in each session goes from the server to the client and the client to the server, it is stored in a buffer. As each chunk of data arrives, the data is evaluated against any enabled signatures. If the signature is checked as "log," the session will be tagged and logged as having matched the specified signature. If the signature is checked as "block," it will be logged, and the session will immediately be closed.

Writing custom signatures can be dangerous and difficult. Usually, one of several outcomes will happen when writing a block signature:
  • It will not match anything. In this case, the signature needs to be fixed.
  • It will block the desired protocol/application and nothing else. This is ideal.
  • It will only partially block the protocol. Many multi-session protocols only have some sessions identified. This can have varying effects depending on the application.
  • It will block the protocol and other things (false positives), which can cause major problems with the network.
  • It will block the protocol, and the application will adapt and use an alternative protocol to communicate. Many applications will try alternative techniques to avoid blocking.

As such, great care and expertise are involved in writing signatures to achieve the desired effect.

Note: Application Control Lite, while powerful, can be difficult, time-consuming, and dangerous to configure correctly. Application Control is recommended for most users as it comes preloaded with hundreds of maintained and current behavioral signatures and a commercial third-party application identification engine.
Warning: There was a default signature set in previous and older versions of the NG Firewall. However, enabling block on some default signatures caused false positives and blocked legitimate network traffic. Despite big warnings in the user interface and help documentation, we found users often misconfigured Application Control Lite anyway and experienced network problems. To avoid this issue, there are now no default signatures. You can download the original list of signatures if you have read this warning and understand that misconfiguring Application Control Lite will cause major network connectivity issues.

Reporting

The Reports tab provides a view of all reports and events for all traffic handled by Application Control Lite.

Application Control Lite Reports

The Reports tab provides a view of all reports and events for all traffic handled by Application Control Lite.

Reports

You can access the applications reports via the Reports tab at the top or the Reports tab within the settings. All pre-defined reports will be listed along with any custom reports that have been created.

Reports can be searched and further defined using the time selectors and the Conditions window at the bottom of the page. The data used in the report can be obtained on the Current Data window on the right.

Pre-defined report queries:

Report Entry Description
Application Control Lite Summary A summary of Application Control Lite actions.
Detection Statistics The number of logged and blocked sessions over time.
Top Blocked Protocols The top blocked sessions by protocol.
Top Logged Protocols The top logged sessions by protocol.
Top Blocked Hosts The top blocked sessions by host.
Top Logged Hosts The top logged sessions by host.
Top Blocked Users The top blocked sessions by user.
Top Logged Users The top logged sessions by user.
All Events All sessions are scanned by Application Control Lite.
Blocked Events All sessions matching an application signature and blocked.
The tables queried to render these reports:

SSL Inspector

The SSL Inspector is a special application that allows other NG Firewall applications that process HTTP traffic to process encrypted HTTPS traffic and applications that process SMTP to also process SMTP over SSL. It does this by performing man-in-the-middle decryption and encryption of SSL traffic, passing the unencrypted traffic through the NG Firewall server for inspection by other applications and services.


About SSL Inspector

When a client makes an HTTPS request, the Inspector first initiates a secure SSL connection with the external server on behalf of the client. While this session is being established, the inspector captures the server SSL certificate information. Once the server session is active, the Inspector uses the details from the server certificate to create a new certificate that will be used to encrypt the session between the inspector and the client. This certificate is generated or loaded on the fly and created using the same subject details in the server certificate. The certificate is signed by the internal CA on the NG Firewall server and is used to establish a secure connection between the inspector and the client. Creating the certificate this way is necessary to eliminate security warnings on the client. Still, it does require a few extra steps to configure the client computers and devices on your network properly. See the SSL Certificates section below for details.

SSL Certificates

SSL Certificates serve two primary purposes. They allow traffic between the client and server to be encrypted, and they allow the client to validate the server's authenticity. There are two main ways the client checks the authenticity of the server certificate. The first is validating the server certificate to ensure it has been issued or signed by a known and trusted third-party certificate authority. Once that trust has been established, the client checks the server name portion of the target URL to ensure it matches the server name registered in the certificate presented by the server. If either of these checks fails, the client will typically display a warning, indicating that the connection's security may be compromised.

When the NG Firewall server is initially installed, a default Certificate Authority is automatically created and used to sign the man-in-the-middle certificates created by the SSL Inspector. To view or make changes to the internal Certificate Authority, check out the Certificates tab of the Config/Administration page.

Config > Administration > Certificates

Client Configuration

For the client authenticity checks to be successful, the client must be configured to trust the root certificate used by the NG Firewall server to sign the man-in-the-middle certificates described above. To configure clients, you must first use the Download Root Certificate button located on the Configuration tab of the SSL Inspector Settings page to download the root certificate. You must then install this certificate to correct the client's location.

Another way to download the root certificate is to access a special URL using the IP address of the NG Firewall server:

http://yourserver/cert

Simply replace 0.0.0.0 with the IP address of your NG Firewall server. This method is especially useful when using mobile devices. For example, accessing this URL on an iPad or iPhone will download and display the certificate and provide an option to install and trust the certificate directly on the device.

Below are basic instructions for installing the root certificate on some common client platforms. If yours needs to be listed, or you need any help, consult the reference material for the target platform for further information.

Internet Explorer or Google Chrome on Microsoft Windows

Follow the below steps:
  1. Log into the NG Firewall server running SSL Inspector.
  2. Go to Config > Administration > Certificates and download the certificate using the "Download Root Certificate Authority (CA)" button.
  3. Copy the root_authority.crt you just downloaded to the Windows client computer.
  4. From a command prompt or Start/Run, run the command "certmgr. msc".
  5. Open the "Trusted Root Certification Authorities" tree in the panel on the left.
  6. Right-click on Certificates and select All Tasks > Import .
  7. Proceed with the Certificate Import Wizard, selecting the root_authority.crt file.

Firefox on Microsoft Windows

Follow the below steps:
  1. Log into the NG Firewall server running SSL Inspector.
  2. Go to Config > Administration > Certificates and download the certificate using the "Download Root Certificate Authority (CA)" button.
  3. Copy the root_authority.crt you just downloaded to the Windows client computer.
  4. Launch Firefox.
  5. From the Tools menu, go to Options > Privacy & Security .
  6. Click the Import button and select the root_authority.crt file.
  7. Enable the "Trust this CA to identify websites" checkbox and click the OK button.

Opera on Microsoft Windows

Follow the below steps:
  1. Log into the NG Firewall server running SSL Inspector.
  2. Go to Config > Administration > Certificates and download the certificate using the Download Root Certificate Authority (CA) button.
  3. Copy the root_authority.crt you just downloaded to the Windows client computer.
  4. Launch Opera.
  5. From the Tools menu, go to Preferences > Advanced > Security and click Manage Certificates.
  6. Select the Authorities tab, click Import, and select the root_authority.crt file.
  7. Click Install and click OK if you want to trust the certificate.

Group Policy Distribution

Suppose you have a fully deployed and implemented Active Directory infrastructure. In that case, you can leverage the Group Policy model to distribute the NG Firewall root certificate to your client computers. This is outside our expertise, so we can only help or assist. Still, we have compiled links to some TechNet articles with instructions for several common versions of Windows Server.

Windows Server 2003

Windows Server 2008

Windows Server 2012

Settings

This section describes the different settings and configuration options available for SSL Inspector.

Status

This displays the current status and some statistics.

Figure 4. SSL Inspector Status

Configuration

Execute the following configurations:

Download Root Certificate

As described above, client computers and devices on your network need to be configured to trust the root certificate of the NG Firewall server. Clicking this button will allow you to download the root certificate. Once downloaded, you need to install it in the Trusted Authorities certificate store on your client computers and devices. Note that this is the same root certificate that can be downloaded from the Config > Administration > Certificates page. The download link is included on the SSL Inspector Configuration page for convenience.

Alternatively, you can download the certificate from a client system by navigating to http://yourserver/cert.

Enable SMTPS Traffic Processing

This option is enabled by default and allows the SSL Inspector to work cooperatively with the other applications that act on SMTP mail traffic. When enabled, port 25 mail sessions that use STARTTLS will be decrypted inbound, allowing the clear traffic to pass through all other applications, and re-encrypted again before passing outbound.

Enable HTTPS Traffic Processing

This option is enabled by default and allows the SSL Inspector to work cooperatively with the other applications that act on HTTP web traffic. When enabled, port 443 web sessions that use SSL/TLS will be decrypted inbound, allowing the clear traffic to pass through all other applications and then re-encrypted again before passing outbound.

Block Invalid HTTPS Traffic

When processing a new HTTPS session, the inspector first analyzes the initial client computer request to see if it contains a valid SSL negotiation message. If not, the session will be ignored by default, and the traffic will flow directly between the client and server without inspection. By enabling this checkbox, you can change the default behavior and effectively block any port 443 traffic that does not contain a valid HTTPS signature.

Client/Server Connection Protocols

This section includes checkboxes for turning SSL and TLS protocols on and off to negotiate secure HTTPS and SMTPS inbound and outbound connections. The client protocols are used when the server is communicating with a client. The server protocols are used when the server is communicating with a server.
  • SSLv2Hello - This is really a legacy handshake protocol that is used between a client and server when deciding which encryption protocol to use. This means it's possible to enable SSLv2Hello and still have a TLSv1.x connection negotiated. While there are no known security issues, we still recommend leaving this disabled unless you specifically need this legacy support.
  • SSLv3 - This is an older protocol that is been deprecated since the discovery of the POODLE vulnerability. For that reason, we recommend this be disabled for maximum security.
  • TLSv1 - This is an older protocol that has some known weaknesses. These can be mitigated if the other side of the connection forces certain secure ciphers to be used. However, since this can only be guaranteed, the best practice is to disable this protocol if it is required to support connections with legacy clients or servers.
  • TLSv1.1 - This is a modern protocol that is generally regarded as secure and is used as a fallback for 1.2 or in older browsers.
  • TLSv1.2 - This is the most common and recommended TLS version.
  • TLSv1.3- This is the most recent version of the TLS protocol and offers the highest security but may have issues with some websites.

Trust All Server Certificates

Normally, when establishing an SSL connection with an external web server, the inspector will authenticate the server certificate against a standard list of trusted certificate authorities. If this trust cannot be established, the inspector will end the session. By enabling this checkbox, you can force the inspector to blindly trust all external server certificates.

Note that we DO NOT recommend running with this option enabled, as it exposes all HTTPS traffic to significant security risks.

The standard list of trusted certificates used by NG Firewall is generated from the standard ca-certificates package. It includes, among others, certificate authorities used by Mozilla's browsers. Please note that Edge Threat Management staff can neither confirm nor deny whether the certificate authorities whose certificates are included in this list have in any way been audited for trustworthiness or RFC 3647 compliance. The local system administrator is fully responsible for assessing them.

Upload Trusted Certificate

Note:This setting applies to all policies when using SSL Inspector with Policy Manager.

The inspector emulates a web browser when it makes outbound connections to external web servers. Just like a web browser, it must verify the authenticity of the server certificate before it will trust the connection and allow traffic to flow freely. As mentioned above, the inspector uses a standard list of known certificate authorities to validate server certificates. However, it's also possible you have servers in your network that use certificates that can't be authenticated this way. Perhaps you have your certificate authority or use self-signed certificates. Whatever the reason, you can use this section of the configuration page to upload additional certificates you want the inspector to trust.

Figure 5. SSL Inspector Configuration

Rules

The Rules tab allows you to specify explicit rules to Inspect or Ignore HTTPS traffic that crosses the NG Firewall. By default, many common HTTPS sites (Google, YouTube, Yahoo, and so on) are inspected, but not all HTTPS. This provides a safe default which provides HTTPS inspection on those sites without interfering with other HTTPS communications. It can easily be configured to inspect all HTTPS by enabling the "Inspect All Traffic" rule.

The Rules describe how rules work and how they are configured. SSL Inspector uses rules to determine if it should inspect or ignore traffic for the specific session.

In addition to all the common rule types, three are unique to the SSL Inspector, and these can be very useful for ignoring traffic that you don't want to inspect, or that isn't compatible with the SSL Inspector.

HTTPS: SNI Hostname

Most web browsers and many client applications include the destination hostname in the initial packet of an HTTPS session. The mechanism is called the Server Name Indication or the SNI extension to the TLS protocol. The main purpose is to allow a single web server to host multiple secure web sites. By analyzing the SNI hostname in the client request, the server can decide which SSL certificate to use to encrypt the session. This extension is necessary because the encryption must be established long before the server ever sees the HTTP request, and by then, it would be too late to use a different certificate.

Creating ignore rules based on the SNI hostname is an effective way to have the SSL Inspector ignore incompatible traffic. A prime example is the default rule for Microsoft Update. The Microsoft Update client checks the server certificate to ensure it was signed by a specific authority. Since it doesn't trust the Root Authority the SSL Inspector uses to generate certificates on the fly, Microsoft Update will fail with an error. The default rule allows this traffic to be detected and ignored, allowing Microsoft Update to work properly.

HTTPS: Certificate Subject and HTTPS: Certificate Issuer

These two rule conditions are useful when dealing with client applications that don't use SNI and aren't compatible with SSL Inspector. An excellent example is the Dropbox client utility, for which there is also a default rule. Like Microsoft Update, the Dropbox client will reject SSL certificates it doesn't explicitly trust.

Using either of these rule conditions, you can match traffic on any portion of the Subject or Issuer Distinguished Name (DN) included in the server certificate. In both cases, the information in the match string includes the standard information fields commonly stored within the SSL certificates, such as CN (common name), C (country), ST (state), L (locality), O (organization), and OU (organizational unit). Each of these is appended to the match string and separated by commas. Not all fields are required in all certificates, and some certificates may have others not listed. The order they occur in the match string is also not guaranteed.

The Subject DN generally includes information about the company to which the certificate was issued. Here is an example Certificate Subject:
CN=*.dropbox.com, O="Dropbox, Inc.", L=San Francisco, ST=California, C=US
The Issuer DN generally includes information about the company that issued and authenticated the certificate. Here is an example Certificate Issuer:
CN=Thawte SSL CA, O="Thawte, Inc.", C=US
Rule Actions
  • Inspect: Causes the traffic that matches the rule to be decrypted and passed along to other applications and services for further inspection, classification, and possible action.
  • Ignore: Causes the traffic that matches the rule to be ignored by the SSL Inspector.
    Figure 6. SSL Inspector Rules

SSL Inspector Reports

The Reports tab provides a view of all reports and events for all traffic handled by HTTPS Inspector.

Reports

This application's reports can be accessed via the Reports tab at the top or the Reports tab within the settings. All pre-defined reports and custom reports created will be listed.

You can search and defined Reports using the time selectors and the Conditions window at the bottom of the page. The data used in the report can be obtained on the Current Data window on the right.

Pre-defined report queries:

Report Entry Description
SSL Inspector Summary A summary of SSL Inspector actions.
Sessions Scanned The amount of SSL sessions over time.
Sessions Inspected The amount of inspected SSL sessions over time.
Top Inspected Sites The number of inspected sessions grouped by site.
Top Ignored Sites The number of ignored sessions grouped by site.
All Sessions All sessions detected by SSL Inspector.
Inspected Sessions Events where traffic was fully processed by the inspector, and all traffic was passed through all the other applications and services.
Ignored Sessions Events where traffic was not or could not be inspected, so the traffic was completely ignored and not analyzed by any applications or services.
Blocked Sessions Events where traffic was blocked because it did not contain a valid SSL request and the Block Invalid Traffic option was enabled.
Untrusted Sessions Events where traffic was blocked because the server certificate could not be authenticated.
Abandoned Sessions Events where traffic was blocked due to an underlying problems with the SSL session.

The tables queried to render these reports:

Status

The status of the session that generated the event.
  • INSPECTED means the session was fully processed by the inspector, and all traffic was passed through all the other applications and services.
  • IGNORED means the session was not or could not be inspected, so the traffic was completely ignored and not analyzed by any applications or services.
  • BLOCKED means the traffic was blocked because it did not contain a valid HTTPS request, and the Block Invalid Traffic option was enabled.
  • UNTRUSTED means the traffic was blocked because the server certificate could not be authenticated.
  • ABANDONED means the connection failed because an underlying SSL connection problem. Usually, the client abandoned the connection because the certificate was not trusted.

Detail

Extra details about the session, with the exact content dependent on the event status.

For INSPECTED and UNTRUSTED sessions, this field will include the SNI hostname extracted from the initial message sent from the client to the server. If the SNI information is not available, the server IP address will be used instead.

For BLOCKED or IGNORED sessions, this field will contain the description of the rule that matched and was applied to the session.

For ABANDONED sessions, the detail will usually record information about the error that caused the inspection to fail. For SSL exceptions, this will include the Client or Server to indicate the session endpoint for which traffic was being processed. It will also include Encrypt or Decrypt to indicate the state of traffic inspection when the exception occurred. If available, the SSL error message will also be included. The following table lists the most common error messages and detailed information about each one.

Table 1. SSL Exception Messages
SSL Exception Messages Description
unexpected_message An inappropriate message was received. This alert is always fatal and should never be observed in communication between proper implementations.
bad_record_mac This alert is returned if a record is received with an incorrect MAC. This alert also MUST be returned if an alert is sent because a TLSCiphertext decrypted in an invalid way: either it wasn't an even multiple of the block length, or its padding values, when checked, weren't correct. This message is always fatal and should never be observed in communication between proper implementations (except when messages were corrupted in the network).
decryption_failed This alert was used in some earlier versions of TLS, and may have permitted certain attacks against the CBC mode [CBCATT]. It MUST NOT be sent by compliant implementations.
record_overflow A TLSCiphertext record was received that had a length more than 2^14+2048 bytes, or a record decrypted to a TLSCompressed record with more than 2^14+1024 bytes. This message is always fatal and should never be observed in communication between proper implementations (except when messages were corrupted in the network).
decompression_failure The decompression function received improper input (e.g., data that would expand to excessive length). This message is always fatal and should never be observed in communication between proper implementations.
handshake_failure Reception of a handshake_failure alert message indicates that the sender was unable to negotiate an acceptable set of security parameters given the options available. This is a fatal error.
no_certificate This alert was used in SSLv3 but not any version of TLS. It MUST NOT be sent by compliant implementations.
bad_certificate A certificate was corrupt, contained signatures that did not verify correctly, etc.
unsupported_certificate A certificate was of an unsupported type.
certificate_revoked A certificate was revoked by its signer.
certificate_expired A certificate has expired or is not currently valid.
certificate_unknown Some other (unspecified) issue arose in processing the certificate, rendering it unacceptable.
illegal_parameter A field in the handshake was out of range or inconsistent with other fields. This message is always fatal.
unknown_ca A valid certificate chain or partial chain was received, but the certificate was not accepted because the CA certificate could not be located or couldn't be matched with a known, trusted CA. This message is always fatal.
access_denied A valid certificate was received, but when access control was applied, the sender decided not to proceed with negotiation. This message is always fatal.
decode_error A message could not be decoded because some field was out of the specified range or the length of the message was incorrect. This message is always fatal and should never be observed in communication between proper implementations (except when messages were corrupted in the network).
decrypt_error A handshake cryptographic operation failed, including being unable to correctly verify a signature or validate a Finished message. This message is always fatal.
export_restriction This alert was used in some earlier versions of TLS. It MUST NOT be sent by compliant implementations.
protocol_version The protocol version the client has attempted to negotiate is recognized but not supported. (For example, old protocol versions might be avoided for security reasons.) This message is always fatal.
insufficient_security Returned instead of handshake_failure when a negotiation has failed specifically because the server requires ciphers more secure than those supported by the client. This message is always fatal.
internal_error An internal error unrelated to the peer or the correctness of the protocol (such as a memory allocation failure) makes it impossible to continue. This message is always fatal.
user_canceled This handshake is being canceled for some reason unrelated to a protocol failure. If the user cancels an operation after the handshake is complete, just closing the connection by sending a close_notify is more appropriate. This alert should be followed by a close_notify. This message is generally a warning.
no_renegotiation Sent by the client in response to a hello request or by the server in response to a client hello after initial handshaking. Either of these would normally lead to renegotiation; when that is not appropriate, the recipient should respond with this alert. At that point, the original requester can decide whether to proceed with the connection. One case where this would be appropriate is where a server has spawned a process to satisfy a request; the process might receive security parameters (key length, authentication, etc.) at startup, and it might be difficult to communicate changes to these parameters after that point. This message is always a warning.
unsupported_extension sent by clients that receive an extended server hello containing an extension that they did not put in the corresponding client hello. This message is always fatal.

Related Topics

Spam Blocker

Spam Blocker is an intelligent email filter that identifies and handles spam (unsolicited bulk email). It leverages technology from the https://spamassassin.apache.org/ project and improves upon it by integrating a commercial spam engine. It can scan any email that is transported via SMTP.

Spam Blocker transparently scans email transported over SMTP on the way to your mail server (or outbound if configured so). It does not require reconfiguring your DNS MX records or the email server. Any SMTP traffic going through the NG Firewall server will be scanned.

Settings

This section discusses the different settings and configuration options available for Spam Blocker.

Status

This displays the current status and some statistics.


Email

These settings apply only to the SMTP protocol.
  • Scan SMTP: This turns SMTP scanning on or off.
  • Strength: If the Spam Score of a message is equal to or greater than this setting, your chosen action will be taken regarding the message. Higher values make Spam Blocker more sensitive to spam.
  • Action: The action was taken regarding the message if the spam score is high enough.
  • If set to Mark, "[Spam]..." will be prepended to the email subject line and delivered. If set to Pass, the message will be delivered as originally sent. The drop will inform the sending server the mail was successfully delivered, but the NG Firewall will drop the mail, so it is never delivered. Quarantine will send the mail to users' email quarantine for them to release or delete as they see fit. For more information, refer to Quarantine.
  • Drop Super Spam: If this option is enabled, any emails with a score greater than the Super Spam score will be dropped.
  • Super Spam Score: The score emails must reach to be dropped as Super Spam.
  • Advanced SMTP Configuration
    Important: The default values are the suggested values. Changing and customizing settings can cause Spam Blocker to perform less than optimally.
    • Enable tarpitting: This option enables Tarpit. If enabled, when an SMTP session is first caught, the Spam Blocker will check if the client's IP is on a Domain Name System BLocklist (DNSBL). If it is, the session is rejected before the remote server can send the email. This increases the capacity of a given server by quite a bit and can also save bandwidth. Still, it can increase false positives if the remote email server has mistakenly been put on a blacklist. This setting will not increase spam scanning accuracy - it will decrease it as it will prevent valuable super-spam training data from reaching the spam engine. Enabling this feature gives you lower spam accuracy but increased email scanning capacity.
    • Enable greylisting: This option enables greylisting. If enabled, each time a new sender tries to send mail to a specific receiver, it will receive a "421 Please try again" error. The second time, mail will be allowed. Greylisting will reduce spam because spammers often won't retry transmissions as they should, or the extra time delay will increase the chances of the spam engine properly identifying new spam waves. However, greylisting adds a delay to all legitimate emails. This setting is not suggested for most sites because of the complications.
    • Add email headers: When enabled, NG Firewall adds information about the Spam Score and the test run to get that score to the message's headers.
    • Close connection on scan failure: This option will close the connection if the scan fails, so the message will be resent and retested. If disabled, a scan failure will allow the email to be delivered without being scanned.
    • Scan outbound (WAN) SMTP: If unchecked, outbound mail (mail-in sessions going out a WAN interface) will not be scanned. If checked, outbound mail will be scanned just like incoming mail.
    • Allow and ignore TLS sessions: This option controls the allowance of TLS sessions. If unchecked (the default), the TLS advertisement (if present) is removed from the server advertisements, and TLS is not allowed in any scanned sessions. If checked, the TLS advertisement is allowed, and if the client initialized TLS, the message will pass through completely unscanned, even if it is spam.
    • CPU Load Limit: If your CPU load exceeds this number, incoming connections will be stopped until the load decreases. This is specified so that spam scanning can not monopolize the server resources.
    • Concurrent Scan Limit: This is the maximum number of messages that can be scanned simultaneously. It is specified so that spam scanning does not monopolize server resources.
    • Message Size Limit: This option allows you to change the maximum size of a message that will be scanned for spam. The default maximum size is 256KB. Spam will typically be much smaller, as spammers rely on the number of messages sent.
      Note: This does not control the message size limit of messages passed through the NG Firewall. It does not affect the maximum size of the message your server will accept, only the limit on the size of the message that will be checked for spam.

Spam Blocker Reports

The Reports tab provides a view of all reports and events for all traffic Spam Blocker handles.

Reports

You can access the application's reports via the Reports tab at the top or the Reports tab within the settings. All pre-defined reports will be listed along with any custom reports that have been created.

You can search and defined using the time selectors and the Conditions window at the bottom of the page. The data used in the report can be obtained on the Current Data window on the right.

Pre-defined report queries:

Report Entry Description
Spam Blocker Summary A summary of spam blocking actions for email activity.
Email Usage (all) The amount of scanned, clean, and spam email over time.
Email Usage (scanned) The amount of scanned email over time.
Email Usage (clean) The amount of clean email over time.
Email Usage (spam) The amount of spam email over time.
Spam Ratio The ratio of spam (true) to ham (false)
Top Spam Recipients The number of email addresses with spam.
Top Spam Sender Addresses The number of IP addresses sending spam.
All Email Events All emails are scanned by Spam Blocker.
All Spam Events All emails are marked as Spam.
Quarantined Events All emails are marked as Spam and quarantined.
Tarpit Events All email sessions that were tarpitted.
The tables queried to render these reports:

Spam Blocker Lite

Spam Blocker Lite is an intelligent email filter that identifies spam (unsolicited bulk email). It leverages technology from the https://spamassassin.apache.org/ project. It can scan any email that is transported via SMTP.

Spam Blocker Lite transparently scans email transported over SMTP on the way to your mail server (or outbound if configured so). It does not require any reconfiguration of DNS MX records or any email servers. Any SMTP traffic going through the NG Firewall server will be scanned.

Settings

This section discusses the different settings and configuration options available for Spam Blocker Lite.

Status

This displays the current status and some statistics.


Email

These settings apply only to the SMTP protocol.
  • Scan SMTP: This turns SMTP scanning on or off.
  • Strength: If the spam score of a message is equal to or greater than this setting, your chosen action will be taken regarding the message. Higher values make Spam Blocker more sensitive to spam.
  • Action: The action was taken regarding the message if the spam score is high enough.
  • If set to Mark, "[Spam]..." will be prepended to the email subject line and delivered. If set to Pass, the message will be delivered as originally sent. The drop will inform the sending server the mail was successfully delivered, but the NG Firewall will drop the mail, so it is never delivered. Quarantine will send the mail to users' email quarantine for them to release or delete as they see fit. For more information, refer to Quarantine.
  • Drop Super Spam: If this option is enabled, any emails with a score greater than the Super Spam score will be dropped.
  • Super Spam Score: The score emails must reach to be dropped as Super Spam.
  • Advanced SMTP Configuration:
    Note: The default values are the suggested values. Changing and customizing settings can cause Spam Blocker to perform less than optimally.
    1. Enable tarpitting: This option enables Tarpit. If enabled, when an SMTP session is first caught, the Spam Blocker will check if the client's IP is on a Domain Name System BLocklist (DNSBL). If it is, the session is rejected before the remote server can send the email. This increases the capacity of a given server by quite a bit and can also save bandwidth. Still, it can increase false positives if the remote email server has mistakenly been put on a blacklist. This setting will not increase spam scanning accuracy - it will decrease it as it will prevent valuable super-spam training data from reaching the spam engine. Enabling this feature gives you lower spam accuracy but increased email scanning capacity.
    2. Add email headers: When enabled, NG Firewall adds information about the Spam Score and the test run to get that score to the message's headers.
    3. Close connection on scan failure: This option will close the connection if the scan fails so that the message will be resent and retested. If disabled, a scan failure will allow the email to be delivered without being scanned.
    4. Scan outbound (WAN) SMTP: If unchecked, outbound mail (mail-in sessions going out a WAN interface) will not be scanned. If checked, outbound mail will be scanned just like incoming mail.
    5. Allow and ignore TLS sessions: This option controls the allowance of TLS sessions. If unchecked (the default), the TLS advertisement (if present) is removed from the server advertisements, and TLS is not allowed in any scanned sessions. If checked, the TLS advertisement is allowed, and if the client initializes TLS, the message will pass through completely unscanned, even if it is spam.
    6. CPU Load Limit: If your CPU load exceeds this number, incoming connections will be stopped until the load decreases. This is specified so that spam scanning can not monopolize the server resources.
    7. Concurrent Scan Limit: This is the maximum number of messages that can be scanned simultaneously. It is specified so that spam scanning does not monopolize server resources.
    8. Message Size Limit: This option allows you to change the maximum size of a message that will be scanned for spam. The default maximum size is 256KB. Spam will typically be much smaller, as spammers rely on the number of messages sent.
      Note: This does not control the message size limit of messages passed through the NG Firewall. It does not affect the maximum size of message your server will accept, only the limit on the size of message that will be checked for spam.

Spam Blocker Lite Reports

The Reports tab provides a view of all reports and events for all traffic handled by Spam Blocker Lite.

Reports

This applications reports can be accessed via the Reports tab at the top or the Reports tab within the settings. All pre-defined reports will be listed along with any custom reports that have been created.

Reports can be searched and further defined using the time selectors and the Conditions window at the bottom of the page. The data used in the report can be obtained on the Current Data window on the right.

Pre-defined report queries:

Report Entry Description
Spam Blocker Lite Summary A summary of spam blocking actions for email activity.
Email Usage (all) The amount of scanned, clean, and spam email over time.
Email Usage (scanned) The amount of scanned email over time.
Email Usage (clean) The amount of clean email over time.
Email Usage (spam) The amount of spam email over time.
Spam Ratio The ratio of spam (true) to ham (false)
Top Spam Recipients The number of email addresses with spam.
Top Spam Sender Addresses The number of IP addresses sending spam.
All Email Events All emails are scanned by Spam Blocker.
All Spam Events All emails are marked as Spam.
Quarantined Events All emails are marked as Spam and quarantined.
Tarpit Events All email sessions that were tarpitted.
The tables queried to render these reports:

Web Filter

Web Filter monitors HTTP and HTTPS traffic on your network to filter and log web activities and block inappropriate content. Web Filter also appeals to customers who require an added level of protection or are subject to regulations; for example, Web Filter helps libraries comply with the Children's Internet Protection Act). Need to block Pornography or Hate Speech on your network? Web Filter is your answer.


About Web Filter

  • Real-time classification and updates: When users visit a site, NG Firewall sends the URL to the Webroot BrightCloud® to be categorized. When the data is returned, the NG Firewall keeps a temporary local cache of the site and category to speed up the process the next time the URL is requested. This data is then used to flag or allow users access to the site they have requested, all without any appreciable increase in load time. If a site is not categorized upon request, it is auto-categorized by our partners at Webroot and put into a queue to be verified by a human. Because this is done dynamically, new sites and updated URLs are allowed or flagged according to your settings without additional intervention; plus, you can request https://www.brightcloud.com/tools/url-ip-lookup.php of sites.
  • HTTPS Filtering: Web Filters have multiple techniques to deal with HTTPS SSL-encrypted HTTP. HTTPS traffic is encrypted, so only some information is visible, and this information is used to categorize the session. More information on how this works is below.
  • Detailed categorization: Web Filter offers 79 categories and tens of billions of URLs. The Web Filter database is over 100 times larger and more accurate. The abundance of categories means that you can narrow your scope—maybe you want to flag websites related to nudity but allow sites dealing with sexual education.
  • Advanced features: Force safe Search on search engines, filter and log user searches, restrict Google domains, and more!

Traffic Flow

When scanning traffic, Web Filter evaluates the pass lists, block lists, categories, and rules at two distinct points of the HTTP transaction. The first evaluation happens after the client receives the request and before it is forwarded to the server. The second is after the response is received from the server and before it is passed back to the client. This allows a high degree of filtering and control over both requested resources and Content returned in response.

HTTP Request

When evaluating HTTP requests, Web Filter applies the configured rules and lists in the following order:
  1. A lookup is performed to determine the category for the requested site. The category is attached to the session for use by Web Filter as well as other applications.
  2. The request's source IP is checked against the Pass Clients list. If a match is found, the traffic is allowed.
  3. The request's destination site is checked against the Pass Sites list. If a match is found, the traffic is allowed.
  4. If 'Restrict Google applications' is enabled, the appropriate header is added to the request using the 'Allowed Domains' configured.
  5. If 'Pass if a referrer matches any Pass Sites' is enabled, the referrer is checked against the Pass Sites list. If a match is found, the traffic is allowed.
  6. If the Unblock option is enabled, the request's destination site and source IP are checked against the unblock list. If a match is found, the traffic is allowed.
  7. If 'Block pages from IP only hosts' is enabled, the request will be evaluated and blocked if the destination is an IP address.
  8. The request's destination site is checked against the Block Sites list. If a match is found, the traffic is blocked.
  9. The traffic details are passed to the Rules list. If a match is found, the traffic is allowed, flagged, or blocked based on the options configured in the rule that was matched.
  10. The category determined in Step 1 is compared to the Categories list, and the traffic is allowed, flagged, or blocked based on the corresponding match. If the category cannot be determined, the traffic is allowed.

HTTP Response

When evaluating HTTP responses, Web Filter applies the configured rules and lists in the following order:
  1. The request's source IP is checked against the Pass Clients list. If a match is found, the traffic is allowed.
  2. The site from which the response was received is checked against the Pass Sites list. If a match is found, the traffic is allowed.
  3. If the Unblock option is enabled, the site from which the response was received and the client IP are checked against the Unblock list. If a match is found, the traffic is allowed.
  4. The traffic details are passed to the Rules list. If a match is found, the traffic is allowed, flagged, or blocked based on the options configured in the rule that was matched.

Settings

This section discusses the different settings and configuration options available for Web Filter.

Status

This displays the current status and some statistics.

Figure 7. Web Filter Status

Categories

Categories enable you to customize which categories of sites will be blocked or flagged. Blocked categories will display a block page to the user; flagged categories will allow the user to access the site but will be silently flagged as a violation for event logs and Reports. These block/flag actions operate similarly for all Web Filter options.

Figure 8. Web Filter Categories

Search Terms

Search Terms filtering enables you to flag or block specific search terms your users perform on popular search sites, including Google, Bing, Ask, Yahoo, and YouTube. For example, if someone searches Google and includes the word "suicide" or searches for "twerking" videos on YouTube, you can have these activities flagged or blocked.

Under Search Filter, you can add terms you want to be blocked or flagged. Search Filter terms use the Glob Matcher syntax.

Figure 9. Web Filter Search Terms

In many cases, you may have an existing list of search terms that you want to import. For example, you can find several banned words on Facebook, YouTube, WordPress, and other sources. Full List of Bad Words and Top Swear Words Banned by Google Block Facebook, YouTube. The import feature lets you import these lists from a comma-separated or newline delimited file. You can also import it in JSON format if you transfer a list from another NG Firewall.

Note: SSL Inspector must be installed and enabled to use search filtering.

Site Lookup

Site Lookup allows you to find a URL's categorization. Clicking it brings up a dialog. In Site URL, specify the URL to find and click Search to find the URL's categorization.

If you feel the current categorization is incorrect, check Suggest a different category, select a new category from the list, and click Suggest to submit the category change for consideration.

Note: This is only a suggestion. It will trigger the URL categorization provider to recategorize all categories for the URL.
Figure 10. Web Filter Site Lookup

Block Sites

Under Block Sites, you can add individual domain names you want to be blocked or flagged - enter the domain name (e.g., youtube.com) and specify your chosen action. This list uses URL Matcher syntax.

Figure 11. Web Filter Block Sites

Pass Sites

Pass Sites is used to pass Content that would have otherwise been blocked. This can be useful for "unblocking" sites you don't want to be blocked according to block settings. Any domains you add to the Passed Sites list will be allowed, even if blocked by category or by individual URL - add the Domain and save. Unchecking the pass option will allow the site to be blocked as if the entry was not present. This list uses URL Matcher syntax.

Figure 12. Web Filter Pass Sites

Pass Clients

If you add an IP address to this list, Web Filter will not block any traffic from that IP regardless of the blocked categories or sites. Just add the IP and save. Unchecking the pass option will have the block/pass lists affect the user as if they were not entered into the Passed Client IPs list. This list uses IP Matcher syntax.

Consider using pass lists if you have a few users who must bypass Web Filter controls completely. If you have users needing different Web Filter settings, you should set up a separate policy using Policy Manager. When using this feature, please remember that DHCP IPs can change, so you'll probably want to set up a Static IP or a Static DHCP Lease for the machine in question.

Figure 13. Web Filter Pass Clients

Rules

The Rules tab allows you to specify rules to Block or Flag traffic that passes through Web Filter.

The Rules describe how rules work and how they are configured. Web Filter uses rules to determine whether to block or flag a specific session. Flagging a session marks it in the logs for review in the event logs or reports but has no direct effect on the network traffic.

Figure 14. Web Filter Rules

Rule Actions
  • Flag: This allows the traffic that matches the rule to flow and flags the traffic for easier viewing in the event log.
  • Block: Blocks the traffic that matches the rule.

Rule Types

In previous versions of Web Filter, there were dedicated lists for blocking certain file extensions or MIME types. This capability is still available when using more flexible filter rules. To block specific file extensions, you can create a rule with the condition HTTP: Response File Extension that has a comma-separated list of the extensions to block in the Value field. You would create a rule for blocking MIME types with the condition HTTP: Content Type with a comma-separated list of the content types to block in the Value field.

Below are tables listing the default file extensions and MIME types available in previous versions. Note that these lists are not exhaustive but are included here to simplify the creation of such rules by copying and pasting the values in the tables.

Extension Category Description
exe executable an executable file format
ocx executable an executable file format
dll executable an executable file format
cab executable an ActiveX executable file format
bin executable an executable file format
com executable an executable file format
jpg image an image file format
png image an image file format
gif image an image file format
jar java a Java file format
class java a Java file format
swf flash the flash file format
mp3 audio an audio file format
wav audio an audio file format
wmf audio an audio file format
mpg video a video file format
mov video a video file format
avi video a video file format
hqx archive an archived file format
cpt compression a compressed file format
Content Category Description
application/octet-stream unspecified data byte stream
application/x-msdownload Microsoft download executable
application/exe executable executable
application/x-exe executable executable
application/dos-exe DOS executable executable
application/x-winexe Windows executable executable
application/msdos-windows MS-DOS executable executable
application/x-msdos-program MS-DOS program executable
application/x-oleobject Microsoft OLE Object executable
application/x-java-applet Java Applet executable
audio/mpegurl MPEG audio URLs audio
audio/x-mpegurl MPEG audio URLs audio
audio/mp3 MP3 audio audio
audio/x-mp3 MP3 audio audio
audio/mpeg MPEG audio audio
audio/mpg MPEG audio audio
audio/x-mpeg MPEG audio audio
audio/x-mpg MPEG audio audio
application/x-ogg Ogg Vorbis audio
audio/m4a MPEG 4 audio audio
audio/mp2 MP2 audio audio
audio/mp1 MP1 audio audio
application/ogg Ogg Vorbis audio
audio/wav Microsoft WAV audio
audio/x-wav Microsoft WAV audio
audio/x-pn-wav Microsoft WAV audio
audio/aac Advanced Audio Coding audio
audio/midi MIDI audio audio
audio/mpeg MPEG audio audio
audio/aiff AIFF audio audio
audio/x-aiff AIFF audio audio
audio/x-pn-aiff AIFF audio audio
audio/x-pn-windows-acm Windows ACM audio
audio/x-pn-windows-pcm Windows PCM audio
audio/basic 8-bit u-law PCM audio
audio/x-pn-au Sun audio audio
audio/3gpp 3GPP audio
audio/3gpp-encrypted encrypted 3GPP audio
audio/scpls streaming mp3 playlists audio
audio/x-scpls streaming mp3 playlists audio
application/smil SMIL audio
application/sdp Streaming Download Project audio
application/x-sdp Streaming Download Project audio
audio/amr AMR codec audio
audio/amr-encrypted AMR encrypted codec audio
audio/amr-wb AMR-WB codec audio
audio/amr-wb-encrypted AMR-WB encrypted codec audio
audio/x-rn-3gpp-amr 3GPP codec audio
audio/x-rn-3gpp-amr-encrypted 3GPP-AMR encrypted codec audio
audio/x-rn-3gpp-amr-wb 3gpp-AMR-WB codec audio
audio/x-rn-3gpp-amr-wb-encrypted 3gpp-AMR_WB encrypted codec audio
application/streamingmedia Streaming Media audio
video/mpeg MPEG video video
audio/x-ms-wma Windows Media video
video/quicktime QuickTime video
video/x-ms-asf Microsoft ASF video
video/x-msvideo Microsoft AVI video
video/x-sgi-mov SGI movie video
video/3gpp 3GPP video video
video/3gpp-encrypted 3GPP encrypted video video
video/3gpp2 3GPP2 video video
audio/x-realaudio RealAudio audio
text/vnd.rn-realtext RealText text
audio/vnd.rn-realaudio RealAudio audio
audio/x-pn-realaudio RealAudio plug-in audio
image/vnd.rn-realpix RealPix image
application/vnd.rn-realmedia RealMedia video
application/vnd.rn-realmedia-vbr RealMedia VBR video
application/vnd.rn-realmedia-secure secure RealMedia video
application/vnd.rn-realaudio-secure secure RealAudio audio
audio/x-realaudio-secure secure RealAudio audio
video/vnd.rn-realvideo-secure secure RealVideo video
video/vnd.rn-realvideo RealVideo video
application/vnd.rn-realsystem-rmj RealSystem media video
application/vnd.rn-realsystem-rmx RealSystem secure media video
audio/rn-mpeg MPEG audio audio
application/x-shockwave-flash Macromedia Shockwave multimedia
application/x-director Macromedia Shockwave multimedia
application/x-authorware-bin Macromedia Authorware binary multimedia
application/x-authorware-map Macromedia Authorware shocked file multimedia
application/x-authorware-seg Macromedia Authorware shocked packet multimedia
application/futuresplash Macromedia FutureSplash multimedia
application/zip ZIP archive
application/x-lzh LZH archive archive
image/gif Graphics Interchange Format image
image/png Portable Network Graphics image
image/jpeg JPEG image
image/bmp Microsoft BMP image
image/tiff Tagged Image File Format image
image/x-freehand Macromedia Freehand image
image/x-cmu-raster CMU Raster image
image/x-rgb RGB image image
text/css cascading style sheet text
text/html HTML text
text/plain plain text text
text/richtext rich text text
text/tab-separated-values tab separated values text
text/xml XML text
text/xsl XSL text
text/x-sgml SGML text
text/x-vcard vCard text
application/mac-binhex40 Macintosh BinHex archive
application/x-stuffit Macintosh Stuffit archive archive
application/macwriteii MacWrite Document document
application/applefile Macintosh File archive
application/mac-compactpro Macintosh Compact Pro archive
application/x-bzip2 block compressed compressed
application/x-shar shell archive archive
application/x-gtar gzipped tar archive archive
application/x-gzip gzip compressed compressed
application/x-tar 4.3BSD tar archive archive
application/x-ustar POSIX tar archive archive
application/x-cpio old cpio archive archive
application/x-bcpio POSIX cpio archive archive
application/x-sv4crc System V cpio with CRC archive
application/x-compress UNIX compressed compressed
application/x-sv4cpio System V cpio archive
application/x-sh UNIX shell script executable
application/x-csh UNIX csh script executable
application/x-tcl Tcl script executable
application/x-javascript JavaScript executable
application/x-excel Microsoft Excel document
application/mspowerpoint Microsoft Powerpoint document
application/msword Microsoft Word document
application/wordperfect5.1 Word Perfect document
application/rtf Rich Text Format document
application/pdf Adobe Acrobat document
application/postscript Postscript document

Advanced

The Advanced section enables you to configure additional web filter options.
  • Secure Name Indication Process HTTPS traffic by SNI (Server Name Indication) if present: If this option is enabled, HTTPS traffic will be categorized using the "Server Name Indication" in the HTTPS data stream, if present. More details in HTTPS Options.
  • Process HTTPS traffic by hostname in server certificate when SNI information is not present: If this option is enabled and SNI information is not present, the certificate is fetched from the HTTPS server, and the server name on the certificate will be used for categorization and filtering purposes.
  • Process HTTPS traffic by server IP if SNI and certificate hostname information are unavailable: If this option is enabled and neither of the previous options works, HTTPS traffic will be categorized using the IP address. More details in HTTPS Options.
Safe Browsing
  • Enforce safe Search on popular search engines: When this option is enabled, safe Search will be enforced on all searches using supported search engines: Google, Yahoo!, Bing, and Ask.
  • Enforce restrict mode on YouTube: When this option is enabled, restrict mode will be enforced on all YouTube content.
  • Force searches through kid-friendly search engines: When this option is enabled, all searches in popular search engines will be redirected through https://www.kidzsearch.com/. KidzSearch is a visual child-safe search engine and web portal powered by Google Custom Search with academic auto-complete that emphasizes safety for children.
Note: SSL Inspector must be installed and enabled to use all Safe browsing options.
Block Options
  • Block QUIC Sessions (UDP port 443): Web Filter prevents browsers from using the QUIC protocol if enabled. The Chrome browser uses QUIC to access many types of Google applications and services. By allowing QUIC, NG Firewall has less visibility and control over this type of traffic.
  • Block pages from IP-only hosts: When this option is enabled, users entering an IP address rather than a domain name will be blocked.
  • Pass if the referrer matches any Pass Sites: When this option is checked, if a site allowed via a Pass Site entry links to external Content using a referrer, that external Content will be passed regardless of Category settings. Please note that this setting requires SSL Inspector to work with HTTPS sites; many sites no longer use referrers.
  • Close connection for blocked HTTPS sessions without redirecting to the block page: If enabled, secure sites blocked by Web Filter do not redirect the user to a denial page and close the connection without any notice to the user. This is useful when you are not using SSL Inspector, and the server's root certificate authority is not installed on the client device.
Google Restrictions
  • Restrict Google applications: Only domains listed in Domain can access Google applications such as Gmail when this option is enabled. Google blocks all others. Multiple domains can be specified and separated by commas, such as google.com and domain.com. This adds an X-GoogApps-Allowed-Domains header to web requests, which is enforced on Google's servers. More information on this feature can be found https://support.google.com/a/answer/1668854?hl=en.
Note: SSL Inspector must be installed and enabled to restrict Google applications.

Custom Block Page

  • Custom block page URL: Set an external location where to redirect users when they are denied access to a web site by Web Filter. This is useful if you want to use your own server to process the denial in a different way than the built-in denial options.

    The following query string variables are passed to the forward location so the receiving system can process the information.

    Variable Description
    reason The reason the user was denied access.
    appname The NG Firewall app that is responsible for the denial.
    appid The ID of the NG Firewall app that is responsible for the denial.
    clientAddress The IP Address of the denied device.
    url The denied URL that the user requested.
Unblock Options
  • Unblock: This section can be used to add a button to allow users to bypass restrictions on a case-by-case basis.

    If Unblock is set to None, no users will be allowed to bypass the block page. If Unblock is set to Temporary, users will be allowed to visit the site for one hour from the time it is unblocked. If Unblock is set to Permanent and Global, then users will be allowed to visit the site and unblocked sites will be added to the permanent global pass list so it will always be allowed in the future.

    You also have the option of setting a password to Unblock; it can either be the existing Administrator password for the NG Firewall or you can set a new, separate password only for the Unblock feature.

  • Clear Category URL Cache: This option will clear the local cache of categorized sites and URLs. After clearing the cache all new web visits will be looked up fresh using the categorization service. The cache automatically cleans itself as entries become old or stale, so this is mostly for testing.
    Figure 15. Web Filter Advanced Tab

HTTPS Options

There are many ways to handle HTTPS.

If SSL Inspector is installed and inspects a session, then it is fully decrypted to HTTP before Web Filter processes the session. In this case HTTPS is treated identically to HTTP. If SSL Inspector is not installed or the session is not inspected, there are still several techniques to handle encrypted HTTP sessions.

There are three HTTPS options.
  • Process HTTPS traffic by SNI (Server Name Indication) if present.
  • Process HTTPS traffic by hostname in server certificate when SNI information not present
  • Process HTTPS traffic by server IP if both SNI and certificate hostname information are not available.

If Process HTTPS traffic by SNI (Server Name Indication) if present encrypted port-443 traffic will be scanned. Most modern browsers on modern OSs will send the hostname of the server in cleartext - this is called "Server Name Indication" or SNI. SNI is an optional cleartext field in the HTTPS request that shows the hostname of the server. If this option is enabled and the SNI information is present in the HTTPS request, this hostname will be used as the URL for this request and all categorization, flag lists, and pass lists, will be processed as if this were a regular HTTP request to that URL.

If the SNI-based categorization determines the page should be passed (and/or flagged) then the session is allowed and the appropriate event based on the SNI information is logged ("https://example.com/").

For example, if the user visits "https://wellsfargo.com/welcome" in the browser, "wellsfargo.com" is seen as the SNI information. If SNI-based categorization is enabled, the request will be handled exactly like "http://wellsfargo.com" would be. If Web Filter is configured to flag "Financial Services" , then "https://wellsfargo.com/welcome" will be flagged, unless "wellsfargo.com" is in the pass list or the client IP address is in the client IP pass list.

If No SNI information is present and Process HTTPS traffic by hostname in server certificate when SNI information not present is enabled, then the hostname will be pulled from the certificate presented to the client.

For example, if the user visits "https://wellsfargo.com/welcome" in a non-SNI enabled browser, then there is no SNI information. In this case if Process HTTPS traffic by hostname in server certificate when SNI information not present is enabled it will use the certificate information instead to categorize the session. It will download the certificate from the site and see that the certificate is "Issued To" "www.wellsfargo.com." It will use this information to check the category for "https://www.wellsfargo.com" and categorize the session.

If no SNI or certificate information was available and Process HTTPS traffic by server IP if both SNI and certificate hostname information are not available the session will be processed and categorized by IP address. If the IP-based processing and categorization of the web requests determines the session should be flagged, the session is reset and no more processing of this session will be done. If the IP-based processing and categorization determines the page should be passed (and/or flagged) then the session is allowed and the appropriate event based on its IP is logged ("https://1.2.3.4").

For example, if the user visits "https://wellsfargo.com/welcome" in a non-SNI enabled browser, then there is no SNI information. If the the certificate information was missing for some reason then this session can only be identified by IP address. In this case if Process HTTPS traffic by server IP if both SNI and certificate hostname information are not available is enabled it will use the IP address instead. So it will process/categorize this web request as 'http://1.2.3.4' if 1.2.3.4 is the IP of wellsfargo.com. This will still often result in correct categorization for dedicated web servers, but does poorly when using generic cloud computing servers that offer a wide variety of websites.

Note: Neither HTTPS processing (SNI, certificate, or IP-based categorization) can read the URI information as it is not sent in cleartext. As such the URI will not be used as part of the categorization and the URI is assumed to be "/" when evaluating pass rules. If scanning the URI is necessary then full SSL Inspection may be required.

To see the HTTPS categorization in action use the "All HTTPS Events" query in the event log.

Web Filter Reports

The Reports tab provides a view of all reports and events for all traffic handled by Web Filter.

Reports

This applications reports can be accessed via the Reports tab at the top or the Reports tab within the settings. All pre-defined reports will be listed along with any custom reports that have been created.

Reports can be searched and further defined using the time selectors and the Conditions window at the bottom of the page. The data used in the report can be obtained on the Current Data window on the right.

Pre-defined report queries:

Report Entry Description
Web Filter Summary A summary of web filter actions.
Web Usage The amount of total, flagged, and blocked web requests over time.
Web Usage (scanned) The amount of total, flagged, and blocked web requests over time.
Web Usage (flagged) The amount of flagged, and blocked web requests over time.
Web Usage (blocked) The amount of flagged, and blocked web requests over time.
Top Categories (by request) The number of web requests grouped by category.
Top Categories (by size) The sum of the size of requested web content grouped by category.
Top Flagged Categories The number of flagged web requests grouped by category.
Top Blocked Categories The number of blocked web requests grouped by category.
Top Sites (by request) The number of web requests grouped by website.
Top Sites (by size) The sum of the size of requested web content grouped by website.
Top Flagged Sites The number of flagged web requests grouped by website.
Top Blocked Sites The number of blocked web requests grouped by website.
Top Domains (by request) The number of web requests grouped by domain.
Top Domains (by size) The sum of the size of requested web content grouped by domain.
Top Flagged Domains The number of flagged web requests grouped by domain.
Top Blocked Domains The number of blocked web requests grouped by domain.
Top Domains Usage The amount of web requests per top domain.
Top Hostnames (by requests) The number of web requests grouped by hostname.
Top Hostnames (by size) The sum of the size of requested web content grouped by hostname.
Top Flagged Hostnames The number of flagged web request grouped by hostname.
Top Blocked Hostnames The number of blocked web request grouped by hostname.
Top Clients (by requests) The number of web requests grouped by client.
Top Clients (by size) The sum of the size of requested web content grouped by client.
Top Flagged Clients The number of flagged web request grouped by client.
Top Blocked Clients The number of blocked web request grouped by client.
Top Usernames (by requests) The number of web requests grouped by username.
Top Usernames (by size) The sum of the size of requested web content grouped by username.
Top Flagged Usernames The number of flagged web request grouped by username.
Top Blocked Usernames The number of blocked web request grouped by username.
Top Content (by request) The number of web requests grouped by category.
Top Content (by size) The sum of the size of requested web content grouped by category.
Top Searches The number of non blocked, non-flagged search queries grouped by term.
Top Flagged Searches The number of flagged search queries grouped by term.
Top Blocked Searches The number of blocked search queries grouped by term.
All Web Events Shows all scanned web requests.
Flagged Web Events Shows all flagged web requests.
Blocked Web Events Shows all blocked web requests.
All HTTP Events Shows all scanned unencrypted HTTP requests.
All HTTPS Events Shows all encrypted HTTPS requests.
Unblocked Web Events Shows all unblocked web requests
All Search Events Shows all search queries processed by Web Filter.
Flagged Search Events Shows flagged search queries processed by Web Filter.
Blocked Search Events Shows blocked search queries processed by Web Filter.
The tables queried to render these reports:

Related Topics

Web Monitor

Web Monitor monitors HTTP and HTTPS traffic on your network to log web activities and flag inappropriate content.


About Web Monitor

  • Real-time classification and updates: When users visit a site, NG Firewall sends the URL to the Webroot BrightCloud® to be categorized. When the data is returned, the NG Firewall keeps a temporary local cache of the site and category to speed up the process the next time the URL is requested. This data is then used to flag or See rule description. Users access the site they have requested, all without any appreciable increase in load time. If a site is not categorized upon request, it is auto-categorized by our partners at Webroot and put into a queue to be verified by a human. Because this is done dynamically, new sites and updated URLs are allowed or flagged according to your settings without additional intervention; plus, you can request https://www.brightcloud.com/tools/url-ip-lookup.php of sites.
  • HTTPS Filtering: Web Monitor has multiple techniques for dealing with HTTPS SSL-encrypted HTTP. Because HTTPS traffic is encrypted, only some information is visible, and this information is used to categorize the session. More information on how this works is below.
  • Detailed categorization: Web Monitor offers 79 categories and tens of billions of URLs. The Web Monitor database is over 100 times larger and more accurate. The abundance of categories means that you can narrow your scope—maybe you want to flag websites related to nudity but allow sites dealing with sexual education.

Traffic Flow

When scanning traffic, Web Monitor evaluates the pass lists, flag lists, categories, and rules at two distinct points of the HTTP transaction. The first evaluation happens after the client computer receives the request and before it is forwarded to the server. The second is after the response is received from the server and before it is passed back to the client. This allows a high degree of monitoring over both requested resources and content returned in response.

HTTP Request

When evaluating HTTP requests, Web Monitor applies the configured rules and lists in the following order:
  1. A lookup is performed to determine the category for the requested site. The category is attached to the session for use by Web Monitor as well as other applications.
  2. The request's source IP is checked against the Pass Clients list. If a match is found, the traffic is allowed.
  3. The request's destination site is checked against the Pass Sites list. If a match is found, the traffic is allowed.
  4. The request's destination site is checked against the Flag Sites list. If a match is found, the traffic is flagged.
  5. The traffic details are passed to the Rules list. If a match is found, the traffic is allowed and possibly flagged based on the options configured in the matched rule.
  6. The category determined in step #1 is compared to the Categories list, and based on the corresponding match, traffic is allowed and possibly flagged. If the category cannot be determined, traffic is allowed.

HTTP Response

When evaluating HTTP responses, Web Monitor applies the configured rules and lists in the following order:
  1. The request's source IP is checked against the Pass Clients list. If a match is found, the traffic is allowed.
  2. The site from which the response was received is checked against the Pass Sites list. If a match is found, the traffic is allowed.
  3. The traffic details are passed to the Rules list. If a match is found, the traffic is allowed and possibly flagged based on the options configured in the matched rule.

Settings

This section discusses the different settings and configuration options available for Web Monitor.

Status

This displays the current status and some statistics.

Figure 16. Web Monitor Status

Categories

Categories allow you to customize which categories of sites will be flagged. Flagged categories allow the user to access the site but will be silently flagged as a violation of event logs and Reports. These flag actions operate similarly for all the different Web Monitor options.

Figure 17. Web Monitor Categories

Flag Sites

Under Flag Sites, you can add individual domain names you want to be flagged - enter the domain name (e.g., youtube.com) and specify your chosen action. This list uses URL Matcher syntax.

Figure 18. Web Monitor Flag Sites

Pass Sites

Pass Sites is used to pass content that would have otherwise been flagged. This can be useful for "unflagging" sites that you don't want to be flagged according to flag settings. Any domains you add to the Passed Sites list will be allowed, even if flagged by category or individual URL - add the domain and save. Unchecking the pass option will flag the site as if the entry was absent. This list uses URL Matcher syntax.

Figure 19. Web Monitor Pass Sites

Pass Clients

If you add an IP address to this list, Web Monitor will not flag any traffic from that IP regardless of the flagged categories or sites. Just add the IP and save. Unchecking the pass option will have the flag/pass lists affect the user as if they were not entered into the Passed Client IPs list. This list uses IP Matcher syntax.

Consider using pass lists if you have a few users who need to bypass Web Monitor controls completely. You should set up a separate rack using Policy Manager if users need different Web Monitor settings. When using this feature, please remember that DHCP IPs can change, so you'll probably want to set up a Static IP or a Static DHCP Lease for the machine in question.

Figure 20. Web Monitor Pass Clients

Rules

The Rules tab allows you to specify rules for flag traffic that passes through Web Monitor.

The Rules section describes how rules work and how they are configured. Web Monitor uses rules to determine when to flag specific sessions. Flagging a session marks it in the logs for review in the event logs or reports but has no direct effect on network traffic.

Figure 21. Web Monitor Rules

Rule Actions
  • Flag: Allows the traffic which matched the rule to flow, and flags the traffic for easier viewing in the event log.

Rule Types

In previous versions of Web Monitor, there were dedicated lists for flagging certain file extensions or MIME types. This capability is still available when using more flexible filter rules. For flagging specific file extensions, you can create a rule with the condition Web Filter: Response File Extension that has a comma-separated list of the extensions to flag in the Value field. For flagging MIME types, you would create a rule with the condition Web Filter: Response Content Type that has a comma-separated list of the content types to flag in the Value field.

Below are tables listing the default file extensions and MIME types available in previous versions. Note that these lists are not exhaustive but are included here to simplify the creation of such rules by copying and pasting the values in the tables.

Extension Category Description
exe executable an executable file format
ocx executable an executable file format
dll executable an executable file format
cab executable an ActiveX executable file format
bin executable an executable file format
com executable an executable file format
jpg image an image file format
png image an image file format
gif image an image file format
jar java a Java file format
class java a Java file format
swf flash the flash file format
mp3 audio an audio file format
wav audio an audio file format
wmf audio an audio file format
mpg video a video file format
mov video a video file format
avi video a video file format
hqx archive an archived file format
cpt compression a compressed file format
Content Category Description
application/octet-stream unspecified data byte stream
application/x-msdownload Microsoft download executable
application/exe executable executable
application/x-exe executable executable
application/dos-exe DOS executable executable
application/x-winexe Windows executable executable
application/msdos-windows MS-DOS executable executable
application/x-msdos-program MS-DOS program executable
application/x-oleobject Microsoft OLE Object executable
application/x-java-applet Java Applet executable
audio/mpegurl MPEG audio URLs audio
audio/x-mpegurl MPEG audio URLs audio
audio/mp3 MP3 audio audio
audio/x-mp3 MP3 audio audio
audio/mpeg MPEG audio audio
audio/mpg MPEG audio audio
audio/x-mpeg MPEG audio audio
audio/x-mpg MPEG audio audio
application/x-ogg Ogg Vorbis audio
audio/m4a MPEG 4 audio audio
audio/mp2 MP2 audio audio
audio/mp1 MP1 audio audio
application/ogg Ogg Vorbis audio
audio/wav Microsoft WAV audio
audio/x-wav Microsoft WAV audio
audio/x-pn-wav Microsoft WAV audio
audio/aac Advanced Audio Coding audio
audio/midi MIDI audio audio
audio/mpeg MPEG audio audio
audio/aiff AIFF audio audio
audio/x-aiff AIFF audio audio
audio/x-pn-aiff AIFF audio audio
audio/x-pn-windows-acm Windows ACM audio
audio/x-pn-windows-pcm Windows PCM audio
audio/basic 8-bit u-law PCM audio
audio/x-pn-au Sun audio audio
audio/3gpp 3GPP audio
audio/3gpp-encrypted encrypted 3GPP audio
audio/scpls streaming mp3 playlists audio
audio/x-scpls streaming mp3 playlists audio
application/smil SMIL audio
application/sdp Streaming Download Project audio
application/x-sdp Streaming Download Project audio
audio/amr AMR codec audio
audio/amr-encrypted AMR encrypted codec audio
audio/amr-wb AMR-WB codec audio
audio/amr-wb-encrypted AMR-WB encrypted codec audio
audio/x-rn-3gpp-amr 3GPP codec audio
audio/x-rn-3gpp-amr-encrypted 3GPP-AMR encrypted codec audio
audio/x-rn-3gpp-amr-wb 3gpp-AMR-WB codec audio
audio/x-rn-3gpp-amr-wb-encrypted 3gpp-AMR_WB encrypted codec audio
application/streamingmedia Streaming Media audio
video/mpeg MPEG video video
audio/x-ms-wma Windows Media video
video/quicktime QuickTime video
video/x-ms-asf Microsoft ASF video
video/x-msvideo Microsoft AVI video
video/x-sgi-mov SGI movie video
video/3gpp 3GPP video video
video/3gpp-encrypted 3GPP encrypted video video
video/3gpp2 3GPP2 video video
audio/x-realaudio RealAudio audio
text/vnd.rn-realtext RealText text
audio/vnd.rn-realaudio RealAudio audio
audio/x-pn-realaudio RealAudio plug-in audio
image/vnd.rn-realpix RealPix image
application/vnd.rn-realmedia RealMedia video
application/vnd.rn-realmedia-vbr RealMedia VBR video
application/vnd.rn-realmedia-secure secure RealMedia video
application/vnd.rn-realaudio-secure secure RealAudio audio
audio/x-realaudio-secure secure RealAudio audio
video/vnd.rn-realvideo-secure secure RealVideo video
video/vnd.rn-realvideo RealVideo video
application/vnd.rn-realsystem-rmj RealSystem media video
application/vnd.rn-realsystem-rmx RealSystem secure media video
audio/rn-mpeg MPEG audio audio
application/x-shockwave-flash Macromedia Shockwave multimedia
application/x-director Macromedia Shockwave multimedia
application/x-authorware-bin Macromedia Authorware binary multimedia
application/x-authorware-map Macromedia Authorware shocked file multimedia
application/x-authorware-seg Macromedia Authorware shocked packet multimedia
application/futuresplash Macromedia FutureSplash multimedia
application/zip ZIP archive
application/x-lzh LZH archive archive
image/gif Graphics Interchange Format image
image/png Portable Network Graphics image
image/jpeg JPEG image
image/bmp Microsoft BMP image
image/tiff Tagged Image File Format image
image/x-freehand Macromedia Freehand image
image/x-cmu-raster CMU Raster image
image/x-rgb RGB image image
text/css cascading style sheet text
text/html HTML text
text/plain plain text text
text/richtext rich text text
text/tab-separated-values tab separated values text
text/xml XML text
text/xsl XSL text
text/x-sgml SGML text
text/x-vcard vCard text
application/mac-binhex40 Macintosh BinHex archive
application/x-stuffit Macintosh Stuffit archive archive
application/macwriteii MacWrite Document document
application/applefile Macintosh File archive
application/mac-compactpro Macintosh Compact Pro archive
application/x-bzip2 block compressed compressed
application/x-shar shell archive archive
application/x-gtar gzipped tar archive archive
application/x-gzip gzip compressed compressed
application/x-tar 4.3BSD tar archive archive
application/x-ustar POSIX tar archive archive
application/x-cpio old cpio archive archive
application/x-bcpio POSIX cpio archive archive
application/x-sv4crc System V cpio with CRC archive
application/x-compress UNIX compressed compressed
application/x-sv4cpio System V cpio archive
application/x-sh UNIX shell script executable
application/x-csh UNIX csh script executable
application/x-tcl Tcl script executable
application/x-javascript JavaScript executable
application/x-excel Microsoft Excel document
application/mspowerpoint Microsoft Powerpoint document
application/msword Microsoft Word document
application/wordperfect5.1 Word Perfect document
application/rtf Rich Text Format document
application/pdf Adobe Acrobat document
application/postscript Postscript documen

Advanced

The Advanced section allows you to configure additional Web Monitor options.
  • Process HTTPS traffic by SNI (Server Name Indication) if present: If this option is enabled, HTTPS traffic will be categorized using the "Server Name Indication" in the HTTPS data stream if present. More details in HTTPS Options.
  • Process HTTPS traffic by hostname in server certificate when SNI information is not present: If this option is enabled and SNI information is not present, the certificate is fetched from the HTTPS server, and the server name on the certificate will be used for categorization and filtering purposes.
  • Process HTTPS traffic by server IP if SNI and certificate hostname information are unavailable: If this option is enabled and neither of the previous options works, HTTPS traffic will be categorized using the IP address. More details in HTTPS Options.
  • Clear Category URL Cache: This option will clear the local cache of categorized sites and URLs. After clearing the cache, all new web visits will be viewed fresh using the categorization service. The cache automatically cleans itself as entries become old or stale, so this is mostly for testing.

HTTPS Options

There are many ways to handle HTTPS.

If SSL Inspector is installed and inspects a session, then it is fully decrypted to HTTP before Web Monitor processes the session. In this case HTTPS is treated identically to HTTP. If SSL Inspector is not installed or the session is not inspected, there are still several techniques to handle encrypted HTTP sessions.

There are three HTTPS options.
  • Process HTTPS traffic by SNI (Server Name Indication) if present.
  • Process HTTPS traffic by hostname in server certificate when SNI information not present
  • Process HTTPS traffic by server IP if both SNI and certificate hostname information are not available.

If Process HTTPS traffic by SNI (Server Name Indication) if present encrypted port-443 traffic will be scanned. Most modern browsers on modern OSs will send the hostname of the server in cleartext - this is called "Server Name Indication" or SNI. SNI is an optional cleartext field in the HTTPS request that shows the hostname of the server. If this option is enabled and the SNI information is present in the HTTPS request, this hostname will be used as the URL for this request and all categorization, flag lists, and pass lists, will be processed as if this were a regular HTTP request to that URL.

If the SNI-based categorization determines the page should be passed (and/or flagged) then the session is allowed and the appropriate event based on the SNI information is logged ("https://example.com/").

For example, if the user visits "https://wellsfargo.com/welcome" in the browser, it will see "wellsfargo.com" as the SNI information. If enabled, the request will be handled exactly like "http://wellsfargo.com" would be. If "Banking" is flagged it will be flagged, unless "wellsfargo.com" is in the pass list or the client IP is in the client IP pass list. If "wellsfargo.com" is flaggeed it will be flagged, unless "wellsfargo.com" is in the pass list or the client IP is in the client IP pass list.

If No SNI information is present and Process HTTPS traffic by hostname in server certificate when SNI information not present is enabled, then the hostname will be pulled from the certificate presented to the client.

For example, if the user visits "https://wellsfargo.com/welcome" in a non-SNI enabled browser, then there is no SNI information. In this case if Process HTTPS traffic by hostname in server certificate when SNI information not present is enabled it will use the certificate information instead to categorize the session. It will download the certificate from the site and see that the certificate is "Issued To" "www.wellsfargo.com." It will use this information to check the category for "https://www.wellsfargo.com" and categorize the session.

If no SNI or certificate information was available and Process HTTPS traffic by server IP if both SNI and certificate hostname information are not available the session will be processed and categorized by IP address. If the IP-based processing and categorization of the web requests determines the session should be flagged, the session is reset and no more processing of this session will be done. If the IP-based processing and categorization determines the page should be passed (and/or flagged) then the session is allowed and the appropriate event based on its IP is logged ("https://1.2.3.4").

For example, if the user visits "https://wellsfargo.com/welcome" in a non-SNI enabled browser, then there is no SNI information. If the the certificate information was missing for some reason then this session can only be identified by IP address. In this case if Process HTTPS traffic by server IP if both SNI and certificate hostname information are not available is enabled it will use the IP address instead. So it will process/categorize this web request as 'http://1.2.3.4' if 1.2.3.4 is the IP of wellsfargo.com. This will still often result in correct categorization for dedicated web servers, but does poorly when using generic cloud computing servers that offer a wide variety of websites.

Note: Neither HTTPS process (SNI, certificate, or IP-based categorization) can read the URI information as it is not sent in cleartext. As such the URI will not be used as part of the categorization and the URI is assumed to be "/" when evaluating pass rules. If scanning the URI is necessary then full SSL Inspection may be required.

To see the HTTPS categorization in action use the "All HTTPS Events" query in the event log.

Web Monitor Reports

The Reports tab provides a view of all reports and events for all traffic handled by Web Monitor.

Reports

You can access the applications reports via the Reports tab at the top or the Reports tab within the settings. All pre-defined reports will be listed along with any custom reports that have been created.

You can search and defined Reports using the time selectors and the Conditions window at the bottom of the page. The data used in the report can be obtained on the Current Data window on the right.

Pre-defined report queries:

Report Entry Description
Web Monitor Summary A summary of web monitor actions.
Web Usage The amount of total and flagged web requests over time.
Web Usage (scanned) The amount of total web requests over time.
Web Usage (flagged) The amount of flagged web requests over time.
Top Categories (by request) The number of web requests grouped by category.
Top Categories (by size) The sum of the size of requested web content grouped by category.
Top Flagged Categories The number of flagged web requests grouped by category.
Top Sites (by request) The number of web requests grouped by website.
Top Sites (by size) The sum of the size of requested web content grouped by website.
Top Flagged Sites The number of flagged web requests grouped by website.
Top Domains (by request) The number of web requests grouped by domain.
Top Domains (by size) The sum of the size of requested web content grouped by domain.
Top Flagged Domains The number of flagged web requests grouped by domain.
Top Domains Usage The amount of web requests per top domain.
Top Hostnames (by requests) The number of web requests grouped by hostname.
Top Hostnames (by size) The sum of the size of requested web content grouped by hostname.
Top Flagged Hostnames The number of flagged web request grouped by hostname.
Top Clients (by requests) The number of web requests grouped by client.
Top Clients (by size) The sum of the size of requested web content grouped by client.
Top Flagged Clients The number of flagged web request grouped by client.
Top Usernames (by requests) The number of web requests grouped by username.
Top Usernames (by size) The sum of the size of requested web content grouped by username.
Top Flagged Usernames The number of flagged web request grouped by username.
Top Content (by request) The number of web requests grouped by category.
Top Content (by size) The sum of the size of requested web content grouped by category.
Top Searches The number of non blocked, non-flagged search queries grouped by term.
Top Flagged Searches The number of flagged search queries grouped by term.
All Web Events Shows all scanned web requests.
Flagged Web Events Shows all flagged web requests.
All HTTP Events Shows all scanned unencrypted HTTP requests.
All HTTPS Events Shows all encrypted HTTPS requests.
All Search Events Shows all search queries processed by Web Monitor.
Flagged Search Events Shows flagged search queries processed by Web Monitor.
The tables queried to render these reports:

Related Topics

NG Firewall Manage Apps


This section discusses the following topics:

Directory Connector

Directory Connector provides functionality to integrate with Microsoft's Active Directory or servers that support RADIUS Server, as well as some tools for managing the Hosts username mapping for the hosts on the network.

Figure 1. Directory Connector

Contents

About Directory Connector

Directory Connector provides many tools to assist Users.

Settings

This section reviews the different settings and configuration options available for Directory Connector.

Status

This displays the current status and some statistics.

Figure 2. Directory Connector Status

User Notification API

The "User Notification API" is a webapp running on the NGFW that various external scripts can call to notify NG Firewall that a specific user is logged into a specific IP. The userapi webapp is used to update and maintain the associated usernames in the Hosts so that User Matcher in Rules matches correctly. When a username is associated with the Username in Rules matches as expected.

This API can be called:
  1. manually
  2. via the User Notification Login Script
  3. via the Active Directory Server Login Monitor Agent
  4. via any custom script or external program
  • Enable/Disable: If the User Notification API is enabled; if it is disabled, the User Notification is completely disabled.
  • Secret Key: Only API calls specifying the correct secret key will be allowed if specified. All other requests are ignored. If not specified, it is not required to use the API; however, the clientIP argument is ignored to avoid API abuse.

The webapp lives at http://SERVERIP/userapi/registration on the server and can be called with the following arguments:

Argument Example Description
clientIp 192.168.1.100 The client IP address of the host in question
username foobar The username to associate with the client IP.
hostname machinename The hostname to associate with the client IP. This argument is optional.
action login or logout The action, login is assumed if no action is specified. login with associate the username and hostname of the specified client IP. logout will unset the client IP's associated username.
secretKey foobarsecret If this argument does not match the specified secretKey the call will be ignored.

For example, If the NGFW internal IP is 192.168.1.1 without a secretKey, to associate user foobar on machine foobarpc to 192.168.1.100 you would call visit this URL: http://192.168.1.1/userapi/registration?action=login&clientIP=192.168.1.100&username=foobar&hostname=foobarpc&secretKey=foobarsecret.

To unset that username mapping when the client logs out simply visit this URL: http://192.168.1.1/userapi/registration?action=logout&clientIP=192.168.1.100&secretKey=foobarsecret.

Visiting these URLs manually each time a user logs in or out of a machine is not realistic. Typically, this process is automated in one of two ways described below or uses a custom script.

Figure 3. User Notification API tab

User Notification Login Script

The User Notification Login Script or UNLS which is a small script that runs at login on each machine to notify the NGFW when a user logs in. This script can be pushed out to all the machines in a domain via a group policy object. This is useful in cases where you want to set the username in the Hosts without having users manually log into the Captive Portal.

Once installed, the script starts each time a user logs on to the network and immediately notifies NG Firewall of the username and IP address. Once this process is finished, any activity for that IP address will be automatically mapped to the username. This script runs on login and periodically in the background to keep the Directory Connector Username Map updated with any current information on your network users.

To download the User Notification Login Script, click the Download User Notification Login Script button and download the script. The script will be configured for your environment but may require further customization. Review the script and make changes as needed.

Now that you have the UNLS on your Domain Controller, you need to decide if you want it run for UNLS for the Entire Domain or UNLS for Specific Users.

UNLS for the Entire Domain

To apply UNLS to your entire domain, you'll need to set up a new Group Policy Object - please follow the instructions below.
  1. Click the Download User Notification Login Script and save the user_notification.vbs file to \\localhost\\NETLOGON.
  2. Log on to the Domain Controller, then launch the Group Policy Management Console ( Start > Run : gpmc.msc).
  3. From the Group Policy Management Console, right-click on the domain and select Create and Link a GPO here.
  4. Specify a name for the Group Policy.
  5. Right-click the group policy that you just created and click Edit.
  6. Go to User Configuration > Windows Settings > Scripts (Logon/Logoff) .
  7. Click the Logon icon, then Show Files. Windows Explorer will launch into the correct directory.
  8. Copy the user_notification.vbs file that you downloaded to this location.
  9. Click the Add button, browse for the script, then click OK.
  10. In the Logon Properties window, click Add, type a descriptive script name, then click OK.
  11. In the Select User, Computer or Group window, select the OU or Group to which you want to apply this GPO.
  12. From a command prompt, activate the group policy that you just created: gpupdate /force.

You can verify it works by looking in the Event Log for login/logout events.

UNLS for Specific Users

If you only want to use the UNLS for a few users, you can use these instructions:

  1. Click the Download User Notification Login Script and save the user_notification.vbs file to \\localhost\\NETLOGON.
  2. Using a text editor, create a local.bat file that has the following lines:
    @ echo off
    \\ADServerIPAddress\netlogon\user_notification.vbs
  3. Save the local.bat file to \\localhost\\NETLOGON.
  4. From the domain, go to the Users folder, right-click the user, and go to Properties.
  5. On the Profile tab, type the filename of the UNLS (probably user_notification.vbs) in the Logon script field.
  6. Launch the Group Policy Management Console, then launch the Group Policy Object Editor ( Start > Run : gpedit.msc).
  7. Copy the user_notification.vbs file that you downloaded in the first step to this location.

Active Directory Server Login Monitor Agent

The other way to call the User Notification API is by running an agent/monitor on the Active Directory Server. The agent monitors the server's login events and updates the NG Firewall when a user logs to a computer. This has several advantages over the UNLS.

Note: A Secret Key must be specified to use the Active Directory Login Monitor.
  1. It allows you to set a secretKey that only the agent knows, so only the AD server itself can update the username mapping. (users have no way of overriding changing the information)
  2. Running a login/logout script on all machines is unnecessary. No GPO is necessary.

First download and install the agent on the Active Directory server. and configure it so that it updates the NG Firewall server when it sees user login events.

Configure the NGFW Settings in Login Monitor so it updates your NG Firewall event when login events occur.

Figure 4. AD Server Login Monitor Settings

  • Secret Key: The Secret Key if there is a Secret Key configured on the NGFW User Notification API. User Notification must be enabled on the NGFW. If no Secret Key is configured, leave it blank.
  • Prefix: The protocol to use to communicate with the NG Firewall.
  • Port: The port to use to communicate with the NG Firewall. The default is port 80 for HTTP and 443 for HTTPS.
  • IP Addresses: The IP addresses to reach your NG Firewall. These should be the LAN addresses of your NG Firewall. By default, HTTP and HTTPS are closed on the NG Firewall's WAN side. If the Login Monitor Agent cannot reach the NG Firewall, an error icon is shown next to the NG Firewall IP address entry.
    Figure 5. Error Reaching NG Firewall

The Exempt IP Addresses tab lists IP addresses the Login Monitor should ignore for login events. IP addresses are accepted in the following format:
  • Single IP address (192.168.2.2)
  • Wildcard IP address (192.168.3.*)
  • CIDR (192.168.4.0/24)
  • Range (192.168.5.5-192.168.5.102)
Figure 6. Exempt IP Address Tab

The Exempt Users tab lists AD users that Login shows ignore for login events.

Active Directory

The Active Directory Connector allows the NG Firewall to communicate with the Active Directory server. This is useful for two things:
  1. Allowing users to login to Captive Portal using their AD login/password. The Captive Portal will verify the authentication information directly with the AD server.
  2. Allow NG Firewall to query the groups to know which groups a user belongs to. If this is configured, the rules matcher in Rules will correctly match.
Before configuring the Active Directory Connector, here are a few important steps:
  1. Ensure that your Active Directory users are in one domain. Users can be in multiple Active Directory Organizational Units (OUs) but must be under one domain - multiple domains are not supported at this time.
  2. Check to see if you have the Group Policy Management Console installed; if not, install it.
The Active Directory Connector tab contains settings for connecting and communicating with a Domain Controller. Other applications like Captive Portal can use Directory Connector to authenticate and identify users against an existing Domain Controller.
  • AD Server IP or Hostname: The IP or hostname of the AD server - we recommend using the IP to prevent DNS issues.
  • Secure: Enable SSL for the connection to the AD server.
  • Port: The port used when connecting to the AD server. The default is 389.
  • Authentication Login: Enter an Active Directory Administrator login.
  • Authentication Password: Enter an Active Directory Administrator password.
  • Active Directory Domain: Your domain (e.g., mycompany.local).
  • Active Directory Organization: The Active Directory organization unit (OU) that contains the users. If you want the NG Firewall server to find all users, leave this blank.

    If you want to limit the users to a specific part of the domain tree, specify the OU path in the format of OU=ouName. Only one OU can be entered.

The test tools can verify your settings and view an incomplete user list. After configuring Active Directory, you can configure Captive Portal to authenticate users.

Figure 7. Active Directory Tab

Azure Active Directory

You can use the Active Directory Connector to authenticate users against Azure Active Directory Domain Services. This type of connection requires that you have a Microsoft Azure account using Azure AD Domain Services. Before configuring NG Firewall to authenticate to your instance of Azure Active Directory, follow these steps:
  1. Enable Azure Active Directory Domain Services
  2. Generate an SSL certificate
  3. Enable secure LDAP
  4. Permit access to secure LDAP
  5. Configure DNS for your AD domain

After setting up Azure Active Directory, you can configure NG Firewall to authenticate via secure LDAP. The connection configuration is similar to a local Active Directory Domain, except you must enable the Azure checkbox. Confirm that the port is 636 and that Secure is enabled, as Azure Active Directory requires secure LDAP.

RADIUS

The RADIUS Connector allows NG Firewall to communicate with a RADIUS server. This is useful for:

  1. Allowing users to login to Captive Portal using their RADIUS login/password. The Captive Portal will verify the authentication information directly with the AD server.
The RADIUS tab contains settings to configure communication with the RADIUS server.
  • RADIUS Server IP or Hostname: The IP or hostname of the RADIUS server - we recommend using the IP to prevent DNS issues.
  • Port: The port used when connecting to the RADIUS server. The default is 1812.
  • Shared Secret: This must match the shared secret set on the RADIUS server.
  • Authentication Method: This must match the authentication method used by the RADIUS server.

You can use the test tool to verify your settings. After RADIUS is configured, you can configure Captive Portal to use it for authenticating users.

Figure 8. RADIUS Connector

Facebook

The Facebook Connector allows the NG Firewall to authenticate against Facebook. This is experimental and is not suggested for deployments.

Figure 9. Google Drive Connector

Related Topics

Policy Manager

Captive Portal

Directory Connector Reports

The Reports tab provides a view of all reports and events for all sessions the Directory Connector handles.

Reports

You can access this applications' reports via the Reports tab at the top or the Reports tab within the settings. All pre-defined reports will be listed along with any custom reports that have been created.

Reports can be searched and further defined using the time selectors and the Conditions window at the bottom of the page. The data used in the report can be obtained on the Current Data window on the right.

Pre-defined report queries:

Report Entry Description
Directory Connector Summary A summary of Directory Connector actions.
API Usage The amount of login, update and logout user notification API events over time.
API Events Events from the user notification API.
The tables queried to render these reports:

Related Topics

Reports

Reports provide users with detailed statistics of the traffic and activity on your network.


About NG Firewall Reports

These reports can be viewed online through the administration interface or the separate reporting interface available to non-administrators reporting-only users.

Customizable report summaries can be sent via email. They include basic information and a link to view the online reports if the user has access.

Reports can backup your data in multiple formats to Google Drive for long term storage.

Settings

This section discusses the different settings and configuration options available for Reports.

Status

You can click View Reports to open up Reports on this tab in a new browser tab.

Figure 10. Reports Status Tab

All Reports

This is the full list of all currently existing reports, including all the default reports and any custom reports that have been added.

To edit a report, click View and then click Settings.

To delete a custom report, click View and then click Delete.

To create a new custom report, click View on a similar existing report, then click Settings. Then, change the name and click Save as New Report.

To create a report from scratch, go to Reports and click Create New in the lower left. When creating reports from scratch, each field must be carefully chosen and tuned until the desired data is provided. This process can be time-consuming and difficult. Working with a similar report is suggested to require the desired result. Additionally, you can ask for help via support or the forums and import the report if someone can craft it for you.

If creating a report from scratch, the settings and fields and their purposes are described below.

Figure 11. All Reports Tab

Report Entry

A report has many settings describing how to craft a SQL query and display the data. Here are the fields:

Name Value Available Description
Report Type Text, Pie Graph, Time Graph, Time Graph Dynamic, Event List The type of graph  
Title Text All The report title
Category Any existing category/application All The category in which the report is located
Description Text All A brief description of the report
Text String Text Text The text used to create the Text Report Type
Pie Group Column Text Pie Graph The column to "group by" in top X charts (usually user, host, and so on)
Pie Sum Column Text Pie Graph The column to sum in the top X charts (usually count, bytes, and so on)
Order By Column Text Pie Graph The column to order by
Graph Style Pie, Pie 3D, Donut, Donut 3D, Column, Column 3D Pie Graph The render style of the pie graph
Pie Slices Number Integer Pie Graph The number of slices to display
Units Text Pie Graph The units being displayed (usually bytes, sessions, and so on)
Graph Style Line, Area, Stacked Area, Column, Overlapped Column, Stacked Columns Time Graph The render style of the time graph
Time Data Interval Auto, Second, Minute, Hour, Day, Week, Month Time Graph The time aggregation unit or resolution
Approximation Average, High, Low, Sum Time Graph The method used to aggregate/combine data points
Units Text Time Graph The units being displayed (usually bytes, sessions, and so on)
Series Renderer None, Interface, Protocol Time Graph The renderer used to display human-readable names
Dynamic Column Text Time Graph Dynamic The column to select for/group by
Dynamic Value Text Time Graph Dynamic The value to sort by and display
Dynamic Limit Integer Time Graph Dynamic The number of series to show
Aggregation Function Count, Sum, Min, Max Time Graph Dynamic The function used to aggregate dynamic values grouped by dynamic column
Graph Style Line, Area, Stacked Area, Column, Overlapped Column, Stacked Columns Time Graph Dynamic The render style of the time graph
Approximation Average, High, Low, Sum Time Graph Dynamic The method used to aggregate/combine data points
Units Text Time Graph Dynamic The units being displayed (usually bytes, sessions, and so on)
Series Renderer None, Interface, Protocol Time Graph Dynamic The renderer used to display human-readable names
Colors Color Picker All The color palette to use
Display Order Integer All The integer used to determine the report's position in the category list

Data

  • Data Retention: This value controls how long report data is kept on disk. Note that increasing the number increases the amount of disk space needed for data storage.
    Note:NG Firewall version 16.3 and above stops reporting data when free space falls below 5 GB.
  • Delete All Reports Data: This option is useful if you are running low on disk space and wish to free space by wiping the reports database.
  • Google Drive Backup: If your system is connected to your Google account, you can configure Reports backups to Google Drive.
    • Upload Data to Google Drive. If enabled, and the Google Connector in Directory Connector is enabled, your daily data will be uploaded to Google Drive each night for safe storage.
    • Upload CSVs to Google Drive. If enabled, and the Google Connector in Directory Connector is enabled, your daily CSV files will be uploaded to Google Drive each night for safe storage.
    • Google Drive Directory configures which subdirectory data will be uploaded to Google Drive.
  • Import/Restore Data Backup Files: Imports data from a previous backup into the database.
    Note:This directly imports the SQL contents. If you have upgraded and the database schema has significantly changed since the time of the back, the import will not work correctly.
    Figure 12. Reports - Data Tab

Email Templates

You can customize emailed reports using Report Templates. You can create as many as you want with any combination of:
  • Interval: Daily, Weekly, Monthly, Week to Date, Month to Date. This determines the time interval that the report will cover. Beware that enough data is available via the Retention settings to provide the data for the configured interval.
  • Mobile: Generate chart images that are more appropriate for a mobile device.
  • Reports: Select those reports under the Config and Application sections. Text and chart reports are allowed, but not event list reports. Applications' reports will be included only if that application is installed.

Additionally, you can copy the settings for an existing report.

The default Daily Reports template includes common text and chart reports for your system. This template is fixed and cannot be changed or modified.

Email Templates must be associated with Report Users.

Figure 13. Email Templates Tab

Reports Users

Reports users are not administrators but can still view reports.
  • The report user's email address (and Username) is the email address. Admin is a special case that determines whether administrators will receive emails and alerts.
  • Email Alerts determines if this report user will receive email alerts.
  • Email Reports determines if this report user will receive email report summaries.
  • Email Templates determines which email report summaries this user will receive if Email Reports is enabled.
  • If Online Access is enabled, a URL to online reports is included in emailed report summaries for this user.
  • Change Password changes the password for this report's user.
    Figure 14. Reports Users Tab

Name Map

You can use the Name Map to configure the hostname for hosts manually. The NG Firewall can often determine the IP hostname automatically via DHCP or other methods. You can view the names of active hosts in the Hosts.

However, when the NG Firewall cannot automatically determine a hostname for an IP, the Name Map provides a way to name them manually.

Figure 15. Name Map Tab

Accessing Reports

If users are set up to receive email report summaries, they only need to view or download the HTML attachment to see an overview report. If they need more information or would like to drill down to specific users or machines, they can select the link in the email, which will open Reports on the NG Firewall if it is accessible from their location.

To access Reports directly from a browser, you have two options:

Note that to view Reports from outside the network, you'll need to check Allow HTTPS on WANs at Config > Network > Advanced > Filter Rules . If you have changed the External HTTPS Port, you'll need to use the proper HTTPS port when connecting from the outside.

Figure 16. Access Reports Summary

Report Viewer

Reports provide a graphical view of your NG firewall's network traffic and actions. Various reports are available within applications and base system components. The Report Viewer allows you to manipulate the reports to drill down, customize, and export data in many ways.

There are a few panels in the Report Viewer:
  • The top panel: This panel (just below the navigation menu) allows you to specify which data is viewed. By default, there is a time frame and no conditions so that reports will show all the data for the specified time frame. Conditions can be viewed to view more specific data, such as a specific host, user, domain, application, web category, etc.
  • The left panel: Allows you to choose the report you want to view. At the bottom, you can quickly use the search box to find reports with the specified string in the title. You can also import and create new reports using the "Add/Import" button.
  • The chart panel: This panel shows you the specified report. It also includes several action buttons at the top.
  • The data panel: The data panel, hidden by default, can be displayed by clicking the Data View button in the chart panel. This will show the raw data used to generate the chart and allow the user to export the data by clicking the Export Data button at the bottom.

Conditions

The Conditions panel appears at the top panel and can filter data displayed in reports. For example, to view a "specific" host's report, you can add a condition for Client = 192.168.1.100, all reports available will only show data where the client is 192.168.1.100. Multiple conditions can be added to drill down and inspect data. Conditions can also be added quickly by clicking on slices in pie charts.

The Add Condition drop-down contains many commonly used conditions, or the full list of all tables and columns can be browsed by clicking on the More button to add conditions for any database column.

Note: Conditions will not apply to all reports. For example, if you view a specific user's report by adding a condition where Username = foobar, many reports will be greyed out and unviewable. This is because the data used to generate those reports is not relevant to the specific user (it does not contain a username column). For example, the CPU usage report is a system report irrelevant to a specific network user, so there is no way to filter that data by user.

Condition Operators

The second field in the condition is the logical operator that will be used in evaluating the condition value defined in the last field. In most use cases, the default "=" operator is what you want to use. However, several other operators are available that make the reports and alerts a lot more powerful.

Conditions Example - Policy by Policy ID

You may often want to see the traffic related to a policy within the Policy Manager. Adding a condition using the Quick Add feature makes this easy.
  1. In the Conditions panel, select Add.
  2. Choose Policy ID and specify equals and the policy ID in question.
  3. The conditions are applied and will remain applied as you switch between reports.

Conditions Example - Web Filter Categories

From pie charts, you can quickly add a condition from the Current Data window. This can be handy with the Web Filter category selection, which we'll use for this example. Once the condition is applied, we can use other reports to find more information about the traffic, such as which user might be responsible.
  1. Open the Report Viewer or the Web Filter Reports tab.
  2. Select the Top Categories report (by size or requests). In our example, you can see Games was at the top.
  3. Click the Games pie slice, and click Yes when prompted to add a condition.
  4. All reports can now be viewed only for game traffic.
  5. For example, the Top Clients (by request) will show the clients that visited the most gaming sites.
  6. For example, the web usage (scanned) will show "Gaming" web usage throughout the network day.

Related Topics

Custom Reports

Custom Reports

Custom Reports allow you to create a report according to your specifications and save it for future use. You can add these by copying an existing report and modifying it to your needs or by creating a report from scratch. Both methods require a strong understanding of how Arista and Database Schema reports work.

If you're having trouble creating any reports, give us a shout on the forums or through support. As we receive requests for common reports, we will add these as default reports in future releases.

Add Custom Reports

The Copy or Customize features allow you to use an existing report as a base for creating new reports. We recommend using an existing report to base your custom report, as the fields and queries are much easier to understand.

Copy Report
  1. Go to the Reports Section,
  2. Locate the report you want to copy and click Settings.
  3. Rename the title and click the Create New button. A copy of the report is made with the new title.
  4. Modify other report settings as needed.
  5. Click Preview/Refresh to view changes.
  6. Click Update to save the changes to the report.
Customize Report
  1. Rename the report and modify other report settings as needed.
  2. Click Create New to save the report with a new name.
Add Report
  1. Go to the Reports section.
  2. Click the Add/Import button and select Create New. A blank report form will appear.
  3. Name the report and description, select the category and report type of graph, and fill in other fields to customize the report.
  4. Click Preview/Refresh at any time to preview the report.
  5. Click Create New or Update to save the report.

Report Fields

Figure 17. Custom Report Fields

The following fields will be there when modifying or creating a new custom report.

Report Field Description
Category The app where the report will be displayed.
Title Title of the report.
Description Description will be shown under the title of the report to provide the reader more information.
Enabled Disabled reports will not be shown in the list within the application.
Display Order Determines the order the reports are displayed within the application.
Units Unit of measure displayed on the graph.
Table Table from the Database Schema to query.
Type Time Chart (Line or Bar), Pie Chart, or Text Chart.
Time Chart Style Line, Bar, or Bar 3D. Bar charts can also be overlapped or separate columns.
Time Data Interval Auto is recommended. You can also use seconds, minutes, hours, day, week or month.
Time Data Columns Data from the table defined above that you wish to use for your chart. This is written with SQL syntax. Add each column or data series on a new line. See the Web Usage (all) report for a good example.
Pie Group Column Column from the table defined above that you wish to group data by. This uses the column name from the Database Schema.
Pie Sum Column Determines how data is calculated after grouping. Common functions would be count() and sum() for specific columns within the table. See the Web Filter Top Sites reports (by size and by request) for good examples.
Pie Slices Number Determines how many results are shown.
Text Columns Data from the table defined above that you wish to use for your page. This is written with SQL syntax. Add each column or data series on a new line. These will be referred to in the text string using the line number.
Text String Text string to be shown on the page. This can include columns from the text columns query. See the Ad Blocker summary report for a good example.
Color Colors used in the chart, defined by hex color codes.
Order By Column Determines how the order will be determined. This will typically be 'value' for pie charts, and left blank for others.
Order Direction Order for the data to be displayed. For a pie chart, this is typically Descending and for time chart, this is typically Ascending.
Sql Conditions Additional conditions added to the data. This can be useful for specifying a username, IP address of other information.

Custom Report Example - User Reporting

A commonly requested report is to be able to monitor a problem employee or student who is using bandwidth excessively or accessing inappropriate web content. You can add this report so that it is always very easily accessible under the Web Filter report tab.

To start, get an idea of the reports you're interested in. We'll use Top Sites (by size) for this example, but others, like Top Categories or top-flagged sites, might also be useful. This is intended to be a rough procedure outline; adjust as needed.

Creating the Report
  1. Go to Reports
  2. Scroll to the Web Filter and select a report.
  3. Update the title and description of the report if necessary.
  4. Click Create New
  5. All other report fields can remain the same since you are interested in the same data type.
  6. Add conditions to SQL Conditions. For this example, we will use the username, but you might also use the hostname, client address, or other fields.
    1. In the Select Column field, select username.
    2. Click Add.
    3. Use the = operator and enter the username for the user in the Value field.
  7. Click Update.
Figure 18. Custom Report

Custom Report Example - Rack Reporting

With Policy Manager, racks can be created to allow different policies to apply to different groups. When reporting, you might wish to see how traffic is being handled differently across racks. Creating custom reports to show information related to a specific rack is easy to accomplish.

For this example we'll use Application Control Top Flagged Applications, but this same procedure would apply for any other application or report. This is intended to be a rough outline of the procedure; adjust as needed.

Find the Rack ID
  1. Open Policy Manager Settings.
  2. Under the Policies tab is a listing of racks with the ID.
  3. Take note of the rack(s) of interest. For this example we'll use rack id 6 for Mobile Devices.
    Figure 19. Rack IDs

Creating the Report
  1. Go to Reports.
  2. Scroll to the Application Control reports and select a report.
  3. Update the Title for the report and description. Here we have added "Mobile Devices Rack".
  4. Click Create New.
  5. Since you are interested in the same type of data, all other report fields can remain the same.
  6. In Sql Conditions, add the condition for the policy_ID.
    1. Click Add.
    2. In the Column field, select policy_id.
    3. Use the = operator and enter the policy id of 6 (matching the Mobile Devices rack) in the Value field.
  7. Click Done.
    Figure 20. Custom Report

Policy Manager

Policy Manager is one of the NG Firewall's most powerful features. It allows you to create multiple policies, which are different sets of applications configured differently for different use cases.


About Policy Manager

Often, you will configure all of the NG Firewall apps to service the whole network; however, often, it is necessary to handle traffic for some users or network devices differently. For example, you may want Web Filter to be different for students vs teachers, and you may want no Web Filtering at all for your servers. You should run Captive Portal only on the WiFi network or for unidentified devices. You should block certain applications with Application Control, but only at certain times of the day.

In these cases, the Policy Manager can simplify configuration a great deal by allowing for multiple sets of applications to be configured differently. The Policy Manager See rule description. Creation of new policies beyond the "Default Policy." To address the earlier examples, the administrator can create a "Student Policy," "Teacher Policy", "After hours Policy", and "Wireless Network Policy," etc. Each policy can run a different set of applications configured differently. The Policy Manager Rules can determine which policy handles which network sessions.
  • Set up multiple policies for different users, hosts, networks, interfaces, times of day, days of week, etc.
  • Choose what applications are running in each policy.
  • Configure multiple applications in separate policies simultaneously using the Parent Policy system.

    This allows you to "copy" the configuration of some applications from another policy but not others - this makes doing things such as having different Web Filter settings across policies but keeping the configuration of all other applications identical across policies. There is not usually a need to modify settings for applications like Virus Blocker or Spam Blocker between different user groups. However, if it is necessary, it only takes a few clicks.

Note that we will select the example of a school in this section as it is quite apt to show how the Policy Manager can help you with different user classes. This can be applied to any organization; look for groups you can fit users into - Administrative Assistants, Marketing, or HR, you're free to choose. It can also apply to different sets of servers (i.e., a DMZ policy for handling public servers, an Internal policy for handling internal user machines, and a Wireless policy for handling wireless users). It can also apply to different times of day (i.e., a Lunchtime and After Hours policy and a Work Hours policy). For simplicity, the examples below will mostly use the school groups.

Getting Started with Policy Manager

Policies provide a way to handle different settings for different sessions. Using our example, an NG Firewall protecting a school might have three policies - Students, Teachers, and Administrators. These policies provide separate configurations for traffic processing; for example, you could allow teachers to access Facebook but not students.

NG Firewall will always have at least one policy, the Default Policy. You can rename it, but you cannot remove this policy. As mentioned, you create Rules to send traffic to policies where the applications process it. Policies are created from within the Policy Manager. However, you will use NG Firewall's web GUI to switch to and configure each policy. At the top of the web GUI, you will see Default Policy with an arrow next to it - clicking this arrow allows you to change the policy you're looking at, and access the Sessions and Hosts, and open the Policy Manager Settings directly.

Parent Policies

When you first create a new policy, it contains no applications. You can add any applications you want and configure them to your liking or use the Parent Policy system. When creating a new policy using Policy Manager, you can select a Parent Policy. If you use this option, your new policy will be pre-populated with all applications and settings from your selected Parent Policy. However, it will look a bit different.

When you view the new child policy, the application faceplates will be greyed out, and you cannot click Settings. This is because the settings for these applications are inherited from the parent policy, which is useful. After all, it saves you from reconfiguring applications you want to operate the same way in multiple policies, such as the virus scanners. To change the settings or view the Events, you'll need to open the application on the parent policy and select the drop-down to select the policy to view traffic.

Suppose you want to modify the settings of an application in a child policy. In that case, you'll need to install the application you want to modify in the child policy - I know it's already there, but you can't click Settings to modify the configuration. On the Apps tab on the left side of the web GUI, click Install again. After a few seconds, the app will re-appear, and you can click Settings. Once this has happened, the new child application overrides the application inherited from the parent. The settings of the parent policy for this application do not affect the application you have added to the child policy. If you're following along, your child policy will contain all applications that your parent policy does. However, only one will have the Settings button enabled.

To recap, using our school example, we would send students to the default policy and then create a new teacher policy that uses the default policy as its parent policy. If you go to the Teacher Policy, all the apps will be greyed out, and you cannot modify any settings because they are copied from the Default Policy. By adding a new copy of Web Filter, you can modify the settings so the teachers can access websites the students cannot; however, settings for all other applications will still be copied from the Default Policy.

Settings

This section discusses the different settings and configuration options available for Policy Manager.

Status

This displays the current status and some statistics.

Figure 21. Policy Manager Status

Policies

From this tab, you can create new policies; however, note that you'll first need to create and save a policy before creating a rule to apply traffic to that policy.

To create a new policy, simply click Add in the Policies section.
  • Name: The name of this policy is displayed in the web GUI.
  • Description: A description of this policy.
  • Parent Policy: Which policy (if any) should this one use as a Parent Policies.
    Figure 22. Policy Manager Policies

Rules

If you've been reading until now, you may have guessed that this new policy will only do something once you send traffic to it. To accomplish this, you'll need to create a rule - click Add in the Rules tab.

When each new session is processed, the rules are evaluated in order. If all of a session's attributes match the criteria of a rule, it is considered a match. The policy for the first matching rule will be used to process the session. If no rules match, the Default Policy will process the session.

These rules operate as described in the Rules documentation.

Like many areas of the NG Firewall, the rules work from the top down. Let's return to our school example and say we have three policies: Default (for students), Teacher, and Administrative Staff. To get traffic to these policies, we would need to create two policies: one for the Teacher policy and one for the Administrative Staff policy - any traffic that did not match those two policies would be sent to the Default Policy. You can also explicitly add a rule sending traffic to the Default Policy, although it's not required.

If the policy rule for the Teacher policy needs to be corrected, it may end up matching all network traffic and sending it to the Teacher policy. Because it matches, the rule under it (for the Administrative Policy) will never be evaluated. On the flip side, if a rule is too narrow, it may not match the traffic you're trying to match, dumping it on the Default Policy. Because of this, we recommend starting policy rules as very general (e.g., match a few IPs or an entire subnet) and then tightening them down from there - let's look at some common example policies:

So, this is the Rules tab of the Policy Manager settings. On this page, you will see all the rules that will be evaluated when determining which policy to use to direct a specific user or IP address. Pay attention to the 'Target Policy' column. Any users defined in the corresponding rule will be directed to that policy. To define the rule, click the page icon under the Edit column.

Click Edit and define the rule.

Once you've clicked the Edit button, this is where you'll end up. This is where you will define which users will be assigned to which policy. You can specify a user using any combination of the identifiers in the drop-down box. Users who match the specified identifiers will be directed to the policy specified in the Target Policy field.

Figure 23. Policy Manager Rules

Policy Manager Reports

The Reports tab provides a view of all reports and events for all traffic handled by Policy Manager.

Reports

You can access the applications' reports via the Reports tab at the top or the Reports tab within the settings. All pre-defined reports will be listed along with any custom reports that have been created.

Reports can be searched and further defined using the time selectors and the Conditions window at the bottom of the page. The data used in the report can be obtained on the Current Data window on the right.

Pre-defined report queries:

Report Entry Description
Policy Manager Summary A summary of Policy Manager actions.
Top Policy Usage The amount of bandwidth per policy.
Sessions By Policy The number of sessions for each policy.
Traffic By Policy The amount of traffic for each policy.
All Events Lists all sessions with the Policy Manager policy that handled the session.
The tables queried to render these reports:

Related Topics

NG Firewall Connect Apps


This section discusses the following topics:

Captive Portal

Captive Portal allows administrators to require network users to log in or accept a network usage policy before accessing the internet.


Captive Portal can authenticate users against NG Firewall's built-in Local Directory, Active Directory (if Directory Connector is installed), or RADIUS. It can also be used to set up policies (for Policy Manager) by username (or group name if using Active Directory) rather than IP. While Captive Portal is running, captured machines will be forced to authenticate (or press OK) on the Captive Portal page before they can access the Internet.

Captive Portal is a common technique used to identify network users as described in Users.

Getting Started with Captive Portal

After installing Captive Portal, complete the following steps to get it working:

  1. Define which machines will be captured and required to complete the Captive Portal process before accessing the Internet. Enabling the first example rule in the Capture Rules table will force all machines on the internal interface to use the Captive Portal.
  2. Enter any IPs that unauthenticated machines will need to access. These can be entered in the Pass Listed Server Addresses section of the Passed Hosts tab.
  3. Enter any IPs that always need access to the Internet—these can be entered in the Pass Listed Client Addresses section of the Passed Hosts tab.
  4. On the Captive Page tab, customize the Captive Portal page. If Basic Login is chosen, set the appropriate authentication method for users on the User Authentication tab.
  5. Turn on the Captive Portal.

At this point, Captive Portal will evaluate your Capture Rules, and any traffic that matches will be stopped until that user has completed the Captive Portal process.

Settings

This section reviews the different settings and configuration options available for Captive Portal.

Status

This tab shows the current status of the Captive Portal. You can see information about current captured IPs, such as the username and other session information, and you can also log out of any active session.

Figure 1. Captive Portal Status

Capture Rules

The Capture Rules tab allows you to specify rules to Capture or Pass traffic that crosses the NG Firewall.

The Rules describe how rules work and how they are configured. Captive Portal uses rules to determine whether to capture or pass each network session. The rules are evaluated in order, and the configured action will be applied on the first match. If no rules match, the traffic is allowed by default.

If the action is passed, the session is passed, regardless of the client's authentication status. If the action is Capture, the session is "captured," which means several different things depending on several factors:
  • If the client is authenticated, the session is passed.
  • If the client is not authenticated, the protocol is TCP, and the destination port is 80, a redirect to the captive portal page is sent.
  • If the client is not authenticated, the protocol is TCP, and the destination port = 443, then a redirect to the captive portal page is sent. (The certificate will not match as the captive portal is not the requested server)
  • If the client is not authenticated and the destination port is 53, a DNS response is sent after it is validated as a valid DNS request.
  • If the client is not authenticated and the session has a destination port != 53,80,443, then the session is blocked.
    Figure 2. Capture Rules Tab

Passed Hosts

The Pass Hosts tab allows you to specify machines that either a) should not be affected by Captive Portal or b) servers that machines behind Captive Portal should be able to access even if unauthenticated.

  • Pass Listed Client Addresses: Captive Portal will not affect these machines. This is useful for servers and devices without browsers.
  • Pass Listed Server Addresses: Machines behind the Captive Portal can access these servers whether or not they have been authenticated through the Captive Portal. Typically, these will be any DNS or DHCP servers separated from their clients by the NG Firewall. This is unnecessary if the NG Firewall is handling DHCP or DNS.
    Figure 3. Passed Hosts Tab

Captive Page

This tab controls the type of Captive Portal page displayed to unauthenticated users. Please note that you can use HTML in the Captive Portal page fields; however, invalid HTML will prevent the page from rendering properly.

  • Basic Message: Select this option if users should see (or accept) a message before being allowed to the internet. It has several tunable properties such as Page Title, Welcome Text, Message Text, and Lower Text. If Agree Checkbox is enabled, users must check a checkbox (labeled with the Agree Text) before continuing.
  • Basic Login: Select this option if users should see a page that requires them to log in. Similar to Basic Message, it has several properties that can be configured. When the login/continue button on the page is clicked, the user will be authenticated. You must also set your authentication method on the User Authentication tab.
  • Custom: Select this option if you would like to upload a custom Captive Portal page. This is for experienced web developers who are comfortable with HTML, Python, and JavaScript. The Edge Threat Management Support department can not help develop or troubleshoot custom Captive Portal pages. If Custom is selected, it is advised to turn off automatic upgrades—newer versions of NG Firewall may be incompatible with any custom captive page
    Note: Select 'Basic Message' when using "Any OAuth provider" for User Authentication. All the "Page Configuration" options except the agree checkbox and text will be used when generating the OAuth provider selection page.
    Figure 4. Captive Page Tab

HTTPS/Root Certificate Detection

This feature checks if the root certificate is installed on the client machine. If it is not installed, the root certificate can display a warning or block the connection. The HTTPS Inspector and other HTTPS connections to the unit, including the Captive Portal, use the certificates. This feature is highly recommended if you have HTTPS installed. The Certificates must have all the names and IP addresses used on the NG Firewall.
  • Disable Certificate Detection: No checking for the root certificate.
  • Check Certificate. Show a warning when it is not detected: Check the root certificate. If not found, display a warning with instructions on how to install the certificate.
  • Require Certificate. Login is prohibited when not detected: The connection is blocked if it is not found, and the client is instructed to install the certificate.

The Preview Captive Portal Page button can be used to view what the configured captive page looks like. This button only works when Captive Portal is on.

Session Redirect
  • Block instead of capture and redirect unauthenticated HTTPS connections: The browser redirecting from an HTTPS URL to the captive page will show a certificate error as the captive page is not requested. To avoid this error message, block the traffic and show nothing instead of showing the captive login page.
  • Use hostname instead of IP address for the capture page redirect: Create the browser redirect using the hostname instead of the server's IP address.
    Warning:If enabled, the admin must ensure that the hostname properly resolves to the internal IP of the NG Firewall on all internal networks. If internal hosts use the NG Firewall for DNS, this is automatic. If using another internal DNS server, the administrator must configure DNS to properly resolve the correct internal IP on all internal networks. If this is not configured properly, the Captive Portal will not function properly, as clients cannot reach the Captive Portal page. The host will NOT be able to reach the captive portal page if the hostname is resolved to the external IP of the NG Firewall.

    This option is useful for organizations with valid certificates on the NG Firewall server who want to avoid the cert warning on the capture page.

    Note: This has nothing to do with the first warning caused by serving/spoofing the 301 redirect from a website to the capture page.
  • Always use HTTPS for the capture page redirect: When using the Captive Portal, always redirect to the HTTPS version of the login page.
  • Redirect URL: Users will be rerouted to this site after successful authentication. If the Redirect URL is blank, they will be sent to the original destination. Make sure to enter a complete URL (e.g., http://edge.arista.com), or this setting will not properly operate.

Custom Pages

You can create a custom.html file and place it, along with any supporting image files, etc., into a zip file and then upload it via the administrative interface. This allows you to customize the look and layout of the page while leveraging the existing code and application settings. To use this model, you must be familiar with HTML and forms.

Customized Captive Portal pages are "used at your own risk." The Edge Threat Management Support department cannot assist you in creating, updating, or troubleshooting Custom captive pages.

User Authentication

This section controls how users will be authenticated if the Basic Login page is used.
  • None: Is used in cases where no login is required.
  • Local Directory: Use the NG Firewall's built-in Local Directory ( Config > Local Directory ) to authenticate users.
  • RADIUS: Use an external RADIUS server to authenticate users. This option requires that the Directory Connector be installed, enabled, and configured.
  • Active Directory: This option can be used if the user should be authenticated against an Active Directory server. It requires the Directory Connector to be installed, enabled, and configured.
  • Any Directory Connector: This option allows users to authenticate against any configured and enabled Directory Connector methods. It requires the Directory Connector to be installed, enabled, and configured.
  • Google Account: Can be used to allow users to authenticate via OAuth using a Google account.
  • Facebook Account: This can be used to allow users to authenticate via OAuth using a Facebook account.
  • Microsoft Account: can be used to allow users to authenticate via OAuth using a Microsoft account.
  • Any OAuth Provider: This option allows users to select and authenticate using any supported OAuth providers. When this option is selected, unauthenticated users will first encounter the OAuth selection page, where they will click the icon or link corresponding to the provider account they want to use.
The Session Settings section controls the Captive Portal's timeout and concurrent login settings.
  • Idle Timeout: This option controls the time before a host is automatically logged out if no traffic is seen. While a machine may be idle, it is still active on the network level. In this case, Idle means the Captive Portal sees no new TCP or UDP connections.
  • Important: It is recommended to leave this at zero (not enabled).
  • Timeout: This option controls the time before a computer is automatically logged out. After this, the user must log in again through the Captive Portal. Timeouts greater than 1440 minutes (1 day) are not recommended. The authenticated table is stored in memory and will be flushed on reboot/upgrade. Additionally, the logout time should be shorter than your DHCP lease time to ensure IPs don't change before the Captive Portal timeout.
  • Allow Concurrent Logins: This option controls whether multiple machines can use the same login credentials simultaneously. If enabled, two or more users can log in with the same username/password at the same time.
  • Allow Cookie-based authentication: When enabled, a cookie is added to the user's browser and used to authenticate the user in future sessions. Cookies must be allowed by the browser and not cleared when closing the browser or by other security programs. When the Cookie timeout is reached, the user must re-authenticate (regardless of activity). The default is 24 hours.
  • Track logins using MAC address: When enabled, Captive Portal will use the MAC address instead of the IP address to identify the client machine. If the MAC address for a given IP address is unknown, it will revert to using an IP address. This option is useful on smaller flat networks where the NG Firewall is on the same network segment as all the hosts, and you have a very long timeout period such that a client's IP address might change.
    Figure 5. User Authentication Tab

Captive Portal Reports

The Reports tab provides a view of all reports and events for all traffic handled by the Captive Portal.

Reports

This application's reports can be accessed via the Reports tab at the top or the Reports tab within the settings. All pre-defined reports and custom reports created will be listed.

Reports can be searched and further defined using the time selectors and the Conditions window at the bottom of the page. The data used in the report can be obtained on the Current Data window on the right.

Pre-defined report queries:

Report Entry Description
Captive Portal Summary A summary of Captive Portal actions.
Activity Summary A summary of Captive Portal activity.
Top Active Users The top active users that logged in to Captive Portal.
Top Blocked Clients The top clients were blocked by Captive Portal because they were not logged in.
All Session Events All sessions are processed by the Captive Portal.
Passed Session Events Sessions matching passed hosts.
Captured Session Events Sessions matching capture rules.
All User Events All user sessions are processed by the Captive Portal.
Login Success User Events Successful logins to Captive Portal.
Login Failure User Events Failed logins to Captive Portal.
Session Timeout User Events Sessions that reached the session timeout.
Idle Timeout User Events Sessions that reached the idle timeout.
User Logout User Events All user logout events.
Admin Logout User Events Sessions logged off by the admin.
The tables queried to render these reports:

Related Topics

Report Viewer

Reports

IPsec VPN

The IPsec VPN service provides secure Internet Protocol (IP) communications by authenticating and encrypting each IP packet of a communication session.

Settings

This section reviews the different settings and configuration options available for IPsec VPN.

Status

The Status tab shows the status of the different components of the IPsec application.
Enabled IPsec Tunnels
This section shows a list of all IPsec tunnels that have been created and enabled. For tunnels that are active, the status will display the connection details reported by the IPsec subsystem. For active tunnels, the status will display the connection details reported by the IPsec subsystem. For inactive tunnels, the configuration information will be displayed.
Active VPN Sessions
This section shows a list of all active L2TP and Xauth connections. In addition to the connection details, a Disconnect column can forcefully disconnect an active session. Please note that there is no confirmation when you click the Disconnect icon. The corresponding session will be immediately terminated.
IPsec Options
Bypass all IPsec traffic
When this checkbox is enabled, traffic from IPsec tunnels will bypass all applications and services on the NG Firewall server. This was the only behavior available in previous versions of NG Firewall, so this option is enabled by default to maintain equivalent functionality on upgrade. If you disable this checkbox, traffic from IPsec tunnels can now be filtered through all active applications and services. Also, note that this only applies to plain IPsec tunnels. Traffic from L2TP and Xauth VPN clients will always pass through all active applications and services.

IPsec Tunnels

The IPsec Tunnels tab is where you create and manage the IPsec VPN configuration. The main tab display shows a summary of all IPsec tunnels that have been created.

Tunnel Editor When you create a new tunnel or edit and existing tunnel, the tunnel editor screen will appear with the following configurable settings:

Name Description
Enabled This checkbox allows you to set a tunnel to enabled or disabled.
Description This field should contain a short name or description.
Connection Type This field allows you to set the connection type to any of the following:
  • Select Tunnel to specify a host-to-host, host-to-subnet, or subnet-to-subnet tunnel. This is by far the most common connection type.
  • Select Transport to specify a host-to-host transport mode tunnel. This connection type is much less common and would generally only be used if you attempt to establish an IPsec connection to another host requiring this mode.
IKE Version The IKE version should use either version 1 or version 2. Both endpoints must use the same IKE version.
Connect Mode This field controls how IPsec manages the corresponding tunnel when the IPsec process restarts:
  • Select Always Connected to have the tunnel automatically loaded, routes inserted, and connection initiated.
  • Select On Demand to have the tunnel load in standby mode. We are waiting to respond to an incoming connections request.
Interface This field allows you to select the network interface associated with the IPsec tunnel on the NG Firewall server. For most situations, choose Active WAN to bind to the active Internet interface. This allows the VPN tunnel to reconnect using a secondary WAN interface in case of Internet failover. The Active WAN option is available when using the WAN Failover app. Alternatively, you can select a specific interface, or you can manually configure an IP address using the Custom option and manually inputting the IP address.
Any remote host Enabling this option allows the VPN Server to accept tunnel connections from any IP Address. This option enables the remote side of the tunnel to connect from a dynamic IP address or via a secondary WAN link. This option switches the Connect Mode to On Demand and removes the Remote Host field, as these options are not used when allowing connections from any remote host.
Remote Host This field should contain the host's public IP address to which the GRE tunnel will be connected.
Warning: Using host names with IPsec tunnels can often cause problems, especially if you have enabled the L2TP/Xauth VPN server. We strongly recommend the use of IP addresses in the Remote Host field.
Local Identifier This field is used to configure the local identifier used for authentication. When this field is blank, the value in the *External IP* field will be used.
Remote Identifier This field is used to configure the remote identifier used for authentication. When this field is blank, the value in the Remote Host field will be used.
Important: If the remote host is located behind any kind of NAT device, you may need to use the value % in this field for a connection to be successfully established.
Local Network This field configures the local network that will be reachable from hosts on the other side of the IPsec VPN.
Remote Network This field configures the remote network that will be reachable from hosts on the local side of the IPsec VPN.
Shared Secret This field should contain the shared secret or PSK (pre-shared key) used to authenticate the connection and must be the same on both sides of the tunnel for the connection to be successful. Because the PSK is used as the encryption key for the session, using long strings of a random nature will provide the highest level of security.
DPD Interval The number of seconds between R_U_THERE messages. Enter 0 to disable this feature.
DPD Timeout The number of seconds for a dead peer tunnel to be restarted.
Ping Address The IP address of a host on the remote network to ping for verifying that the tunnel is connected and routed. Leave blank to disable.
Ping Interval The time in minutes between ping attempts of the ping address. Leave as 0 to disable. The recommended value is 1 when using a Ping address.
Authentication and SA/Key Exchange If you leave the Phase 1 and Phase 2 manual configuration checkboxes disabled, IPsec will automatically attempt to negotiate the encryption protocol with the remote peer when creating the Tunnel. Given the number of different IPsec implementations and versions and the overall complexity of the protocol, best results can often be achieved by enabling manual configuration of these two options and selecting Encryption, Hash, DH Key Group, and Lifetime values that exactly match the settings configured on the peer device.

VPN Config

The VPN Config tab manages the L2TP/Xauth/IKEv2 server configuration, enabling VPN client connections from remote desktops and mobile devices. IPsec is preferred because it uses native VPN software built into most systems and, therefore, does not require installing 3rd party software. When available, use the IKEv2 VPN connections for optimal performance and compatibility.
Table 1.
Name Description
Enable L2TP/Xauth/IKEv2 Server Use this checkbox to enable or disable the L2TP/Xauth/IKEv2 server.
L2TP Address Pool This field configures the pool of IP addresses assigned to L2TP clients while connected to the server. The default 198.18.0.0/16 is a private network generally reserved for internal network testing. It was chosen as the default because it is used less frequently than other RFC-1918 address blocks and, thus, is less likely to conflict with existing address assignments on your network.
Xauth Address Pool This field configures the pool of IP addresses assigned to Xauth clients while connected to the server. The default 198.19.0.0/16 is a private network generally reserved for internal network testing. It was chosen as the default because it is used less frequently than other RFC-1918 address blocks, and thus, is less likely to conflict with existing address assignments on your network.
Custom DNS Servers Leave both fields blank to have L2TP and Xauth clients use the NG Firewall server for all DNS resolution. Alternatively, if you have other DNS servers you want clients to use, you can enter IP addresses in these fields.
IPsec Secret This is the shared secret that will be used between the client and server to establish the IPsec channel that will secure all L2TP and Xauth communications.
Allow Concurrent Logins If enabled, the same credentials can be authenticated simultaneously from multiple devices.
User Authentication In addition to the IPsec Secret configured above, VPN clients must authenticate with a username and password. To use the Local Directory, select this option and click the Configure Local Directory button to manage use credentials. Alternatively, you can use an external RADIUS server for authentication by selecting the RADIUS option and clicking the Configure RADIUS button to configure the RADIUS server options.
Server Listen Addresses This list configures one or more of your server IP addresses to listen for inbound VPN connection requests from remote clients. Clicking the Add button will insert a new line, allowing the entry of another server IP address.

GRE Networks

The GRE Networks tab is where you create and manage connections to remote GRE servers. Generic Routing Encapsulation (GRE) is a tunneling protocol that can encapsulate a wide variety of network layer protocols inside virtual point-to-point links over an Internet Protocol network.

GRE Address Pool

This field configures the pool of IP addresses assigned to interfaces created and associated with tunnels added on the GRE Networks tab. The default 198.51.100.0/24 is a private network generally reserved for internal network testing. It was chosen as the default because it is used less frequently than other RFC-1918 address blocks and, thus, is less likely to conflict with existing address assignments on your network. If you use GRE to connect multiple NG Firewall servers, you need to configure a different, unused pool on each server.

The main tab display shows a summary of all GRE Networks that have been created.

Network Editor

When you create a new GRE Network or edit and existing network, the network editor screen will appear with the following configurable settings:

Name Description
Enable This checkbox allows you to set a network to either enabled or disabled.
Description This field should contain a short name or description.
Interface This field allows you to select the network interface that should be associated with the GRE Network on the NG Firewall server. When you select a valid interface, the Local IP field (see below) will automatically be configured with the corresponding IP address. If, for some reason, you want to configure an IP address that is not currently active manually, you can set the Interface to Custom and manually input the IP address below.
External IP Use this field to configure the IP address associated with the GRE Network on the NG Firewall server. Normally, this field will be read-only and automatically populated based on the Interface selected earlier. If you select Custom as the interface, you can manually enter the local IP address.
Remote Host This field should contain the host's public IP address to which the GRE tunnel will be connected.
Remote Networks This field configures the list of remote network traffic that should be routed across this GRE tunnel. Networks should be entered after per line in CIDR (192.168.123.0/24) format.
Note: The subnets in Remote Networks must not conflict with your GRE Address Pool.

IPsec State

The IPsec State tab allows you to see the status of all established IPsec connections. There will typically be two entries per tunnel, one with details about the local side of the connection and another with details about the remote side.


IPsec Policy

The IPsec Policy tab allows you to see the routing table rules associated with each active IPsec VPN.


IPsec Log

The IPsec Log tab lets you see the low-level status messages the underlying IPsec protocol components generate. This information can be very helpful when diagnosing connection problems or other IPsec issues.


L2TP Log

The L2TP Log tab lets you see the low-level status messages generated by the underlying L2TP protocol daemon. This information can be very helpful when diagnosing connection problems or other L2TP issues.


Reporting

The Reports tab provides a view of all reports and events for all connections handled by IPsec VPN.

Related Topics

OpenVPN

IPsec VPN Reports

The Reports tab provides a view of all reports and events for all connections handled by IPsec VPN.

Reports

This application's reports can be accessed via the Reports tab at the top or the Reports tab within the settings. All pre-defined reports will be listed along with any custom reports that have been created.

Reports can be searched and further defined using the time selectors and the Conditions window at the bottom of the page. The data used in the report can be obtained on the Current Data window on the right.

Pre-defined report queries:

Report Entry Description
IPsec VPN Summary A summary of IPsec VPN actions.
Hourly Tunnel Traffic The amount of IPsec tunnel traffic over time.
Top Tunnel Traffic The amount of traffic for each IPsec tunnel.
Top Active Users The top IPsec VPN users by number of sessions.
Top Download Users The top IPsec users are grouped by the amount of data downloaded.
Top Upload Users The top IPsec users are grouped by the amount of data uploaded.
Top Protocols The top IPsec VPN connections by protocol.
L2TP/Xauth Events Shows all user L2TP/Xauth events.
Tunnel Connection Events Shows all IPsec VPN tunnel connection events.
Tunnel Traffic Events Shows all IPsec tunnel traffic statistics events.
The tables queried to render these reports:

OpenVPN

OpenVPN enables you to create an SSL-based VPN (virtual private network) that supports both site-to-site and client-to-site tunnels. This allows your road warrior users to connect to local resources as if they were in the office or connect the networks of several geographically distant offices - all with the added security of encryption protecting your data. OpenVPN supports any operating system with an OpenVPN-compatible VPN client (which is almost every OS), even smartphones! The OpenVPN application can run as a server, allowing remote clients to connect to the NG Firewall server, and the OpenVPN application can connect to other remote NG Firewall servers as a client. The VPN Overview article provides general guidance on which VPN technology may best fit different scenarios.

The Remote Clients sub-tab configures all the Remote Clients that can connect to this OpenVPN server. A Remote Client is any entity that connects to this OpenVPN server as a client. This includes remote desktops, laptops, devices, road warriors, etc., as well as remote OpenVPNs and remote NG Firewall networks.

Initially, no clients are allowed to connect, and a unique entry must be created for each remote client you want to allow to connect to this server.

To add a new Remote Client, click Add and provide the following information:
  • Enabled—If checked, this client is enabled. If unchecked, it is disabled and can not connect.
  • Client Name - A unique name for the client. (alphanumerics only)
  • Group - The group for this client. More information is below.
  • Type - The type of this client. An individual client for a single host is like a remote desktop or laptop. Network for an entire remote network that the server should also be able to reach.
  • Remote Networks - The remote network in CIDR notation if this remote client is of type Network. For example, 192.168.1.0/24 means that the 192.168.1.* The network lives behind the remote client and should be reachable from the server. A comma-separated list of CIDR networks can be used if multiple networks are reachable through this remote client. These networks are automatically exported so hosts on the main network and other remote clients can reach these networks.
After configuring this information, save the new Remote Client by clicking OK, then Apply. After saving settings, click the Download Client button in the Remote Clients table on the row for the new client. This will provide links to download the configuration profile for the configured client.
Click here to download this client's configuration zip file for other OSs (Apple/Linux/etc).
This file provides a zip file with the OpenVPN client configuration files. This file can configure various OpenVPN clients for various OSs, like Linux, Apple, and even some phones/tablets/devices.
Click here to download this client's configuration file for remote OpenVPN clients.
This file provides a zip file with the OpenVPN client configuration for setting up a remote OpenVPN application to connect as a client to this server.
Click here to download this client's configuration ONC file for Chromebook.
This file provides an ONC file that can be used to configure your Chromebook as a client to connect to the NG Firewall OpenVPN server. On the target device, browse to chrome://net-internals and use the Import ONC file.

First, you must install the OpenVPN client on the client system. You can download the client from here: https://openvpn.net/download-open-vpn/. After installing the OpenVPN client on the remote client, you can import the OpenVPN profile into the client.

Note: A client can only be connected once. If you install the same client on multiple remote devices, they will kick each other off when a new one logs in. In most cases, you need to setup a client for each remote device.

Groups

Groups are a convenient feature for "group" clients; some settings can be applied to that entire group. By default, there will be a Default Group. Each group has the following settings:

Table 2. Group Settings
Setting Description
Full Tunnel If checked, remote clients will send ALL traffic bound to the internet through the VPN. This allows NG Firewall to filter ALL internet traffic for connected clients by "proxying" it through the VPN and then out through NG Firewall's internet connection. This will have no effect on remote OpenVPN clients. If unchecked, only traffic destined to the local network is subject to filtering.
Push DNS If enabled, OpenVPN will "push" some DNS configuration to the remote clients when they connect. This is useful if you want some local names and services to resolve via DNS that would not be publicly resolved properly.
Push DNS Server If set to OpenVPN Server, the IP of the NG Firewall server itself will be pushed to the remote clients, and all remote clients will use the NG Firewall for all DNS lookups. If Custom is selected, one or two DNS entries can be specified that will be used for DNS resolution.
Push DNS Custom 1 If Push DNS Server is set to Custom, this IP will be pushed to remote clients to use for DNS resolution. It is important to export this address if traffic should travel through the VPN tunnel. If this value is blank, nothing will be pushed.
Push DNS Custom 2 This is just like Push DNS Custom 1, except it sets the secondary DNS value. If blank, no secondary DNS will be pushed.
Push DNS Domain If set, this domain will be pushed to remote clients to extend their domain search path during DNS resolution.

These settings will apply to all clients belonging to that group. Many sites will only have one group because all clients need the same settings. However, some clients have some Full Tunnel remote clients and some Split Tunnel remote clients. In this case, you need two groups where each client belongs to the appropriate group.

Exported Networks

Exported Networks is a list of networks reachable through the OpenVPN server for remote clients. These routes are pushed to remote clients when they connect, telling remote clients to reach the specified network through the OpenVPN server.

For example, exporting 1.2.3.4/24 will result in all 1.2.3. traffic going through the OpenVPN server.

The Exported Networks grid is pre-populated on installation with the IP/netmask of each static non-WAN interface.
  • This network will be exported/pushed to connect remote clients if Enabled is checked.
  • Export Name is a name that is purely used for documentation purposes.
  • The network is the network in CIDR notation.

Settings

The Status tab lists open connections, the time the tunnels were created, and transmits statistics.

Status

The Status tab shows you a list of open connections, the time the tunnels were created, and transmit statistics.

Connected Remote Clients

This table shows the currently connected remote clients connected to this OpenVPN (if the server is enabled.)

Name Description
Address The IP of the remote client.
Client The OpenVPN client name.
Start Time The time that the client connected.
Rx Data The amount of data received from this client in this session.
Tx Data The amount of data sent to this client in this session.

Remote Server Status

This table shows the remote servers this OpenVPN is connects to as a client.

Name Description
Name The name of the remote server.
Connected The current connection status
Rx Data The amount of data received from this client in this session.
Tx Data The amount of data sent to this client in this session.

Server


The Server tab includes all the configuration for OpenVPN's server functionality.

Site Name is the name of this OpenVPN site. A random name is chosen so that it is unique. A new name can be given, but it should be unique across all NG Firewall sites in the organization. For example, if the company name is "MyCompany," then "mycompany" is a bad site name if you have multiple NG Firewalls deployed, as it might be used elsewhere. The Site Name must be unique.

The site URL shows the URL remote clients will use to connect to this server. This is just for reference. Verify that this address will be resolved and publicly accessible from remote networks. This URL can be configured in Config > Network > Hostname .

If Server Enabled is checked, the OpenVPN server will run and accept connections from configured Remote Clients. If unchecked, the OpenVPN server will not run, and no server services will be provided.

Address Space defines an IP network/space for the VPN to use internally. The Address Space must be unique and separate from all existing networks and other address spaces on other OpenVPNs. A default will be chosen that does not conflict with the existing configuration.

NAT OpenVPN Traffic will NAT all traffic from remote networks to local networks to a local address. This helps solve routing and host-based firewall issues. The default and recommended values are enabled.

Username/Password Authentication can be enabled to activate two-factor authentication, requiring clients to provide a username and password when connecting.

Add MFA client configuration can be enabled to activate multi-factor authentication using a TOTP app. This feature uses the Local Directory users and requires each user to be configured with multi-factor authentication and paired with a TOTP app.

Authentication Method is used to select the authentication method for clients when Username/Password authentication is enabled.

Remote Clients


Client

The Client tab configures which remote servers this OpenVPN will connect to as a client.

Remote Servers

The Remote Servers table lists the currently configured remote servers that OpenVPN is configured to connect.

To configure a new server to connect to, log in to the remote server, configure a new client as described above, and click the Download Client. After you have downloaded the distribution zip file:
  1. Return to this OpenVPN and click the Browse button below the Remote Servers table.
  2. Select the zip file downloaded from the OpenVPN server computer and select OK.
  3. Press the Submit button to upload the zip file to OpenVPN, adding a new entry into the Remote Servers grid based on the configuration in the submitted zip file.

Suppose the remote server requires authentication using a username or password. In that case, you must edit the configuration, enable the Username/Password authentication checkbox, and enter the username and password to be used when establishing the connection.

After connected to a remote server, you can reach their exported networks. They will also be able to reach the networks on this server, specified as the remote network configuration.

Note: Site-to-site connections are not full-tunnel even if selected in the Group for the site-to-site. Internet traffic on the remote site will exit through its local gateway.

Advanced

The Advanced tab is provided for advanced users with detailed knowledge and understanding of OpenVPN who need specific configuration changes to address unique or unusual situations. It is possible to break your OpenVPN configuration completely with a single wrong character, misplaced space, or by changing a configuration option that probably shouldn't be changed. Changes you make on this page could compromise your server's security and proper operation and are not officially supported.

Common Settings

At the top of the Advanced page are the Protocol, Port, and Cipher options. These must be the same on the client and server for connections to work. Since they are the options most frequently modified, they can be easily configured here and will apply to both the client and server.

The Client to Client Allowed checkbox turns traffic on or off, passing between OpenVPN clients. When enabled, all clients will have full network access to each other when connected. If disabled, traffic will not be allowed to flow between connected clients.

Server Configuration and Client Configuration

Suppose you require changes to other low-level parameters. In that case, the Server and Client Configuration grids allow you to control the generated OpenVPN configuration file effectively. Both grids work similarly, with each configuration applied to the corresponding server or client openvpn.conf file, respectively.

Both lists contain config items comprised of an Option Name and Option Value pair. By default, all items in both configuration grids are read-only. The lists represent the default configuration settings used for the server and client configuration files. The default items cannot be modified or deleted; they can only be excluded. When you exclude an item, it is effectively removed from the resulting configuration file. To change one of the default items, add a new item with the same Option Name and input the Option Value that you want to be used. This will effectively override the default. The same method can also be used to add configuration items not included in the default list.

Exclude Default Configuration Item

This example shows how to disable the comp-lzo option in the server configuration file to turn off compression:


Modify Default Configuration Item

This example shows how to change the default keepalive setting in the server configuration file:


Add New Configuration Item

This example shows how to add a socks-proxy setting to the client configuration file:


OpenVPN Reports

The Reports tab provides a view of all reports and events for all connections handled by OpenVPN.

Reports

You can access the applications reports via the Reports tab at the top or the Reports tab within the settings. All pre-defined reports will be listed along with any custom reports that have been created.

Reports can be searched and further defined using the time selectors and the Conditions window at the bottom of the page. The data used in the report can be obtained on the Current Data window on the right.

Pre-defined report queries:

Report Entry Description
OpenVPN Summary A summary of OpenVPN actions.
OpenVPN Bandwidth Usage The approximate amount of data transferred over openvpn connections.
OpenVPN Events The number of login and logout events over time.
OpenVPN Sessions The amount of openvpn sessions over time.
Top Clients (by usage) The number of bytes transferred grouped by remote client.
Connection Events OpenVPN client connection events.
Statistic Events Shows all OpenVPN connection traffic statistics events.
The tables queried to render these reports:

Tunnel VPN

The Tunnel VPN service app provides secure tunnels to remote servers and services and determines which traffic on the network goes through these tunnels.

Use Cases

Tunnel VPN is used in a wide variety of configurations. Some common scenarios are described below.

Branch Offices

Organizations with one or more small branch offices can use Tunnel VPN to send all internet-bound traffic at the remote small branch through the central site for security and filtering. This alleviates the need to actively manage the security and filtering configuration at the branch offices and allows for easier management at the central site and centralized monitoring and reporting.

Remote Security Services

Many cloud-based security services, or Cloud Access Security Brokers (CASB), enforce policy and security network traffic as it transits from the local infrastructure to the Internet.

Tunnel VPN can be configured to send traffic, either in total or selectively, to the desired cloud services. For example, Tunnel VPN can send all port 25 (SMTP) through a specific tunnel to a cloud email archiving service. Alternatively, you could send DNS, web, or all traffic through dedicated cloud services.

SD-WAN

SD-WAN (software-defined networking) type deployments often need to maintain several tunnels to dedicated CASBs or internet "exit" points. Tunnel VPN allows you to maintain connections to several cloud exit points and prioritize the tunnels such that if one tunnel goes down, the next available tunnel will be leveraged.

Combined with WAN Failover and WAN Balancer, this provides an easy way to ensure the network is always online and the best possible tunnel is being used for connectivity, regardless of cloud services going up or down or individual ISPs or internet connections being up or down.

Privacy

Tunnel VPN can connect to other NG Firewall services or most Privacy VPN services (like NordVPN, ExpressVPN, Private Internet Access, and so on).

Many countries have imposed limits or monitored "forbidden" content. This can range from content expressing certain political views to information on historical events, region-locked content, unapproved types of entertainment, or copyrighted material. Also, many locations do not have access to ISPs (or governments) that respect net neutrality.

For these locations, Tunnel VPN can provide safe encrypted passage to a location that supports freer internet and net neutrality. Rules can either statically determine what traffic goes through a tunnel (specific hosts or ports) or can dynamically shift which traffic uses the tunnel using tags. For example, a host can be switched to using a tunnel once Skype or Bittorrent usage is detected.

Settings

This section discusses the different settings and configuration options available for Tunnel VPN.

Status

The Status tab shows the on/off status of Tunnel VPN.

Tunnels

The Tunnels tab configures the encrypted tunnels to remote servers/services.

To add a new tunnel, click the Add button at the top.
  • Enabled—If checked, this tunnel is enabled. If not enabled, it will not connect and will not be active.
  • Tunnel Name - A unique name for the tunnel.
  • Provider - this is the remote service/provider. Select the appropriate option for the remote service.
    1. Arista - this is for connecting to a remote NG Firewall server.
    2. NordVPN - this is for connecting to NordVPN at [nordvpn.com].
    3. ExpressVPN - this is for connecting to ExpressVPN at [expressvpn.com].
    4. Any remote service that supplies a zip file with an OpenVPN configuration inside uses a custom zip file.
    5. Custom zip file with username/password - used for any remote service that supplies a zip file with an OpenVPN configuration inside and requires a valid username and password.
    6. Custom Ovpn file - used for any remote service that supplies an Ovpn file.
    7. Custom Ovpn file with username/password - used for any remote service that supplies an Ovpn file, which also requires a valid username and password.
    8. A custom conf file is used for any remote service that supplies an OpenVPN conf file.
    9. Custom conf file with username/password - used for any remote service that supplies an OpenVPN conf file and requires a valid username and password.
  • Select the VPN Config File button to upload the zip/conf/ovpn file.
  • The username specifies the username (if required).
  • Password specifies the password (if required).

First, provide a name and choose the remote provider type. After choosing the provider type, the instructions describe configuring the rest of the fields.

All enabled tunnels will attempt to connect to the remote services on save. The log can be viewed on the Log tab.

Rules

Rules control what traffic is routed through the tunnels. The Tunnel VPN rules are run before any WAN Balancer rules are evaluated, and the routing table is consulted. If a Tunnel VPN rule matches and the tunnel is active, the traffic will exit through the tunnel regardless of the WAN Balancer or routing configuration. In other words, Tunnel VPN takes precedence over any other routing configuration.

The Rules describe how rules work and how they are configured. As with all rules, rules are evaluated in order, and the action is taken from the first matching rule.

Example: Static Rules

  • If the following conditions are met:
    • Destination Port is 25
  • Perform the following action(s):
    • Destination Tunnel: tunnel-1

This will route all port 25 traffic through tunnel-1. If tunnel-1 is offline, traffic will be routed normally.

Example: Preference Order

  • Rule 1: Always (no conditions) perform the following action, Destination Tunnel: 'tunnel-1'
  • Rule 2: Always (no conditions) perform the following action, Destination Tunnel: 'tunnel-2'
  • Rule 3: Always (no conditions) perform the following action, Destination Tunnel: 'tunnel-3'

Then traffic will always route to tunnel-1. If tunnel-1 is not available it will route to tunnel-2. If tunnel-2 is not available, it will be routed to tunnel-3. If tunnel-3 is not available, it will normally route.

Example: Dynamic Rules

Unlike most solutions, the NG Firewall also allows for automatic dynamic adjustment of traffic through the tunnel using tags. Hosts can be tagged manually by tagging the appropriate device or username associated with a host or automatically using trigger rules Events.

For example, if you'd like a bittorrent host to be routed through the tunnel automatically. Add a trigger rule to tag hosts detected as using bittorrent (an example is there by default), and then add the following Tunnel VPN rule:
  • If allow of the following conditions are met:
    • Client Tagged is bittorrent-use.
  • Perform the following action(s):
    • Destination Tunnel: tunnel-1.

This will route any hosts tagged bittorrent-use through tunnel-1. The trigger rule will ensure that any host detected using BitTorrent will automatically be tagged so that each session after the detection will go through the tunnel.

Example: Multiple Triggers

If there are many scenarios in which a host should be routed through a tunnel, you can configure multiple triggers. For example, you can configure multiple trigger rules:
  • If the host uses Skype, the tag host tunnel expires in 10 minutes.
  • If the host is accessing Craigslist, the tag host tunnel expires in 10 minutes.
  • If the host is accessing Gaming category website, tag host tunnel expires in 10 minutes.

Then add the following Tunnel VPN Rule:

  • If allow of the following conditions are met:
    • Client Tagged is a tunnel.
  • Perform the following action(s):
    • Destination Tunnel: tunnel-1.

If a host does any of that action, it will automatically be switched to the tunnel (until the tag expires, 10 minutes after the specified activity stops).

Log

This shows the raw OpenVPN log file.

CAUTION: OpenVPN often logs many errors that are not issues.

This is useful for debugging issues if the tunnels are not initializing correctly to the service providers.

Related Topics

OpenVPN

OpenVPN Reports

Tunnel VPN Reports

There are currently no specific reports for Tunnel VPN. However, all traffic is logged using the appropriate tunnel set as the destination interface.

All reports (Application Control, Web Filter, etc.) can be viewed and filtered per tunnel by adding a Destination Interface condition where the value equals the tunnel ID.

WireGuard VPN

The WireGuard VPN service provides virtual private networking via Wireguard VPN, an open-source lightweight VPN application and protocol designed to be fast, secure, and easy to configure.

Settings

This section reviews the different settings and configuration options available for WireGuard VPN.

Status

The Status tab shows the status of the WireGuard VPN service:

  • Local Service Information

This section displays information about the local WireGuard service, such as the public key, endpoint address and port, peer address, and the list of local networks.

  • Enabled Tunnels

    Table 3. Settings
    Listen port Sets the port where the WireGuard server will listen for inbound tunnel connections from peers.
    Keepalive interval Sets the passive keepalive interval, which ensures that sessions stay active and allows both peers to determine if a connection has failed or been disconnected passively.
    MTU Sets the MTU size for WireGuard tunnels.

Remote Client Configuration

These fields are used when generating the Remote Client configuration.

Table 4. Remote Client Configuration Fields
Field Description
DNS Server The IP address of the local DNS server will be added to the client configuration. It is initially populated using the first defined DHCP DNS Server Override address is used it found. If not, the IP address of your first non-WAN interface is used.
Networks These are networks added to the client's allowed IP list. It is initially populated with all known local networks discovered from non-WAN interfaces (and their aliases) and static routes.
Peer IP Address Pool
Assignment They were used to select the method for address pool assignment. It can be set automatically to allow the system to select an unused network space or be self-assigned to configure a user-entered network space.
Network Space Shows the automatically assigned networks space or allows editing the self-assigned network space.
New Network Space Click when using Automatic Assignment to select a new random network space.

Tunnels

The Tunnels tab is where you create and manage WireGuard VPN tunnels. Each tunnel in the table can view the client configuration or edit the tunnel.

For a step-by-step guide to setting up WireGuard VPN tunnels, see Setting up WireGuard VPN site-to-site connections in NG Firewall.
Remote Client
Clicking this icon will display a window showing the recommended client configuration in both Quick Reference (QR) Code, which many WireGuard mobile apps can scan with the device's camera, and import a text file suitable for copying and pasting into the remote client.
Tunnel Editor
When you add a tunnel or edit and existing tunnel, the tunnel editor screen will appear with the following configurable settings:
Note: You can copy the configuration from a remote NG Firewall peer and paste it into any configurable field. The screen automatically populates all of the relevant fields from the remote side. This simplifies the configuration of tunnels and is recommended to avoid misconfiguration.
Name Description
Enabled This checkbox allows you to set a tunnel to enabled or disabled.
Description This field should contain a short name or description.
Remote Public Key This field is for the public key of the tunnel peer.
Remote Endpoint Type This field controls the endpoint type for the peer.
  • Select Roaming if the remote endpoint is a mobile device using the WireGuard app or if the remote network is used for client access only and does not host any resources.
  • Select Static for a traditional site-to-site tunnel configuration where each network hosts resources that must be accessible through the virtual private network.
Remote Endpoint IP Address Sets the IP address for a static endpoint.
Remote Endpoint Port Sets the port for a static endpoint.
Remote Peer IP Address This field sets the IP address that will be used by the remote peer.
Remote Networks This field configures the list of remote networks that should be routed across this WireGuard tunnel. Networks should be entered per line in CIDR (192.168.123.0/24) format.
Monitor Ping IP Address The IP address of a host on the remote network to ping for verifying that the tunnel is connected. Leave blank to disable.
Monitor Ping Interval The time in seconds between attempts to ping the configured ping monitor address.
Monitor Alert on Tunnel Up/Down When enabled, CONNECT and DISCONNECT alerts will be generated when the configured ping monitor transitions from reachable to unreachable and unreachable to reachable.
Monitor Alert on Ping Unreachable When enabled, UNREACHABLE alerts will be generated for each monitor ping that fails when the target is unreachable.
Local Service Information This section includes information from the Status tab useful when copying/pasting configurations between peers.

WireGuard VPN Client

The WireGuard Virtual Private Network client app is available for download on various mobile devices and desktop operating systems, including iOS, macOS, Android, Windows, and Linux. The download links for each supported OS are available from the WireGuard Website.

For a step-by-step setup guide, refer to the KB article Setting up WireGuard VPN on mobile devices and desktops.

Related Topics

IPsec VPN

OpenVPN

WireGuard VPN Reports

The Reports tab provides a view of all reports and events for all connections handled by WireGuard VPN.

Reports

You can access the applications' reports via the Reports tab at the top or the Reports tab within the settings. All pre-defined reports will be listed along with any custom reports that have been created.

Reports can be searched and further defined using the time selectors and the Conditions window at the bottom of the page. The data used in the report can be obtained on the Current Data window on the right.

Pre-defined report queries:

Report Entry Description
WireGuard VPN Summary A summary of WireGuard VPN traffic.
WireGuard VPN Bandwidth Usage The amount of traffic processed by the WireGuard service.
WireGuard VPN Events Time chart of WireGuard VPN connection events.
Top Remove Clients (by usage) The top WireGuard VPN peers by traffic usage.
Connection Events Shows all WireGuard VPN tunnel monitoring events.
Tunnel Traffic Events Shows all WireGuard tunnel traffic statistics events.

NG Firewall Performance Apps


This section discusses the following topics:

Bandwidth Control

Bandwidth Control allows you to monitor and control bandwidth usage on your network.


Bandwidth control can be used to ensure that your network continues to operate smoothly and that Bandwidth is shared optimally based on what is important to you. Many organizations need help with bandwidth problems, such as students watching online videos or clients using BitTorrent, while more important tasks are difficult to complete for Bandwidth. Using BitTorrent, you can use Bandwidth Control to prioritizePriorityhat or slow down all traffic from machines.

Note: Enabling Bandwidth Control automatically enables Quality of Service (QoS). But disabling Bandwidth does not automatically disable QoS.

Settings

This section discusses the different settings and configuration options available for Bandwidth Control.

Status

This displays the current status and some statistics.

About Bandwidth Control


Setup Wizard

The setup wizard configures the initial configuration of the Bandwidth Control. Pay attention to the prompts as they provide valuable information on how the application works and the answers to your questions will determine the configuration.
  • Configure WAN download and upload Bandwidth: After the welcome screen, you will be asked to set the bandwidth rates for your WAN interface. This is the most important setting in the configuration of Bandwidth Control. If you are unsure, it is recommended that you run some bandwidth tests when there is no other activity to determine the true download and upload rates of your WAN connection. Entering a value around 95%-100% of the measured value is typically ideal. If the value is too low, Bandwidth Control will unnecessarily limit Bandwidth to your entered value. If the value is too high, Bandwidth Control will be less effective as it will over-allocate Bandwidth and lose some ability to differentiate by priority. YPrioritybe asked to repeat this process for each WAN interface.
  • Choose a starting configuration: After setting the WAN settings, choose a configuration that best suits your organization. Each configuration's goals are described, as well as what is prioritized and deprioritized. These rules can be customized later. This is just a starting configuration.
  • Quotas: Quotas can be configured in addition to the starting configuration. Most sites will not need quotas, but they can be extremely useful in some scenarios to prevent users from monopolizing resources. Click Enable to enable quotas and provide information that best suits your organization.
    1. Quota Clients: The clients will be given quotas. Refrain from giving a range that includes servers and machines for which you don't want to have quotas.
    2. Quota Expiration: The expiration time of each quota (or the time the quota will be used.) After a quota expires, a new quota will be granted.
    3. Quota Size: The size of the quota each host is granted (in bytes).
    4. Quota Exceeded Priority: The priority giPriorityosts after they exceed their quota (if they do so).

More information on Quotas and how they work can be found in the Quotas section.

After this, your configuration of Bandwidth Control is complete, and Bandwidth Control is enabled!

Rules

The rules tab contains most configurations and settings controlling bandwidth control behavior. Rules determine the action taken when traffic passes through Bandwidth Control. For each session, the rules are evaluated in order until the first match is found; then, the action associated with the matching rule is performed, and the data chunk is sent. If no rule is found, no action is taken. If the session has been given no priority, it is given the default QoS priority, which is normally Medium.

Note: Unlike most Rules in other apps, the rules in Bandwidth Control are consulted not only when the session is formed but also again on the first ten packets because some matches, such as "HTTP: Hostname" or "Application Control: Application" are not known until several packets into the session. Also, all of a host's sessions will be reevaluated when added/removed to the penalty box or when a quota is exceeded, so active sessions will be reprioritized accordingly.

Extensive rule sets can be created (imported and exported) that carefully assign the correct priorities to the desired traffic and perform the desired actions at the desired times.

The Rules documentation describes how rules work and how they are configured.

Rule Actions
  • Set Priority SePriorityatching session to the chosen priority.
    1. PPriorityThe priority toPrioritygned.
  • Tag Host adds a tag to the host to mark it for further actions.
  • Give Host a Quota: Gives the host IP a quota.
    1. Quota Expiration defines how long their quota will last
      1. "End of Hour" means the quota will expire at the 59th minute of the hour.
      2. "End of Day" means the quota will expire at 11:59pm.
      3. "End of Week" means the quota will expire 1 minute before the end of the week (Saturday 11:59pm if US-localized)
      4. An integer can also be specified for the number of seconds the quota will last from the creation date.
    2. Quota Bytes define the number of bytes in their quota.
  • Give User a Quota: Gives the user a quota
    1. Quota Expiration defines how long their quota will last
      1. "End of Hour" means the quota will expire at the 59th minute of the hour.
      2. "End of Day" means the quota will expire at 11:59pm.
      3. "End of Week" means the quota will expire 1 minute before the end of the week (Saturday 11:59pm if US-localized)
      4. An integer can also be specified for the number of seconds the quota will last from the creation date.
    2. Quota Bytes define the number of bytes in their quota.

Priorities

The overall effect of Bandwidth Control is to map traffic to priorities that are enforced by the QoS engine. There are 7 Priorities: Very High, High, Medium, Low, Limited, Limited More, and Limited Severely.

The first four priorities can be considered "normal" - very High, High, Medium, and Low. They are given certain precedence over bandwidth rights. Very High traffic can consume bandwidth before High, Medium, and Low. The Very High bucket will be assigned the largest bandwidth, less to High, even less to Medium, and much less to Low.

The other three - Limited, Limited More, and Limited Severely - are different because they will never use all available bandwidth. The classes are punitive because they limit bandwidth to a percentage of the whole, even if more is available.

To read more in-depth about the effects of prioritization and how bandwidth allotment works, see Quality of Service (QoS).

Note: Effective bandwidth shaping is all about assigning the correct priorities so that important traffic is never starved by less important traffic.

A fundamental principle is that limiting traffic to fixed low-rate enforcement is almost never right because wasted bandwidth is irrecoverable.

In cases where the desire is to starve less important traffic, it should be assigned a lesser priority (medium or low) to consume all bandwidth if no more important tasks are available. This means the less important task will be finished quicker so that later, these resources will be free, which occurs definitionally at no expense to higher priority traffic.

The priorities that limit to less than 100% even when the bandwidth is unused (Limited, Limited More, and Limited Severely by default) are useful for punitive situations.

Quotas

Quotas are set amounts of data that can be used over a certain amount of time. This is useful for sites where you want to punish excessive usage. For example, in a hotel, we want each IP to get 1 GB a day, but if this amount is exceeded, it will be considered excessive, and that host can be treated differently (be blocked, receive less bandwidth, etc). By using quotas and rules, bandwidth abusers are handled automatically, requiring no administrator intervention.

Quotas can be assigned to Users or Hosts, and the current quota status can be viewed by clicking on Users or Hosts accordingly. All sessions' data passing through the NG Firewall gets counted against the corresponding Host or User.

Bandwidth Control Reports

The Reports tab provides a view of all reports and events for all traffic handled by Bandwidth Control.

You can access the applications' reports via the Reports tab at the top or the Reports tab within the settings. All pre-defined reports will be listed along with any custom reports that have been created. Reports can be searched and further defined using the time selectors and the Conditions window at the bottom of the page. The data used in the report can be obtained on the Current Data window on the right. Pre-defined report queries:

Report Entry Description
Bandwidth Control Summary A summary of Bandwidth Control actions.
Bandwidth Usage The approximate averaged data transfer rate (total, sent, received) over time.
Top Hostnames Usage The bandwidth usage of the top hostnames.
Top Hostnames (by total bytes) The sum of the data transferred grouped by hostname.
Top Hostnames (by received bytes) The sum of the received data grouped by hostname.
Top Hostnames (by sent bytes) The sum of the sent data grouped by hostname.
Top Clients Usage The bandwidth usage of the top clients.
Top Clients (by total bytes) The sum of the data transferred grouped by client address.
Top Usernames Usage The bandwidth usage of the top usernames.
Top Usernames (by total bytes) The sum of the data transferred grouped by username.
Top Server Port Usage The bandwidth usage by top server port.
Top Ports (by total bytes) The sum of the data transferred grouped by server port.
Top Ports (by received bytes) The sum of the data received grouped by server port.
Top Ports (by sent bytes) The sum of the data sent grouped by server port.
Top Applications Usage The bandwidth usage of the top applications.
Top Application (by total bytes) The sum of the data transferred grouped by Application Control application.
Top Application (by received bytes) The sum of the data sent grouped by Application Control application.
Top Application (by sent bytes) The sum of the data sent grouped by Application Control application.
Top Categories Usage The bandwidth usage of the top application categories.
Top Category (by total bytes) The sum of the data transferred grouped by Application Control category.
Top Priorities Usage The bandwidth usage by priority.
Top Priorities (by total bytes) The sum of the data transferred grouped by priority.
Top Countries Usage The bandwidth usage by top countries.
Top Countries (by total bytes) The sum of the data transferred grouped by country.
Bypassed (by total bytes) The sum of the data transferred grouped by bypassed.
All Sessions All sessions are processed by Bandwidth Control.
Quota Events Shows when quotas are assigned or expired.
Prioritized Sessions All sessions are prioritized by Bandwidth Control.
The tables queried to render these reports:

Related Topics

Report Viewer

Reports

Branding Manager

The Branding Manager is designed to allow you to re-brand user-facing components by adding your company logo, name, URL, and contact email.


The Branding Manager will replace the "Arista Edge Threat Management" branding in all user-facing interactions, such as block pages, quarantine digest emails, quarantine digests, root certificate installer, etc. This is not meant to remove all Arista Edge Threat Management branding; the administrator UI still contains many references to the hNG Firewall. For HTML/CSS experts, combining Branding Manager with a custom block page skin and a custom rack skin gets you a fully customized style. Of course, you don't need a custom skin to change any branding elements. See the table below to see what you can change with Branding Manager!

Settings

Status

This displays the current status and some statistics.


Settings

This section reviews the different settings and configuration options available for Branding Manager.

Select the Settings button on the faceplate to modify your Branding Manager settings. This will bring up a menu where you can upload a custom logo and modify the name, URL, and contact settings. Note that the recommended resolution for logos is 150x100; the maximum resolution is 166x100. All image formats are supported; however, we do not recommend including animation, as it can affect the PDF reports. Branding Manager's text fields have a 256-character limit.


  • Logo: Use this option to upload a replacement logo.
  • Contact Information
    • Company Name: The name of your company.
    • Company URL: The URL for your website (for example, http://www.arista.com).
    • Contact Name: The name of the network administrator who should be contacted if questions or problems arise.
    • Contact Email: The email address of the network administrator (for example, This email address is being protected from spambots. You need JavaScript enabled to view it.)
  • Banner Message
    • Message Text: Text that will be displayed above login boxes. This is restricted to plain text.

Fine-tune Your Logo

You do not need to fine-tune your logo, but it will make it look more professional. Here are a few tips:
  • Convert your image to Greyscale: Using Adobe Photoshop, open your image and go to File > Save As Web & Devices , specify GIF and Greyscale, then Save.
  • Resize your image: Using Adobe Photoshop, open your image and go to File > Save As Web & Devices , click the Image tab, and resize to 150x100.
  • Place your logo on a background: Download the templates, then overlay your logo.

WAN Balancer

The WAN Balancer works with multiple ISPs to distribute your traffic across multiple connections. It will decide dynamically which WAN connection to send traffic over, maximizing your bandwidth usage.


Consider using WAN Failover in your network. It automatically reroutes traffic over working WAN links when one fails. If WAN Failover is running and detects a WAN as being down, the WAN Balancer will not balance traffic to that WAN.

Settings

This section discusses the different settings and configuration options available for the WAN Balancer.

Status

This tab displays information and statistics for each WAN interface.


Traffic Allocation

On the Traffic Allocation tab,

You set the weights for each WAN connection on the Traffic Allocation tab. If only one WAN is defined, you will see only one interface listed here. Enter the weighting you want, check that you are good with the percentages assigned to each WAN, and select Save.

As each WAN Balancer processes each new session, it decides which WAN it will use to send this traffic if there is no local route for the traffic. If traffic between these two IPs has occurred recently, a route is likely already in the cache. If so, this route will be used to send this new session. This ensures that all traffic between two IPs uses the same WAN consistently to avoid issues with cloud services.

If there is no route in the cache, then a WAN will be chosen based on the hash of the source and destination and the weights given in the Traffic Allocation settings. It is not that the traffic allocation weights don't determine exactly the percentages of traffic over the various WANs; it is only how sessions will be assigned to various WANs.


Route Rules

Route Rules determine which WAN will be used for traffic going to the internet (traffic with no local route). As described in the Rules documentation, the Route Rules are evaluated for new sessions, and the first matching rule will determine which WAN interface is used. If no matching rule is found or the first one has a Destination WAN set to Balance, the session will be randomly assigned a route based on Traffic Allocation settings. A limited set of conditions are available for WAN Balancer Route Rules, which include source, destination, port, and protocol.

This lets you specify which WAN is used for certain traffic based on various conditions. For example:
  • To put all traffic from one server on a specific WAN, add a rule with the condition "Source Address is server_ip" and the Destination WAN as the WAN to be used.
  • To send all SMTP to a specific WAN, add a rule with "Destination Port is 25," the Destination WAN is the WAN to be used.

This is also useful if you have one connection with less throughput but lower latency. In this case, you can specify that all VOIP or latency-sensitive traffic uses the lower latency connection.

Note: Unlike Routes, Route Rules that route traffic to a down WAN will automatically balance traffic to one of the active WANs. For example, if a rule says to send all port 25 traffic to WAN2, but WAN Failover knows WAN2 is down, this rule will effectively mean Balance, which means the session will be put on one of the other active WANs.
Note: Routes and routes based on the network configuration always override Route Rules. Route Rules only apply to sessions with no local route based on configuration on routes in Routes. Route Rules suggest that the traffic be routed out a specific WAN if no other route says where to send it.

WAN Balancer Reports

The Reports tab provides a view of all reports and events for all traffic handled by WAN Balancer.

Reports

The reports of this application can be accessed via the Reports tab at the top or the Reports tab within the settings. All pre-defined reports and custom reports created will be listed.

Reports can be searched and further defined using the time selectors and the Conditions window at the bottom of the page. The data used in the report can be obtained on the Current Data window on the right.

Pre-defined report queries:

Report Entry Description
WAN Balancer Summary A summary of WAN Balancer actions.
Sessions By Interface The number of sessions destined to each interface.
Bytes By Interface The number of bytes destined to each interface.
The tables queried to render these reports:

Related Topics

Report Viewer

Reports

WAN Failover

WAN Failover works with multiple ISPs to ensure that you maintain Internet connectivity if a loss of connectivity occurs on one of your WAN connections. If one of your ISP links goes down, WAN Failover will automatically route all traffic over the other WAN(s) until service is restored.

Consider using a WAN Balancer in your network. It allows you to maintain an automatic distribution of traffic over multiple WAN links rather than just failing over if one goes down.

Tests are configured for each WAN and run continuously to determine the current status of each interface. If enough tests fail on a given WAN to exceed the failure threshold, the WAN is considered down, and internet-bound traffic will not go out of that WAN. The lowest ID active WAN is the default WAN interface for internet-bound traffic.

Settings

This section discusses the different settings and configuration options available for WAN Failover.


Status

The Status tab overviews the WANs and the current test results.
  • Interface ID: The number of the interface.
  • Interface Name: The name of the interface in the NG Firewall GUI.
  • System Name: The name of the interface as seen by NG Firewall.
  • Online Status: True or False whether the WAN is online.
  • Current Tests Count: The total number of tests ran on that interface.
  • Tests Passed: The total number of tests ran on that interface that passed.
  • Tests Failed: The total number of failed tests ran on that interface.

Tests

WAN Failover must have tests set up for every WAN interface; these tests are set up on the Tests tab. Click Add, select your interface and test type, then run the test. If it passes, go ahead and save it.

Tests are how WAN Failover determines if the given WAN interface is up or down, so it is important to pick tests that correlate with that WAN connection's status. For example, pinging an ISP router is generally a good test because it usually fails when the ISP is down but works when connectivity is good. Pinging a public site like google.com may work, but sometimes have false positives or negatives. Pinging the gateway may also work but may sometimes provide false positives when the gateway is reachable but the ISP is offline.

The options are as follows:
Table 1. Options
Interface The interface for which you want to set up a test.
Description A description for this test.
Testing Interval Determines how often (in seconds) your specified test will be executed.
Timeout The maximum time that may pass without receiving a response to your test. This value should be less than the Testing Interval. Ensure that you allow enough time to pass if you have a poor connection to the internet or a connection that often has long latency (delays) associated with it.
Failure Threshold How many failures are acceptable during the testing period.
Test Type The specific method you will use to determine whether failover will be initiated.

Note on DNS tests:

Warning:DNS tests use all the DNS entries in the Interface WAN settings. If the DNS entries are only available on a specific WAN, for example, ISP DNS is only available on their network, then routes must be configured for those DNS servers. Otherwise, some DNS tests will fail as the DNS is not reachable on a non-ISP WAN, making NG Firewall falsely see the WAN as down.

WAN Failover Reports


The Reports tab provides a view of all reports and events for all traffic handled by WAN Failover.

Reports

You can access the applications' reports via the Reports tab at the top or the Reports tab within the settings. All pre-defined reports and custom reports created will be listed.

Reports can be searched and further defined using the time selectors and the Conditions window at the bottom of the page. The data used in the report can be obtained on the Current Data window on the right.

Pre-defined report queries:

Report Entry Description
WAN Failover Summary A summary of WAN Failover actions.
WAN Disconnect Events The number of disconnect events grouped by WAN.
WAN Interface Outages The failed tests of each interface over time.
Outage Events Events where the failure threshold was exceeded and the WAN was considered offline.
Test Events All test events and their outcome.
Failed Test Events All tests that failed.
Success Test Events All tests that resulted in success.
The tables queried to render these reports:

Related Topics

Report Viewer

Reports

Web Cache

Web Cache application provides HTTP content caching: as web traffic passes through the NG Firewall server, it will be transparently cached. This will save bandwidth by serving repeat content from the local cache and improve user experience by loading cached sites faster.


Like Web Filter and other applications on the NG Firewall, Web Cache works transparently on traffic passing through the NG Firewall server. You do not need to change any settings on any of the PCs behind the NG Firewall to gain the benefits of web caching.

When content is downloaded from the web, it is stored in a local cache on the disk. Upon later requests of the same web document, the content is served directly from the local cache. The same document does not get downloaded multiple times, and the client gets a better user experience because they don't have to wait for subsequent downloads of the same document.

Cache Bypass

The Cache Bypass tab allows you to enter sites you do not want to be cached. Some sites do not operate properly with Web Cache working (such as Google Maps, which is bypassed by default), so you may need to add some sites to this list. Select Add, fill in the domain name, and save.


Settings

This section discusses the different settings and configuration options available for Web Cache.

Status

The Status tab displays statistics from Web Cache, but there are no settings to configure.
  • Statistics: The following information will help you understand the statistics Web Cache provides:
    • Cache Hit Count displays the total number of HTTP requests served from the cache.
    • Cache Miss Count displays the total number of HTTP requests that were not found in the cache and were thus served using content retrieved from the external server where the content resides.
    • Cache Hit Bytes displays the size, in bytes, of all HTTP requests that have been served from the cache.
    • Cache Miss Bytes displays the size, in bytes, of all HTTP requests not found in the cache.
    • User Bypass Count displays the number of HTTP sessions that bypassed the cache because the server hosting the content was listed in the user-managed cache bypass list.
    • System Bypass Count displays the number of HTTP sessions that bypassed the cache because the system determined they were incompatible with our caching model. Web Cache can generally handle all GET and HEAD requests, and we also allow smaller POST requests to transit through the cache logic. Everything else (i.e., Large POST requests, non-HTTP traffic, etc.) will bypass the cache entirely.
  • Clear Cache: If content stored in the cache becomes stale or corrupt, the Clear Cache button can be used to clear it. As noted in the GUI, clearing the cache requires restarting the caching engine, which will cause active web sessions to be dropped and may disrupt web traffic for several seconds.

Web Cache Reports


The Reports tab provides a view of all reports and events for all traffic handled by Web Cache.

Reports

You can access the applications' reports via the Reports tab at the top or the Reports tab within the settings. All pre-defined reports will be listed along with any custom reports that have been created.

Reports can be searched and further defined using the time selectors and the Conditions window at the bottom of the page. The data used in the report can be obtained on the Current Data window on the right.

Pre-defined report queries:

Report Entry Description
Web Cache Summary A summary of Web Cache actions.
Cache Hit-Miss Statistics The number of cache hits, misses, and sessions bypassed over time.
Cache Size Statistics The amount of cached and uncached web data over time.
Web Cache Events All HTTP events are processed by Web Cache.
The tables queried to render these reports:

Related Topics

Report Viewer

Reports

Network Configuration

The most critical configuration in the NG Firewall is properly configuring your network settings in Config > Network .

For simple networks, the configuration completed during the Setup Wizard is sufficient. However, some networks have multiple WANs, multiple LANs, subnets, VLANs, VRRP, etc. This describes how networking operates and is configured in the NG Firewall.

Interfaces

The Interfaces page configures the network interfaces or the server.

Interfaces Grid

The Interfaces tab shows the current interfaces' status and configuration information.


Several columns along the top of the grid show the current interface status and configuration. Some are hidden by default.

Columns

Column Description
ID The IDis the unique integer primary key of the interface. All interface configurations will refer to It.
Name This is the name/description of the interface. It is recommended that you choose names representative of their purpose.
Connected This shows the device's current "connected" state, which is currently mapped to this interface. This may not display correctly for all network interface cards.
Device This shows the current network device (physical NIC card or wireless card) mapped to this interface.
Speed  
Duplex  
Config This shows the current configuration for this interface. ADDRESSED, BRIDGED, or DISABLED.
Current Address This shows the current address if one of the interfaces exists.
WAN This shows true if the interface is configured as a WAN and false otherwise.
Edit This column shows an edit button to edit the configuration of this interface.
Delete This column shows a delete button on VLAN Tagged Interfaces to delete the interface. Physical interfaces cannot be deleted unless their physical devices have been removed from the system.
There are also several additional options on this page:
Remap Interfaces
This utility can change the mapping between physical devices and the corresponding interface configurations. This is useful if you want to use certain physical devices for certain purposes.
Refresh Device Status
This refreshes the "Connected" column in the interfaces grid. To verify your interface mapping, plug/unplug one network card at a time and select Refresh Device Status to verify that the expected interface changes the Connected status.
Add VLAN Tagged Interface
This allows for an additional 802.1q VLAN tagged interfaces. For more information, read the Virtual LANs section in Network Configuration.

Interface Configuration

Clicking the edit button on an interface will open the interface configuration settings.

An interface can be configured in many ways. Some settings and configuration options are only relevant and/or available in certain configurations. Based on an interface's configuration, certain options may appear and disappear. For example, when checking 'is WAN,' the options available to WAN interfaces will appear. After unchecking 'is WAN,' the WAN options will disappear, and the options for non-WAN interfaces will appear. Because of this, configuring your interface from the top of the page downward is suggested.

The table below shows the various configuration options and their meanings.

Interface Options

Option Description
Interface Name This is the name/description of the interface. It is recommended that you choose names representative of its purpose.
VLAN (802.1q) Interface This is true if this is a tagged VLAN interface. Otherwise, this is not shown.
Parent Interface This is the parent interface for this tagged VLAN interface. This is only shown for VLAN interfaces.
802.1q Tag This is the VLAN tag for this interface. This is only shown for VLAN interfaces.
Wireless Interface This is available if the interface is detected as a wireless (WLAN) interface. Otherwise, this is not shown.
Config Type This is the basic configuration type of this interface. Addressed means this interface has its address and configuration. Bridged means this interface is bridged to another interface. Disabled means this interface is entirely disabled.
WAN Interface This should be checked if this is a WAN (Wide Area Network) interface. This means it is connected to your ISP or an internet connection. It should be unchecked if this interface is connected to a private/local network.

Wireless Configuration - This section configures the wireless settings for wireless interfaces. It is only shown for wireless interfaces.

Option Description
SSID The broadcasted Service Set Identifier (SSID) for the wireless network.
Mode Access Point (AP) or Client.
Visibility Select whether to advertise or hide the SSID.
Encryption The encryption method is used to encode the wireless signal. WPA2 is recommended.
Password When encryption is enabled, a password will be required to access the network.
Regulatory Country Choose the country in which this NG Firewall is based. This is required to comply with regulations around Wi-Fi bands and frequencies.
Channel Choose from the available channels and 2.4GHz or 5GHz frequencies. The options available here depend on your wireless card.
Warning:Many chips/drivers do not correctly implement "Automatic" (ACS or Automatic Channel Survey), so depending on your card, it may not work.
Note: Automatic channel selection has been removed from modern builds due to a lack of support and usability issues.

IPv4 Options - This section configures this interface's Internet Protocol v4 (IPv4) settings.

Option Description
Config Type This is the IPv4 configuration type. Static means this interface has a static IPv4 address. Auto (DHCP) means this interface will automatically use DHCP to acquire an address. PPPoE means this interface will use PPPoE to acquire an address. This option is only available for WAN interfaces because non-WANs can only be statically configured.
Address This is the IPv4 static address. It is only shown if the Config Type is Static.
Netmask This is the IPv4 static netmask. It is only shown if the Config Type is Static.
Gateway This is the IPv4 static gateway. It is only shown if the Config Type is Static.
Primary DNS This is the primary DNS used for DNS resolution. It is only shown if the Config Type is Static.
Secondary DNS This is the secondary DNS used for DNS resolution. It is only shown if the Config Type is Static.
Address Override If set, this address will be used instead of the one in the offered DHCP lease. It is only shown if the Config Type is Auto (DHCP).
Netmask Override If set, this netmask will be used instead of the one in the offered DHCP lease. It is only shown if the Config Type is Auto (DHCP).
Gateway Override If set, this gateway will be used instead of the one in the offered DHCP lease. It is only shown if the Config Type is Auto (DHCP).
Primary DNS Override If set, this will be used instead of the one in the offered DHCP lease. It is only shown if the Config Type is Auto (DHCP).
Secondary DNS Override If set, this will be used instead of the one in the offered DHCP lease. It is only shown if the Config Type is Auto (DHCP).
Username This is the PPPoE username. It is only shown in the Config Type PPPoE.
Password This is the PPPoE password. It is only shown in the Config Type PPPoE.
Use Peer DNS If checked, the server will use the DNS provided by the PPPoE server for DNS resolution. It is only shown in the Config Type PPPoE.
Primary DNS The primary DNS to be used for DNS resolution. It is only shown in the Config Type PPPoE, and Use Peer DNS is unchecked.
Secondary DNS The secondary DNS is to be used for DNS resolution. It is only shown in the Config Type PPPoE, and Use Peer DNS is unchecked.
IPv4 Aliases This is a list of alias addresses. This is an additional list of addresses this interface will have and their associated netmasks.
IPv4 Options - NAT traffic exiting this interface (and bridged peers) This option is only available on WAN Interfaces and defaults to checked. If checked, all traffic exiting this interface and interfaces bridged to it will be NATd, and all incoming sessions from this interface will be blocked unless they are forwarded via a Port Forward Rules or destined to the local server.
IPv4 Options - NAT traffic coming from this interface (and bridged peers) This option is only available on non-WAN Interfaces and defaults to unchecked. If checked, all traffic from this interface and interfaces bridged to it will be NATd, and all incoming sessions to this interface will be blocked unless they are forwarded via a Port Forward Rules.

IPv6 Options - This section configures this interface's Internet Protocol v6 (IPv6) settings.

Option Description
Config Type This is the IPv6 configuration type. Disabled means the interface has no IPv6 configuration. Static means this interface has a static IPv6 address. Auto (SLAAC/RA) means this interface will use SLAAC to acquire an address automatically. This option is only available for WAN interfaces because non-WANs can only be statically configured.
Address This is the IPv6 static address. Blank is allowed, which means no IPv6 address will be given. It is only shown if the Config Type is Static.
Prefix This is the IPv6 static prefix. It is only shown if the Config Type is Static.
Gateway This is the IPv6 static gateway. It is only shown if the Config Type is Static.
Primary DNS This is the primary DNS used for DNS resolution. It is only shown if the Config Type is Static.
Secondary DNS This is the secondary DNS used for DNS resolution. It is only shown if the Config Type is Static.
IPv6 Aliases This is a list of aliases addressed. This is an additional list of addresses this interface will have and their associated netmasks. This is only available on non-WAN interfaces.
IPv6 Options - Send Router Advertisements If route advertisements are checked, they are sent on this interface. This is only available on non-WAN interfaces.

DHCP Configuration (server) - Configures the DHCP serving options on this interface. DHCP Serving is only available on Addressed non-WAN interfaces.

Option Description
Server If selected, DHCP will be served to this interface so that machines can automatically acquire addresses.
Range Start The start of the DHCP range.
Range end The end of the DHCP range.
Lease duration The duration of the provided DHCP leases in seconds.
Gateway Override If set, this value will be provided as the gateway in the DHCP leases. Otherwise, this interface's static IPv4 address of this interface will be provided as the gateway.
Netmask Override If set, this value will be provided as the netmask in the DHCP leases. Otherwise, this interface's static IPv4 netmask of this interface will be provided as the netmask.
DNS Override If set, this value will be provided as the DNS in the DHCP leases. Otherwise, the static IPv4 address of this interface will be provided as the DNS. A single IPv4 address or a comma-separated list of IPv4 addresses is accepted.
DHCP Options This is a list of DHCP options for dnsmasq. WARNING: This option is for advanced users. The specified DHCP options will be used on this interface. For example, to specify an NTP server, use enabled = true, description = "time server," and value = "42,192.168.1.2". For multiple DNS override servers, specify enabled = true, description = "DNS," and value = "6,192.168.1.1,192.168.1.2". The value must be specified in a valid dnsmasq format as described in the dnsmasq documentation.

DHCP Configuration (relay) - This configures the DHCP relay on this interface.

Option Description
Relay If selected, DHCP requests received on this interface will be forwarded to a specified DHCP server.
Relay Host Address The IP address of the relay host server.

Redundancy (VRRP) Configuration - This configures the VRRP redundancy options for this interface. VRRP is only available on statically assigned interfaces. Virtual Redundancy Router Protocol documentation.

Option Description
Enable VRRP If checked, VRRP is enabled on this interface.
VRRP ID The VRRP (group) ID of this server. It must match the VRRP ID of peers but must be unique on the server.
VRRP Priority The VRRP Priority of this server. Higher value is a higher priority. (1-255)
VRRP Aliases The list of VRRP Virtual Addresses. This list should be the same for all VRRP peers.

Interface Status

The status button on the interface brings up a window showing some of the statistics about the interface. This includes statistics, the ARP table, and the connected clients if it's a wireless interface.

Hostname

The Hostname tab configures the hostname and related settings of the NG Firewall server.


Hostname

Hostname
This is the name given to the NG Firewall server, such as "NGFW" or "firewall."
Domain
This is the domain name of the NG Firewall server. If your company uses "mycompany.com," you will likely want to use mycompany.com.

The Fully Qualified Domain Name (FQDN) for the NG Firewall server is Hostname + Domain. So Hostname = "NGFW" and Domain = "mycompany.com" means the FQDN for NG Firewall is ngfw.mycompany.com. If you have publicly available services like VPN and/or spam quarantines, you should make sure that ngfw.mycompany.com resolves in DNS to the/a public IP of the NG Firewall server.

Dynamic DNS Service Configuration

Several Dynamic DNS services are available to help those with dynamic public IPs. Some ISPs and areas only offer dynamic IPs, which can be problematic for networks with remote users who want to access services.

You can not remote users access the server/network by the public IP because it can change anytime.

These services exist to automatically update the public DNS entry when your DHCP address changes. This allows you to refer remote users to a FQDN such as "firewall.mycompany.com" and then automatically update the DNS resolution of "firewall.mycompany.com" to your public IP when it changes.
Enabled
If enabled, a Dynamic DNS server will be used to update the FQDN's DNS resolution.
Service
The drop-down shows the supported services. Choose the service you want to use.
Username
The username to use the service.
Password
The password for the service account.
Hostname(s)
The hostname will be updated with the NG Firewall's public IP address. Specify a single FQDN or multiple FQDNs separated by commas.

Services

The Services tab configures the local services available on the Arista Server. The Arista Server hosts an HTTPS and HTTP server (Apache) that hosts services.

Services like administration, spam quarantine, reports, blockages, etc

  • HTTPS Port: TCP Traffic to the primary address of each interface on the HTTPS Port will be forwarded to the local webserver to provide services. Often, if you only have one public IP (1.2.3.4) and want to port forward the HTTPS port to an internal service like webmail to an internal machine, you will need to move the HTTPS Port to another port, like 4343, so that port can be forwarded to your internal machine. In this case, the administration and other HTTPS services will be accessible at https://1.2.3.4:4343/, and 443 can be forwarded.
  • HTTP Port: TCP Traffic from non-WANs to the primary address of each non-WAN interface on the HTTP Port will be forwarded to the local web service to provide services. If those ports are required for port forwarding, the default HTTP Port can be changed to another port, like 8080.
Note:The configured HTTPS port will be forwarded to the local Apache process listening on port 443. The configured HTTP port will be forwarded to the local Apache process listening on port 80. The Access Rules will evaluate these sessions post-redirection where the destination port has already been altered.

Port Forward Rules

Port forwarding is a technique of rewriting the destination address and destination port of packets to send them to a new location.

Port Forward Rules


Port forwarding has many uses. The most common use is on networks doing NAT where internal servers have private addresses (i.e., 192.168.1.100); port forwarding allows traffic to the NG Firewall server's public IP to an internal host.

For example, suppose the email server is behind the NG Firewall with a private address (192.168.1.100), and the NG Firewall has one public IP (1.2.3.4), which all hosts are "sharing" via NAT to reach the internet. In that case, port forwarding can forward TCP traffic to 1.2.3.4, port 25 (SMTP) to 192.168.1.100, port 25.

Port Forwards Rules work like all rules in the NG Firewall, as described in the Rules documentation. Rules are evaluated in order on all new sessions. The destination will be rewritten to the New Destination and the New Port of the first matching rule. If no rule matches, then no changes are made to the session.

Following the Port Forward Troubleshooting Guide is suggested if you are having issues with port forwards.

There are two types of port forward rules. To add a Simple Rule, click Add Simple Rule. Click Add to add a regular rule, as described in the Rules documentation.

Simple Rules

Simple rules allow for most use cases and avoid extra configuration, which can lead to non-functional forwards. Simple port forward rules should be used wherever possible.


Table 1. Simple Rules
Enable Port Forward Rule If checked, the rule is enabled. If unchecked, the rule has no effect and is disabled.
Description A description of this rule. This is just for documentation.
Protocol If "TCP," only TCP traffic to the specified port is forwarded. If "UDP," only UDP traffic to the specified port is forwarded. If "TCP & UDP," TCP and UDP traffic to the specified port is forwarded.
Port This is a list of commonly forwarded ports. Use commas to separate multiple ports or a dash to denote a range. To specify an arbitrary port, select Other and specify the port.
New Destination The new destination of the session after the port forward is typically the internal machine, such as 192.168.1.100.

Expert Rules

There are cases where a more complex rule is desired, such as:
Forward non TCP/UDP protocols
Simple Rules can only forward TCP and UDP.
Changing the new destination port
Simple Rules only rewrite the destination address. Expert rules are necessary if you also want to change the destination port. For example, forward TCP to 1.2.3.4 port 8080 to 192.168.1.100 port 80.

It is further limiting what traffic is forwarded.

Expert Rules allow additional conditions to limit when a port forward matches. For example, you can limit forwarded traffic to traffic from a specific interface, specific IP range, etc.

Only to a certain public IP (not all NG Firewall IPs)
Simple Rules match all Destined Local traffic as described in Rules. If your NG Firewall has multiple public IPs and you only want to forward traffic to one of them, you can use Expert Rules.
Important: Simple rules are encouraged because users tend to misconfigure the port forward rule conditions. Adding MORE conditions means your port forward rule will match LESS traffic. For example, you might specify only forwarding traffic with "Source Interface = External" and then discover that traffic to a public IP from the internal interface is NOT forwarded because its source interface is NOT external.

A port forward:
Enables Port Forward Rule If checked, the rule is enabled. If unchecked, the rule has no effect and is disabled.
Description A description of this rule. This is just for documentation.
Conditions The conditions describing which sessions will match.
New Destination The new destination of the session after the port forward. Typically, this is the internal machine, which is like 192.168.1.100.
New Port Optional. If blank, the new destination port will remain unchanged. All matching sessions will be rewritten to the new destination port if specified.

Reservations

At the bottom of the Port Forward Rules tab is a list of reserved ports that can not be forwarded because they are currently used for NG Firewall services. These services can be moved to different ports in the Services tab if these ports are required for port forwarding.

NAT Rules

NAT rules allow rewriting the source address of traffic.


Typically, NAT is used so machines on a private subnet (10.*.*.*, 192.168.*.*, etc.) can share a single public IP address. To do this, when a private machine (say 192.168.1.100) makes a connection to a public server (say google.com), the NG Firewall server rewrites the source address to the public IP address of NG Firewall (say 1.2.3.4) on the way out. When return traffic in that session returns to 1.2.3.4, it is rewritten back to the internal address, 192.168.1.100, and forwarded back to the internal server.

NAT

By default, "NAT traffic exiting this interface (and bridged peers)" is checked on WAN Interfaces. This enables the NATing of all sessions exiting that WAN interface with the source address of the primary IP of that interface. In other words, all sessions leaving the External interface will use the External interface's primary IP.

Another option is "NAT traffic coming from this interface (and bridged peers)" on non-WAN Interfaces. If checked, all traffic coming from the interface will be NAT'ed using the primary IP address of its destination interface.

By default, since only "NAT traffic exiting this interface (and bridged peers)" is checked, NAT is only done on traffic that exits a WAN interface. This means traffic between internal networks will be un-NAT'ed, and each can reach the other using private addresses. If this is not desired, NAT can be done as traffic comes from a non-WAN by checking "NAT traffic coming from this interface (and bridged peers)." This means NAT occurs between local interfaces, and no traffic will flow between separate internal networks without explicit port forwards.

Note: Checking "NAT traffic exiting this interface (and bridged peers)" adds an implicit NAT rule to NAT all traffic exiting that interface to Auto. It also adds implicit Filter Rules to block all from that interface that is not to the local server and is not explicitly port forwarded.
Note: Checking "NAT traffic coming from this interface (and bridged peers)" adds an implicit NAT rule to NAT all traffic from that interface to Auto. It also adds implicit Filter Rules to block all to that interface that is not to the local server and is not explicitly port forwarded.

NAT Rules

Occasionally, additional rules are necessary for more complex NAT setups.

For example, let's assume you have two public IPs, 1.2.3.4 and 1.2.3.5. By default, you want all traffic to be NATd to the primary address 1.2.3.4, but you want your mail server (192.168.1.100) to send mail from 1.2.3.5. To do this, you need to add a NAT rule that says that traffic from the mail server should be NATd to 1.2.3.5. To do so, add a rule with Source Address = 192.168.1.100, where NAT Type = 'Custom' and New Source = '1.2.3.5'.

Another common scenario is setting up 1:1 NAT, using a paired Port Forward Rules and a NAT Rule.


NAT Rules contain several components.
Table 2. NAT Rules
Enable If checked, the rule is enabled. If unchecked, the rule has no effect and is disabled.
Description A description of this rule. This is just for documentation.
Conditions The conditions describing which sessions will match are documented in the Condition List of Rules documentation.
NAT Type Auto or Custom. Auto means the session will be NAT'd to the primary address of the interface in which the session exits. Custom allows you to specify a specific IP.
New Source If Custom is selected, specify the IP address to which the session will be NAT'd.

Like all Rules, the NAT rules are evaluated in order. The session will be NAT'd according to the first matching rule. If the rule does not match, the session will be NAT'd according to the checkboxes in the Interfaces settings. If no rules match and all NAT options in Interfaces are disabled or do not match the session in question, the session is not NAT'd and sent with the source address.

1:1 NAT

This section will help you set up 1:1 NAT.

What is 1:1 NAT

1:1 Network Address Translation (NAT) is a mode of NAT that maps one internal address to one external address. For example, if a network has internal servers at 192.168.1.10, 1:1 NAT can map 192.168.1.10 to 1.2.3.4, where 1.2.3.4 is an additional external IP address provided by your ISP.

How do I Setup 1:1 NAT?

You need to do three things:

  1. Set up an external IP Address Alias.
  2. Map inbound traffic destined for the external address so it is redirected to the correct internal machine.
  3. Map outbound traffic from the internal machine to the correct external address.

In this example, we'll assume you're trying to set up 1:1 NAT for 192.168.1.10 to 1.2.3.4. You will need to be in advanced mode to configure 1:1 NAT.

Create an IP Address Alias on the WAN interface for 1.2.3.4, with the appropriate netmask provided by your ISP, and save it. This can be done at Config > Network > Interfaces on the specific interface and tells Arista to take ownership of that IP.

Create a port forward for inbound sessions and save it.This rule will forward all inbound sessions destined for 1.2.3.4 to 192.168.1.10: Destination Address: 1.2.3.4 New Destination: 192.168.1.10.

Create a port forward for inbound sessions and save it. This rule will forward all inbound sessions destined for 1.2.3.4 to 192.168.1.10: Destination Address: 1.2.3.4 New Destination: 192.168.1.10.

Create a NAT rule for outbound sessions—this causes all outbound sessions from 192.168.1.10 to be NAT'd to 1.2.3.4. This is done at Config > Network > NAT Rules Source Address: 192.168.1.10 NAT Type: Custom New Source: 1.2.3.4 Once configured and saved, your 1:1 NAT setup is complete.

How do I Verify that 1:1 NAT is Working?

You can check outbound traffic by visiting your internal server and whatismyip.com, and inbound traffic can be checked by testing your port forward. For example, if your internal server is running a web server, visit http://1.2.3.4/ from outside the network—it should load the web server on 192.168.1.10.

Bypass Rules

Bypass Rules work like other Rules. They are evaluated in order.


The NG Firewall's applications run in the "Arista VM" Arista Virtual Machine. UDP and TCP streams are endpointed during this process, and their streams are reconstructed in layer 7 (the application layer). The data stream then flows through the applications, and if passed eventually, the data is put back into new packets and sent on its way.


Unlike most proxy firewalls, the NG Firewall processes almost all ports of both UDP and TCP at the application layer by default. Sometimes, it may be ideal to "bypass" traffic so that it is not subject to scanning. As shown in the image on the right, bypassed traffic will skip all the NG Firewall VM Layer 7 processing and all the applications.

Sometimes, it is ideal to bypass traffic for performance reasons. This can be traffic you are not interested in scanning and want to save server resources or traffic extremely sensitive to scanning, like VoIP.

Sometimes, bypassing traffic that the application layer processing interferes with is also necessary.

As defined by your network configuration, bypassed sessions are routed, NATd, and filtered identically to all other sessions. The only difference is that bypassed sessions are not processed at Layer 7, so their traffic "bypasses" the applications.

Bypass Rules

Bypass Rules work like other Rules. They are evaluated in order. The action from the first matching rule is taken.

For example, let's say you have a backup server at 1.2.3.4 and don't want traffic to that backup server scanned or interfered with. To bypass it, create a rule with Destination Address = 1.2.3.4 and action = "Bypass."

Bypass Rules contain several components.

Table 3. Bypass Rules
Enable If checked, the rule is enabled. If unchecked, the rule has no effect and is disabled.
Description A description of this rule. This is just for documentation.
Conditions The conditions describing which sessions will match are documented in the Condition list in the Rules section.
Action Bypass or Process. Bypass means the traffic will be bypassed. Process means the AVM and the apps will process the traffic.

Like all Rules, the Bypass rules are evaluated in order. The session will be processed or bypassed according to the first matching rule. If no bypass rule matches, the session will be processed.

Common Uses

There are several scenarios in which it makes sense to bypass traffic.

On large networks with servers that might be very busy, bypassing traffic that need not be scanned makes sense. This all depends on why you use the NG Firewall on your network.

Check-in Reports under "System" and look at the "Top Destination Ports." Occasionally, you'll see some bizarre port with millions of sessions, like Syslog. Often, these ports can be bypassed if you want to avoid scanning them.

Often, it makes sense to bypass port 53 from your internal DNS server so you can guarantee that NG Firewall will not interfere with your DNS server's resolution process. This is critical if the NG Firewall uses this server for DNS resolution.

If you are using NG Firewall for just Web Filter, you can bypass all of UDP and save lots of processing time; however, this is a bad idea if you are using Bandwidth Control, as then it would not be able to shape UDP.

Bypassing can sometimes be useful for troubleshooting. If you are having an issue with some traffic, you can bypass it to see if it helps. If it does help, then revert to processing and turn off the apps one at a time to see if one of the applications is interfering with the traffic in question.

Filter Rules

Filter rules are kernel-level iptables (Layer 3) "filter" rules. Filter rules apply to sessions transiting THROUGH the Arista server. By default, this ruleset is blank. Filter Rules are useful for blocking traffic going through the Arista server.


Table 4. Filter Rules
Enable Filter Rule If checked, the rule is enabled. If unchecked, the rule has no effect and is disabled.
IPv6 If checked, the filter rule will also be active with IPv6 addressing.
Description A description of this rule. This is just for documentation.
Conditions The conditions describing which sessions will match. As documented in the Condition_List section of Rules.
Action Block or Pass. Block means the session dropped silently. Pass means the session will be passed.

As described in the Rules documentation, the rules are evaluated in order on all new sessions going through the Arista server. The action from the first matching rule is taken; if no rule matches, the session is passed. All passed sessions are still subject to processing in the Apps.

Why Use Filter Rules

The firewall app also offers block/pass rules. Several key differences determine whether using a filter rule rather than a firewall rule is appropriate.
  • Filter Rules still apply to bypassed traffic. The Firewall does not see bypassed traffic. This means if you want to block anything that's bypassed, you should use the Filter Rule.
  • Filter Rules apply to all protocols, while Firewall only sees TCP and UDP. If you want to block IP protocols other than TCP and UDP, you should use Filter Rules.
  • Firewall Rules have more application-layer conditions, such as Client exceeding Quota and HTTP: Client User OS. If you need these conditions, you should use the Firewall.
  • Firewall Rules are evaluated in the Firewall app and can be used in policies set up in Policy Manager.

Routes

Arista routes all traffic according to its routing table. As such, it is critical to configure your Arista server with a complete routing table.


If Arista does not have a complete routing table, it will not be able to reach hosts behind Arista, it will not properly route return traffic back to them, and they will be offline.

Figure 1. Network Routes Example

A route:
Description A description of this route. This is just for documentation.
Network This is the IP/network for this route. Upon saving, any bits past the prefix length or netmask will be zeroed out as they are irrelevant and are not accepted in a route.
Netmask/Prefix This is this route's netmask (or prefix).
Next Hop This should either be a currently reachable local IP address or an interface chosen from the drop-down. If an IP address is specified, all traffic to this network will be routed to that IP address. If an interface is specified, all traffic to this network will be routed locally to that IP address using Address Resolution Protocol (ARP) to resolve those hosts.
Tip: It is easy to test routes using the Ping Test in Config > Network > Troubleshooting > Ping Test .

The route is likely correct if Arista can ping a host on the network in question. If Arista can ping a host on the network in question, the route probably needs to be corrected, and those hosts will not be online.

Common Uses

Some networks have subnets that exist behind other internal routers. For example, let's say my Internal interface is 192.168.1.1/24. A 192.168.2.0/24 network also exists behind another router at 192.168.1.5. Without this route, the entire network would be offline because its return traffic would go to the wrong place (the default gateway). In this case, I need to specify that the 192.168.2.* The network is reachable through 192.168.1.5. This would look as follows:


Some networks also run multiple subnets on the same switch infrastructure internally. If these are "untagged" networks/VLANs, you must add a route. For example, let's say my Internal interface is 192.168.1.1/24. There is also a 10.0.0.0/8 network on this interface. These hosts would be offline without a route because their traffic would be routed to the wrong place (the default gateway). In this case, I need to specify that 10.*.*.* hosts are directly reachable on the Internal interface. This would look as follows:


DNS Server

The DNS Server settings configure the DNS server running on the NG Firewall server.

These settings do NOT affect DNS traffic passing through the NG Firewall; only DNS traffic is sent to the NG Firewall server.


It is not required to use the DNS server on the NG Firewall. However, it is often desired on small networks because the NG Firewall server caches DNS for the entire network. If the NG Firewall is configured 'as a router' to provide DHCP to clients on the internal network, the default is to provide the NG Firewall server as the DNS server.

Static DNS Entries

Static DNS entries will always be resolved at the address provided. Often, this is useful for servers hosted internally. For example, if your mail server is local, you can add a static entry for mail.mycompany.com to its internal IP (like 192.168.1.20). This means machines using the NG Firewall for DNS will resolve this hostname to the internal IP and communicate with it directly.

Domain DNS Servers

Often, certain domains need to be resolved using certain DNS servers instead of the DNS servers configured on the WAN interfaces. For example, you may want all queries to "*.mycompany.local" to go to the local DNS server for resolution. Domain DNS Servers allow you to specify that all queries matching the domain go to the specified server. For example, if all *.example.com queries should go to 192.168.1.20, then you can add an entry for Domain = example.com with Local Server = 192.168.1.20.

In this scenario, the NG Firewall and all those using the NG Firewall for DNS resolution will have the matching queries resolved through the specified server. For example, Suppose someone using the NG Firewall server for DNS resolves aaa.example.com. This DNS query will be forwarded to 192.168.1.20 instead of NG Firewall's upstream DNS servers configured in the WAN interface settings.

This can also tell NGFW how to do reverse DNS lookups using in-addr.arpa as the domain. For example, if you want 172.16.*.* reverse DNS queries to go to 192.168.1.10, then set the Domain of "16.172.in-addr.arpa" and the Local Server of "192.168.1.10". If you want for 10.*.*.*, reverse DNS queries to go to "1.2.3.4" and then set the Domain to "10.in-addr.arpa" and the Local Server of "1.2.3.4".

DHCP Server

These settings configure the settings of the DHCP server running on the NG Firewall server.

DHCP Server

Note: The DHCP configuration for each interface is handled in the configuration of that interface in Config > Network > Interfaces . This page handles the global DHCP configuration.

Static DHCP Entries

This table contains any static DHCP leases. Entries in this table will always be given the same DHCP lease with the configured address. For example, if MAC Address = aa:bb:cc:00:11:22' and Address = 192.168.1.100, then when the machine with aa:bb:cc:00:11:22 requests a DHCP lease, it will always be given 192.168.1.100.

Current DHCP Leases

This shows the current table of active DHCP leases and their expiration time.

Custom DNSMasq Options

This text field holds any custom DNSMasq options. This is for advanced users. Misconfiguration of this field will result in improper functioning of the NG Firewall server. Any text in this field will be appended to the dnsmasq.conf.

DNSMasq is the server NG Firewall uses to provide DNS & DHCP services. DNSMasq documentation describes the options available.

Advanced


Options


Options contain some global networking options.
  • Enable SIP NAT Helper.
  • This enables the kernel SIP NAT fixup. Most SIP solutions handle NAT independently, but sometimes, the NAT device must rewrite the address inside the SIP. Enabling this will enable bypassed SIP sessions to be rewritten in the kernel. The default is off.
  • Send ICMP Redirects.
  • ICMP Redirects are used to alert machines if a shorter route is available. The default is on.
  • Enable Spanning Tree Protocol (STP) on Bridges.
  • This enables the Spanning Tree Protocol (STP) on bridges, a protocol used to help detect loops and avoid packet storms in this case. Given that a bridge loop is a fatal configuration, this option is off by default, so that the fatal configuration will fail quickly. It is NOT suggested to rely on STP to stop bridge loops.
  • Strict Address Resolution Protocol (ARP) Mode
    • If enabled, ARP replies will only go out for network requests where the request source matches the expected configuration. This helps avoid ARP flux with complicated networks. Strict mode means arp_ignore = 1, arp_announce = 2. Loose mode means arp_ignore = 0, arp_announce = 0. More documentation about arp_ignore and arp_announce can be found here.
  • DHCP Authoritative
  • If enabled, all DHCP servings are authoritative. The default is on. DHCP Authoritative is documented here.
  • Block new sessions during network configuration.
  • If enabled when changes to network settings are applied, all sessions will be blocked (dropped). This will provide increased security for router mode deployments and is not recommended for bridged mode deployments. The default setting is disabled.
  • Log bypassed sessions.
    • If enabled, bypassed sessions will be logged into the sessions table.
  • Log outbound local sessions.
    • If enabled, bypassed sessions created by the Arista server will be logged into the sessions table.
  • Log inbound local sessions.
    • If enabled, bypassed sessions to the Arista server will be logged to the sessions table.
  • Log blocked sessions.
  • All sessions blocked by filter rules, NAT, or the shield will be logged to the sessions table if enabled.

Quality of Service (QoS)

About QoS

Quality of Service (QoS) is a mechanism to ensure high-quality performance to latency- and bandwidth-sensitive applications. It allows for the prioritization and differential treatment of traffic based on rules. Most often, this is used to improve the performance of latency and bandwidth-sensitive applications and traffic (like Voice over IP) at the cost of less important traffic such as peer-to-peer. QoS can greatly improve network traffic performance and important protocols, especially when the upload or download bandwidth is saturated. However, QoS is also detrimental to network performance if configured incorrectly. You are advised to read this section in its entirety before enabling QoS.

QoS settings can be found at Config > Network > Advanced > QoS .

The Seven Priorities

The seven priorities in the default configuration can be thought of as two sets - the top four priorities, Very High, High, Medium, and Low, all consume all available bandwidth if no higher priority class wishes to use it. Use these to prioritize traffic above normal, such as VoIP or important business traffic. The bottom three priorities, Limited, Limited More, and Limited Severely, are always limited regardless of other priorities' bandwidth consumption because their download and upload limits are set to less than 100%. These should be used in situations when the goal is to restrict traffic regardless of whether more bandwidth is available.

Examples

Following are a few examples going from simple to more complex:
  1. The network is completely idle except for one Medium-priority download. This download uses all the available bandwidth and happens at full speed because no other priorities are using any traffic, and the Medium download limit is 100%.
  2. The network is completely idle except for one low-priority download. This download uses all the available bandwidth and happens at full speed because no other priorities are using any traffic, and the Low download limit is 100%.
  3. The network is completely idle except for one Limited More priority download. This download is given only half the available bandwidth because the reservation of Limited More is only 50%. The other 50% remains unused.
  4. The network is fully saturated, and all seven priorities have several active downloads running. All Very High Priority downloads equally split 60% of the bandwidth (the Very High Reservation). All the other priorities similarly split their reservations down to Limited Severely, which splits the 1% reservation between all Limited Severely Sessions.
  5. One medium-priority download and one Low-priority download run simultaneously. Because the other priorities are not using any of the reservations, the leftover is split relative to the Medium and Low reservations (5:12 or roughly 1:2.5). As such, the Medium priority download runs roughly 2.5 times faster than the Low priority download and together they consume all available bandwidth. (example: Low priority runs at 100kB/sec while the Medium runs at 250kB/sec and the total available bandwidth is 350kB/sec).
  6. Two Limited Severe downloads are taking place simultaneously. All sessions are given the same priority and share the resources, so the two sessions split the priorities. Because all other priorities are not in use, the two split the bandwidth limit (10%), and each download runs at 5% of the total available bandwidth.
  7. There are two WAN interfaces, and the WAN Balancer balances traffic across them. One medium-priority download occurs on WAN1, and one low-priority download occurs on WAN2. The medium-priority download is 100% of WAN1's bandwidth, and the low-priority download is 100% of WAN2's.
  8. There are two WAN interfaces, and the WAN Balancer balances traffic across them. One medium-priority download occurs on WAN1, and one limited-priority download occurs on WAN2. The medium-priority download uses 100% of WAN1's bandwidth, and the limited-priority download uses 50% of WAN2's.
Attention:
  1. Any given TCP download uses upload bandwidth to communicate to the sender that the data is being received. Usually, this upload bandwidth is only a little, but sometimes, if there is very little upload bandwidth available, it can be the limiting factor in the total rate of the download. The receiver can only communicate with the sender to tell it that data is being received sporadically, and as such, the sender will slow down. This is especially common with asymmetric links, especially if other uploads are in progress.

  2. Because packets are often approximately 1500 bytes (the MTU size), the lower priorities must either send them or not. Splitting the packet and sending a portion is not an option. As such, the packet will be sent to prevent starvation but may sometimes exceed the 1% reservation. This is especially true on small links with very little bandwidth. As such, the granularity of the limits and reservations on small links may be skewed.
  3. WANs are treated completely separately. Rules run on all traffic, regardless of which WAN the traffic is going out. However, the bandwidth settings on each WAN are separate, and they are treated as separate resources that are divided amongst traffic independently.

Settings

This section reviews the different settings and configuration options available for QoS.
  • Queue Discipline is the queueing discipline. The queue discipline is the algorithm used to "queue" packets ready to be transmitted. The default is Fair/Flow Queueing + Codel or fq_codel because it is the most modern performant and minimizes buffer bloat. Another commonly used and good algorithm is sfq or Stochastic Fairness Queueing (the old default). FIFO, or First in First out, is the simplest but could be more optimal as all packets are treated equally.
  • Enabled: Controls whether QoS is enabled or disabled. The default setting is unchecked, which means QoS is disabled, and no rules have any effect. WAN Bandwidth should be set before enabling QoS.
  • Default Priority: This priority is assigned to traffic that matches no QoS rule. You are advised to leave it at the Medium setting's default.
  • WAN Bandwidth: This is the most critical setting to configure correctly. It should be 85-95% of your line speed. We recommend contacting your ISP to get the proper numbers and testing to verify.
  • Finding the right settings for the WAN Bandwidth may take some experimentation. Quality of Service will only have an effect if the bandwidth limit is lowered. If the bandwidth setting is higher, traffic will be more manageable to a higher bandwidth. Remember, traffic only receives preferential treatment when the set bandwidth limit is saturated.
  • The QoS limits are configured correctly when the network has slightly less throughput than when QoS is disabled entirely. Depending on your hardware, the QoS settings may not match exactly the ISP-provided or testing Mbit numbers. Experimentation is required.
    Figure 2. QoS - WAN Bandwidth

  • QoS Rules: Built-in rules to prioritize some typically important packets and traffic types. If you need more clarification, leave these as the default.
    Figure 3. QoS Rules

  • QoS Custom Rules: This provides a simple way to create custom rules to prioritize or de-prioritize certain traffic.

    As the note warns, QoS Custom Rules only match on bypassed traffic - they will do nothing if the traffic is not bypassed. If you want to prioritize scanned sessions, use Bandwidth Control. Default rules exist for VoIP traffic, which is also bypassed by default. Here's a list of the qualifiers you can use to build Custom QoS Rules:

    Name Legal Value Description
    Destination Address IP Matcher The Destination IP of the traffic.
    Destination Port Int Matcher The Destination Port of the traffic.
    Destined Local   This will match any IP the Arista holds, including aliases. It is only recommended if your WAN interface(s) are Dynamic.
    Protocol Checkboxes The protocol that should be forwarded - check all that apply.
    Source Interface Radio Buttons The Source Interface of the traffic - choose only one.
    Source Address IP Matcher The Source Address of the traffic.
    Source MAC Address XX:XX:XX:XX:XX:XX The MAC Address of the source of the traffic.
  • QoS Priorities: This table allows customization of how each priority is treated and prioritized relative to other priorities. It is recommended that the default values be kept.
    Figure 4. QoS Priorities


    • Download Limit can be any value between 1% to 100%. It limits the maximum amount of download bandwidth available to this priority under any circumstance.
    • Upload Limit can be any value between 1% to 100%. It limits the maximum amount of upload bandwidth available to this priority under any circumstance.
    • Download Reservation can be any value between 1% and 100%. This value guarantees the minimum amount of bandwidth available to this priority should it be needed under any circumstance.
    • Upload Reservation can be any value between 1% to 100%. It guarantees the minimum bandwidth available to this priority should it be needed.

      Some bandwidth is always guaranteed (by the Reservation) to each priority. This prevents any priority from being fully starved and disconnected from the internet because higher priorities use all the bandwidth. When a higher class is not using its Reservation, the leftovers are reassigned to the lower classes based on the ratio of their reservations. For Example, by default, the Medium priority is limited to 100% of the download bandwidth and is guaranteed at least 12% of the download bandwidth.

  • QoS Statisticsis a status readout of recent activity. It is reset at reboot and when settings are saved.

    It is useful for diagnosing which rules are being matched and for assigning the proper priorities. It is also useful to test the total usage of each priority. The statistics are broken up by WAN interface. For Example, External-—Outbound shows the priority byte counts of all traffic going out the External WAN, while External—Inbound shows the priority byte counts of all traffic coming in the External WAN.

    Figure 5. QoS Statistics

  • QoS Current Sessions shows a table of all active sessions and the assigned priority. This is useful for testing to ensure that priorities are being prioritized correctly. Please note that sessions are assigned priorities at creation time, so if rules are changed, active sessions will keep their current priority - only new sessions will be run against the new rules.

Related Topics

Here are several other relevant QoS links that are worthwhile reading and may give the curious administrator more insight.

Access Rules

Access Filter rules apply to sessions destined to the Arista server's local processes and only sessions destined to the Arista server's local processes. These rules have no effect on sessions passing through Arista and are only used to limit and secure access to local services on the Arista server.

Note: Improperly configuring access rules can compromise the security and proper functioning of the Arista server.
Note: Disabling rules in the default configuration may interfere with the proper functioning of many features of the Arista server.
There are two rules not enabled by default:
  • Allow HTTPS on WANs - enable this rule if you would like HTTPS access externally.
  • Allow SSH - enable this rule if you want SSH access to Arista's SSH service.
Note: Changing other settings of Access Rules is not recommended.

Access Rules Configuration

Enable Access Rule If checked, the rule is enabled. If unchecked, the rule has no effect and is disabled.
IPv6 If checked, the filter rule will also be active with IPv6 addressing.
Description A description of this rule. This is just for documentation.
Conditions The conditions describing which sessions will match.
Action Block or Pass. Block means the session dropped silently. Pass means the session will be passed.

The rules are evaluated in order on all new sessions going to the Arista server as described in the Rules documentation. The action from the first matching rule is taken; if no rule matches, the session is passed.

Universal Plug and Play


About UPnP

Universal Plug and Play (UPnP) allows clients to create firewall port forward rules. Common uses include:
  • Allowing gaming consoles to host games.
  • Enables BitTorrent clients to host uploads.

UPnP settings can be found at Config > Network > Advanced > UPnP .

Security Considerations

These are considered "automatic port forward rules"; therefore, you should consider the potential security implications before enabling them in your environment. You probably want them enabled in a home environment with an Xbox, but you likely do not want them enabled in an office environment.

Settings

This section reviews the different settings and configuration options available for QoS.
  • Enabled: Controls whether UPnP is enabled or disabled. The default setting is unchecked, which means UPnP is disabled.
  • Secure Mode:is an option that restricts port creation to the client system. In most environments, you should leave this enabled.
  • UPnP Status is a status readout of recent activity. The statistics are reset at reboot and when settings are saved.

Access Control Rules

These rules allow you to control which networks can use UPnP and the ports they can manage, along with an allow or deny action. All rules are processed in order.

The default rules for Allow all and Deny all allow all UPnP traffic if UPnP is enabled.

To control access to a particular network, create a new Allow rule for that network and ports and ensure it is above the Deny all rule.

Network Cards

This grid configures the various options of the network cards in the Arista server.

MTU is the maximum transmission unit. The correct configuration is Auto, which is usually 1500. Occasionally, if the MTU is lower and PMTU (Path MTU discovery) is broken, it may be necessary to lower the MTU manually to a lower value. No settings (blank) are "Auto"—any other setting is an explicit hardcoded MTU.

The Ethernet Media drop-down configures the duplex of the Network card. Usually, Auto is the correct value. However, some network cards do not automatically configure the duplex setting properly or perform poorly when Auto is configured. In those cases, you can manually configure the speed and duplex settings.

DNS and DHCP

Custom Dnsmasq Options

This text field holds any custom Dnsmasq options. This is for advanced users. Misconfiguration of this field will result in improper functioning of the Arista server. Any text in this field will be appended to the dnsmasq.conf.

Dnsmasq is the server Arista uses to provide DNS & DHCP services. Dnsmasq documentation describes the options available.

Arista does not support any custom configurations for Dnsmasq.

Netflow

NetFlow is a feature developed by Cisco that can collect IP network traffic information as it enters or exits an interface. By analyzing the data provided by NetFlow, a network administrator can determine the source and destination of traffic, class of service, and the causes of congestion. A typical flow monitoring setup consists of three main components:
  • Flow exporter: aggregates packets into flows and exports flow records towards one or more flow collectors. In this case, the NGFW.
  • Flow collector: responsible for reception, storage, and pre-processing flow data from a flow exporter.
  • Analysis application: analyzes received flow data in the context of intrusion detection or traffic profiling, for example.

Netflow on NGFW uses soft flow.

Netflow

Netflow settings are located in Config > Network > Advanced > Netflow .

Netflow enabled This enables the sending of Netflow data to the specified Netflow collector.
Host The IP address or hostname of the NetFlow collector.
Port The port for the Netflow collector.
Version The version of NetFlow to send. NGFW supports multiple standard versions: v1, v5, and v9.

Dynamic Routing

About Dynamic Routing

Dynamic routing allows for exchanging routes between other routers using Border Gateway Protocol (BGP) and Open Shortest Path First (OSPF).

Dynamic Routing settings can be found at Config > Network > Advanced > Dynamic Routing .

BGP Overview

The Border Gateway Protocol (BGP) requires all nodes known as neighbors to be identified and added to the settings.

OSPF Overview

Open Shortest Path First (OSPF) does not require all nodes to be known. Instead, each route is associated with a group called an area. OSPF can be hierarchical in multiple areas, so some networks are publicly known, and others are private. Additionally, OSPF supports authentication.

Settings

This section reviews the different settings and configuration options available for Dynamic Routing.
  • Dynamic Routing Enabled: This controls whether dynamic Routing is enabled or disabled. The default setting is unchecked, which means dynamic Routing is disabled. BGP and/or OSPF must also be enabled.
  • Status: Overall status of dynamic routing shows:
    1. Acquired Dynamic Routes: All routes obtained from enabled dynamic routing protocols.
    2. BGP Status: Information about each BGP neighbor, including messages received, sent, and uptime.
    3. OSPF Status: Information about discovered OSPF neighbors, such as their IP address and the time remaining until they next synchronize.
  • BGP: Enable BGP protocol.
    1. Router ID: An IP-like identifier. It can be any IP-address-like value, but it is typically your WAN address.
    2. Router Authentication Server: This system's Autonomous System (Authentication Server) number can be any number from 1 to 65535, but it must be unique to your BGP network.
    3. Neighbors: Define each BGP neighbor here. You will need to know each neighbor's IP address and Authentication Server.
    4. Networks: Define each local network route to share via BGP.
  • OSPF: Enable OSPF protocol.

Network Reports

You can access Network reports via the Reports tab at the top or the Reports tab within the settings. All pre-defined reports will be listed along with any custom reports that have been created.

Reports

You can search and define Reports using the time selectors and the Conditions window at the bottom of the page. The data used in the report can be obtained using the Current Data window on the right.

Pre-defined report queries:
Report Entry Description
Network Summary A summary of network traffic.
Data Usage (by interface) The total data usage by interface.
Data Usage per Day (by interface) The data usage of each interface by day.
Data Rx-Usage (by interface) The total received data usage by interface.
Data Tx-Usage (by interface) The total received data usage by interface.
Sessions The total number of scanned and bypassed sessions over time.
Sessions Per Minute The total number of scanned and bypassed sessions created per minute.
Sessions Per Hour The total, scanned, and bypassed sessions created per hour.
Bandwidth Usage The approximate averaged data transfer rate (total, sent, received) over time.
Top Client Addresses The number of sessions grouped by client (source) address.
Top Server Addresses The number of sessions grouped by server (destination) address.
Top Server Ports The number of sessions grouped by server (destination) port.
Top IP Protocols The number of sessions grouped by IP protocol number.
Top Server Countries The number of sessions grouped by server (destination) country.
Interface Usage The RX rate of each interface over time.
Arista handles all Sessions All sessions.
Scanned Sessions All sessions that were not bypassed.
Bypassed Sessions All sessions matching a bypass rule were bypassed.
Filter rules block blocked Sessions All sessions.
Port Forwarded Sessions All sessions match a port forward rule.
NATd Sessions All sessions that have been NATd by Arista.
All Session Minutes All sessions by minute.
  • The tables queried to render these reports:

Related Topics

Reports

Troubleshooting

Setting Description
Connectivity Test The Connectivity Test checks that your NG Firewall can resolve and connect to http://updates.arista.com. This is an important test to establish that your WAN connections are functioning properly.
Ping Test A simple Ping utility. Enter a hostname or IP and ping away.
DNS Test A simple DNS utility. Enter a hostname and get an IP.
Connection Test The Connection Test is a very useful tool for checking the status of a port on a remote machine. Enter an IP or Hostname and a Port, click Run Test, and see what happens.
Traceroute Test A Simple Traceroute utility. Enter a hostname or IP and see what's between your NG Firewall and the remote machine.
Download Test Provides a utility to test the download speed that NG Firewall has available. This download is not scanned to provide an upper bound of the bandwidth available to the NG Firewall as a single TCP download. Note that the results of this test are displayed in MBps, megabytes per second. You must multiply this result value by eight to get the speed test result in Mbps, megabits per second.
Packet Test The Packet Test is a very powerful troubleshooting tool. Select an interface to listen to and a timeout value, then hit Run Test to see traffic on that interface. You can filter by IP and/or port to, for example, check if traffic is hitting an interface or if a remote machine is answering a request.

General Configuration

This section discusses the following topics:

Config

The Config tab holds all the settings related to the configuration of the NG Firewall server itself and settings for platform components that apps may interact with.

This is a list of all sections available under the Config tab in the Administration UI.

Network

The Network configuration contains all the settings to control how your NG Firewall server routes and handles network traffic. Properly configuring network settings is critical for proper operation.

The Network Configuration documents how networking in NG Firewall functions and is commonly configured.

Administration

Administration controls the administration-related functionality of the NG Firewall server.

Email

The email contains all the email-related configuration of the NG Firewall server.

Local Directory

Local Directory stores a list of users that applications can use. It also supports RADIUS for 802.1x authentication from properly configured wireless network access points.

The RADIUS Server can be enabled to allow WiFi users to authenticate as any user configured in the Local Directory.

The RADIUS Proxy can be enabled to allow WiFi users to authenticate with credentials that are validated with a configured Active Directory Server.

Upgrade

The upgrade allows the server to upgrade and contains upgrade-related settings.

Upgrade Settings

Upgrades show the currently available upgrades, if any. If upgrades are available, an upgrade can be started by pressing the Upgrade button at the top under Status.

To see changes, see the Logs.


After the upgrade begins, it will download the new packages (which may take some time) and then apply the upgrades. Do not reboot or power off the server during the upgrade.

If Automatically Install Upgrades is checked, NG Firewall will automatically check for new versions and upgrade if available.

An automatic upgrade schedule is configured when the NG firewall automatically upgrades if upgrades are available. NG Firewall will automatically upgrade at the specified time on the days of the week that are checked.

Upgrade FAQs?

When will I get the upgraded version?
Upgrades are rolled out gradually to NG Firewall deployments, sometimes over several weeks. If you want the upgrade immediately, email This email address is being protected from spambots. You need JavaScript enabled to view it. your UID and request that they add it to the Early Upgrade list.
When is the new version available for my NG Firewall?
When a new version is available, the Upgrade button will appear on your NG Firewall's Upgrade page. If the automatic upgrade setting is enabled, your NG Firewall will upgrade automatically once the upgrade is available on the day and time specified.
Does the upgrade require a reboot?
If a reboot is needed, the upgrade will reboot automatically once installed. There is no need for a manual reboot. Most upgrades will not reboot as there is no kernel change.
How long does the upgrade take?
It's difficult to be precise since customer platforms, Internet connection speed, and upgrade complexity vary. Generally, upgrades take less than 20 minutes. If the database version is changed as part of the NG Firewall upgrade, the process will take longer as the database will need to be converted. There are extreme cases where the upgrade takes over an hour.
Do I need to reinstall?
No, the upgrade process will seamlessly update all the NG Firewall components.
Where can I get what is changed in the new version?
Release changes are posted on the Logs page.

System

The system contains settings related to the server.

About

About contains system information.

Reports

The reports tab is only visible if the Reports app is currently installed. To read more about reports, view the reports documentation.

About

This section discusses Servers, Licences, and License agreements.

Server

The Server tab shows the current information about the Arista server.


Unique ID

The first field shows the Unique ID (UID) of the Arista server. The UID is a 16 alphanumeric code uniquely identifying this server for licensing and tracking purposes.

Never share the UID of the server.

The UID is generated automatically upon installation, and each server must have a unique UID to function properly.

Cloning servers post-installation will create two servers with identical UIDs, which will result in problems and licensing issues.

Server Information

The second field shows the build version and server information.
  • Build shows the version of the Arista-vm.
  • Kernel shows the kernel version. Arista support uses the other fields.
  • Current "licensed" device count shows the current number of devices in the host table that count as "licensed" devices.
  • Highest "licensed" device count since reboot shows the highest value of licensed devices seen by this Arista since reboot.

Licenses

License Agreement

There is currently no text on this page. You can search for this page titlein other pages, search the related logs , or create this page .

Administration

Administration controls the administration-related functionality of the NG Firewall server.

Admin
Admin stores settings related to the administration settings for the NG Firewall.
Certificates
The NG Firewall uses digital certificates when serving web content via SSL.
Simple Network Management Protocol
Simple Network Management Protocol (SNMP) can be used to remotely query and monitor the current state of the ETM server.
Skins
Skins control the look and feel of the administration interface, allowing customization and tuning of the Arista administration's look and feel.
Reports
Reports can be searched and further defined using the time selectors and the Conditions window at the bottom of the page. The data used in the report can be obtained on the Current Data window on the right.
Google
The Google Drive connector enables certain features of the NG Firewall to store data in the connected Google account. For example, you can set the Configuration Backup app to store configuration backups in Google Drive.

Admin

Admin stores settings related to the administration settings for the NG Firewall.


Admin Accounts

This table stores the administration accounts that can administer the NG Firewall. Administrators have full administrator/root access to the NG Firewall server.

By default, only one admin account with the password is set during the Setup Wizard. Other accounts can be created. This can be useful in a few scenarios:
  • If you have multiple administrators and want to distinguish who logged in at what time.
  • You want to be able to easily disable/enable access for an administrator without changing the admin password.

Additional administrator accounts are also administrators. They also have full administrator/root access.

Allow HTTP Administration

If Allow HTTP Administration is checked, administration will be allowed on HTTP (unencrypted) on the primary address of non-WAN interfaces via each non-WAN interface on the port configured in Services. If unchecked, administration will not be allowed on HTTP, only on HTTPS.

Note: Unchecking Allow HTTP Administration does not close the HTTP port, as this service is used for other functions, such as blockpages and Captive Portal.
Note:HTTPS on WANs access is controlled in Config > Network > Advanced > Filter Rules > Access Rules . To enable HTTPS administration on WANs (external), check the Allow HTTPS on WANs rule.

Root

When saving administrator account settings, the "root" shell password is set to the admin account's password for convenience. The root password is not set if there is no admin account (because it was renamed to something else).

The root password is stored separately from the administrator account passwords. It can be changed in the shell using a password to any value. However, if you modify the admin password, the root password will be set to the new "admin" password when saved.

Password Recovery

If you forget the "admin" password - follow the Password Recovery process to reset the administration login/password settings to default.

Certificates

NG Firewall uses certificates when serving web content via SSL.


About Digital Certificates

The server certificate mainly provides secure access to the Administrative Console and the Email Quarantine features. The server must also generate imitation certificates on the fly when using the SSL Inspector application. There are two different ways to configure the certificate used by your server, depending on your specific requirements:
  1. Create and use a server certificate signed by the internal certificate authority
  2. Create a Certificate Signing Request (CSR), which you can have signed by a third-party certificate authority.

If you plan on using the SSL Inspector application, option #1 is likely a good choice. Since you'll need to install the root certificate on all client computers and devices to use SSL Inspector effectively, signing the certificate used by the NG Firewall server with this same CA makes sense.

If you aren't going to use the SSL Inspector or have some other reason to prefer a third-party certificate, then option #2 may be a better choice. This will allow you to obtain and use a server certificate signed by a third-party authority. Assuming you use one of the standard and well-known providers, the benefit is that their root certificate will already be included in the list of trusted Certificate Authorities (CA's) on client computers and devices, so you won't have to distribute and install a new root certificate.

Certificate Authority

A default Certificate Authority (CA) was created automatically during the initial server installation. This CA is used to create and sign imitation certificates generated on the fly by the SSL Inspector application. It was also used to sign the default server certificate used by the server itself. You can use the default CA as is or generate a new CA if you want to customize the information in the root certificate.

Generate Certificate Authority

When you click this button to generate a new CA, you will be presented with a popup form where you can enter the details to be included in the Subject DN of the new root certificate. Since this operation creates a root certificate, not a server certificate, the CN field can contain anything you like. Once the form is complete and you click the Generate button, the new CA will be created, and the Certificate Authority information fields will be updated to display the contents of the new certificate.

Download Root Certificate

Click this button to download the root_authority.crt certificate file of the Certificate Authority on the NG Firewall server. Suppose you use SSL Inspector or have configured your NG Firewall server to use a server certificate signed by the internal Certificate Authority. In that case, you must download and install this certificate on all client computers and devices to eliminate certificate warning messages when browsing or accessing secure content.

Upload Root Certificate (CA)

This option lets you upload the root certificate and key files you may have generated using a different source. You can paste the certificate's contents and key files or upload the PEM formatted files.

View other Root Certificate Authorities

This option lets you view other Root Certificates you may have previously uploaded. If necessary, you can revert to a previous Root Certificate.

Server Certificate

The Server Certificate secures all HTTPS connections with the NG Firewall server. This mainly applies to the Administrative Console and the Email Quarantine pages.

During the initial server installation, a default certificate is created and signed using the default Certificate Authority created during installation. You can use the default root certificate as is or generate a new server certificate if you want to customize the information contained in the server certificate.

Generate Server Certificate

When you click this button to generate a new server certificate, you will be presented with a popup form where you can enter the details to be included in the Subject DN of the server certificate. All fields are optional except for the Common Name (CN) field, which should contain the hostname that will be used to access the server.

Example: hostname.domain.com

Once the form is complete and you click the Generate button, the new server certificate will be created, and the NG Firewall server will start using it immediately. The Server Certificate information fields will also be updated to display the contents of the new certificate.

Third-Party Certificate

Instead of using a certificate signed by the local CA, you should have the NG Firewall server use a certificate signed by a well-known CA such as VeriSign or Thawte. The advantage of this type of certificate is that client computers and devices will need no additional configuration since most browsers are already configured to trust certificates issued by these authorities.

Note: This has nothing to do with SSL Inspector and is just the certificate used when connecting to web services running on the NG Firewall server (Administration, Captive Portal, Quarantine).

Upload Server Certificate

Click the Upload Server Certificate button to upload an officially signed certificate provided by a CA, or you can generate it yourself.

Certificates from CAs are provided in many different formats. The Import a certificate or key file button can be used to upload the certificates and keys:
  1. Select the Import a certificate or key file and select the certificate.
  2. Select the Import a certificate or key file and select the private key file. Repeat this process for additional intermediate certificates (not commonly required). When finished, the Server Certificate field should contain the server cert, and the "Certificate Key" field should contain the private key.
  3. The "Optional Intermediate Certificates" field may be populated if the CA provides an intermediate certificate.

At this point, click Upload Certificate to upload the certificate. Remember to adjust how the new certificate will be used (HTTPS, IPSEC, etc) in the Server Certificates table!

Alternatively, instead of importing files, you can copy and paste the certificate, key, and intermediate certificates provided by the CA into the fields.

Create Signature Signing Request

Click the Create Signature Signing Request button to generate a signature signing request; you will be presented with a popup form where you can enter the details to be included in the Subject DN of the CSR. Once the form is complete and you click Generate, a server_certificate.csr file will be downloaded to your computer. The certificate authority you choose will require this file and possibly additional information to verify that you are the "owner" of the website for which you request the certificate. When they receive all the required information and any associated fee, they will issue you a new certificate file, which you can upload to the NG Firewall server.

Import Signing Request Certificate

Note: Formatting your signed certificate as a PEM file before importing it. This format is common with Apache or Linux-type systems. Suppose your certificate is not in PEM format. In that case, you need to re-download it from your certificate authority in PEM format, or you can use tools such as OpenSSL to convert the certificate into the correct format.

When you receive your signed certificate, click the Import Signing Request Certificate button to upload the certificate to the NG Firewall server. Certificates are provided in many different formats.

You can select the Import a certificate file to upload a certificate file provided by the signer. This will parse the file and put the result in the displayed Server Certificate field and any other optional "Intermediate Certificates" in the Optional Intermediate Certificates field. To finish the upload, click the Upload Certificate button.

Alternatively, you can copy and paste the certificate (text) provided by the signer into the fields and click Upload Certificate.

Simple Network Management Protocol

Simple Network Management Protocol (SNMP) can be used to remotely query and monitor the current state of the ETM server.


When Enable SNMP Monitoring is checked, and the SNMP daemon will be enabled. Access to the SNMP daemon is controlled via the Access Rules. ETM uses Simple Network Management Protocol; the following settings will control how the SNMP daemon is configured.

Community (Get) This community is for a Get* operation, the most common communication method. An SNMP community is the group to which devices and management stations running SNMP belong. The SNMP community defines where information is sent. The SNMP community acts as a password. ETM Server will not respond to requests from management systems that do not belong to its community.
System Contact The system administrator's email address who should receive SNMP messages.
System Location Description of the system's location. Use the default if you don't want to specify a location.
Enable Traps If checked, SNMP traps (events) will be sent to the configured host/port.
Community (Traps) This community is for a Trap or Inform operation, which is a rare method of communication. An SNMP community is the group to which devices and management stations running SNMP belong. The SNMP community defines where information is sent. The SNMP community acts as a password. ETM Server will not respond to requests from management stations that do not belong to its community.
Host The management system's hostname or IP address is authorized to receive statistics from the ETM Server.
Port The default port for SNMP traps is 162.

Skins

Skins control the look and feel of the administration interface. Skins allow customization and tuning of the look and feel of the Arista administration.


Administration Skin configures the skin to be used to render the administration UI.

Upload New Skin allows for the upload of custom skins.

Custom Skins

Custom Skins can be created. It requires extensive work and knowledge of HTML and CSS.

Reports

You can search and further define reports using the time selectors and the Conditions window at the bottom of the page. The data used in the report can be obtained on the Current Data window on the right.

Pre-defined report queries:

Report Entry Description
Admin Logins The number of total, successful, and failed admin logins over time.
Settings Change The number of settings changes over time.
Admin Login Events All local administrator logins.
All Settings Changes All settings changes are performed by an administrator.
The tables queried to render these reports:

All Settings Changes

All Settings Changes is a report that provides a detailed view of any settings changes an administrator performs when upgrades are applied. This is available on all systems in the Config > Administration > Reports tab .

The Reports tab shows the timestamp when the change was made, the username and hostname that made the change, and the settings files that were changed.

Click the Differences button to see the exact changes made to the files. This feature uses a color-coded ‘diff’-like feature to show the differences.

Red = Line was removed

Green = Line was added

Yellow = Line was changed

Port Forward Rule Example

The following shows an example of adding a port forward for DNS to the system.

First, you can see the rule was added on 8/3/15 by the user admin from IP 10.24.24.40. The settings file that changed was network.js with the appropriate version-YYYY-MM-DD-time.js file name.

You can see all the changes by clicking the Differences button. Only the DNS rule was added for this instance; the changes are recorded below.

Google

The Google Drive connector enables certain features of the NG Firewall to store data in the connected Google account. For example, you can set the Configuration Backup app to store configuration backups to Google Drive.

You can also set the Reports app to backup the database to Google Drive. Before setting these features, you must connect your NG Firewall system to a Google account.


Configure Google Drive: Click this button to connect your Google account. This opens a browser window that asks you to allow your NG Firewall system to access your Google account. After you complete the setup, the status shows the connector as configured. You can reconfigure or disconnect Google Drive.


Events

Events control the handling of "events" in the NG Firewall.

When noteworthy actions occur within the NG Firewall and the apps, an "event" is logged. An event is an object that describes an action. For example, an HttpRequestEvent is logged when a client on the network makes an HTTP Request, and a SessionEvent is logged when a PC creates a network connection.

The Event Definitions page details all of the events and the attributes.

The platform and all apps log events through the Event Manager. The Event Manager will do several things with each event:
  1. Evaluate the Alert Rules below section and create, log, and send an alert if necessary.
  2. Evaluate Trigger Rules from the below section and take action if necessary.
  3. Evaluate Syslog Rules from the below section and send a syslog message if necessary.
  4. If installed, send the event to Reports to save it in the reports database.

Alerts

Alert rules are evaluated on all events logged and will log and/or alert the administrator when interesting or noteworthy events occur.

Unlike most rules, all Alert rules are evaluated beyond the first matching rule.

A JSON object represents each logged event. The alert rules are evaluated as each event is logged into the database. If an alert rule's conditions match the logged event, the action(s) configured in the alert rule is performed.
  • Enable determine if the Alert rule is enabled.
  • Class is the type of event this rule matches. Selecting the Class will determine what Fields are available in the conditions.
  • Conditions list the fields within the event object to be checked. If all of the conditions match, then the rule will match.
  • Enable Thresholds to limit the Alert from firing until it reaches a certain frequency threshold.
    • Exceeds Threshold Limit is the frequency limit for which this condition will match. If the frequency is greater than this value, then the threshold conditions match.
    • Over Timeframe defines the time range, in seconds, to compute the frequency.
    • Grouping Field defines how to group thresholds by an attribute field in the events. This field is optional.
  • Log Alert logs the event to the Alert Event Log.
  • Send Alert sends an email to all administrators' emails describing the event.
    • Limit Send Frequency limits the number of times a rule can send an alert email to once per the configured number of minutes. For some cases, like a low disk space alert, limiting the number of alerts sent is useful so that an alert is not sent every minute.

If the threshold limit exceeds 100 and The over-time frame is 60, then the threshold condition will only match when these rules and other conditions match approximately 100 times over any 60 seconds. If the Group Field is set to "CClientAddr," then the threshold load is grouped by the "CClientAddr" value in the event objects. The above example would mean that the Alert would only fire when a specific "CClientAddr" like "192.168.1.100" does something over 100 times within 60 seconds. The threshold value for other clients like "192.168.1.150" is tracked separately.

Adding Alert Rules

Writing and designing alert rules is an art.

Start by finding an event that describes the action you want to be alerted about. The Event Definitions describe all the event objects and the attributes associated with each object.

Set the Class to the event you want to alert about, then add conditions that check the fields to look for the events you are interested in.

Let's say we want to set up an alert when a specific user visits a specific website.

As a Class, select HttpRequestEvent. Then, as a field, add domain = example.com and sessionEvent.username = example_user.

We want to know if this user visits this website a single time, so we want to leave the threshold as is. We want it to log this alert, so we want to check Log, and we want to send an email, so we're going to check Send Email.

However, when a user visits a website, many separate HTTP requests are made to load all components. We do not want to receive 20 emails each time a user visits a single page on that website. We want to check the Limit Send Frequency to 20 minutes so we aren't flooded with emails.

Many other alert rules are not enabled by default, which can provide some common examples.

Triggers

Triggers are similar to Alert rules; however, instead of alerting when something interesting happens, trigger rules can "tag" a specific host, device, or user for a specific period.

Unlike most rules, all Trigger rules are evaluated beyond the first matching rule.

This allows the system to keep a state on the different hosts on the network, which can serve several purposes. For example, you can tag a specific host/device/user as using a specific application when the application is used.

Several rules are included but need to be enabled to provide some examples.
  • Enable determine if the alert rule is enabled.
  • Class is the type of event this rule matches. Selecting the Class will determine what Fields are available in the conditions.
  • Conditions list the fields within the event object to be checked. If all of the conditions match, then the rule will match.
  • Enable Thresholds to limit the alert from firing until it reaches a certain frequency threshold.
    • Exceeds Threshold Limit is the frequency limit for which this condition will match. If the frequency is greater than this value, then the threshold conditions match.
    • Over Timeframe defines the time range, in seconds, to compute the frequency.
    • Grouping Field defines how to group thresholds by an attribute field in the events. This field is optional.
  • Action Type determines the action taken.
    • Tag Host will tag the specified host with the specified tag.
    • Untag Host will remove the specified tag from the specified host.
    • Tag User will tag the specified user with the specified tag.
    • Untag User will remove the specified tag from the specified user.
    • Tag Device will tag the specified device with the specified tag.
    • Untag Device will remove the specified tag from the specified device.
  • Target identifies the specific host/device/user. If it is a single attribute name, 'cClientAddr,' it will look up to three layers deep within an object for any attribute named cClientAddr. If it is a fully qualified name like 'sessionEvent. ' cClientAddr,' it will look at that specific attribute within the specified sub-object.
    • Tag Name specifies the string (name) of the tag to be given or removed.
    • Tag Lifetime specifies the lifetime of the tag when adding a tag. After the lifetime expires, the tag will disappear.

Syslog

Syslog sends events via syslog messages to a remote syslog server. To use syslog, install a syslog receiver on another server, then enable syslog and configure it as necessary. Some syslog products are easier to set up than others. Kiwi, a third-party syslog daemon, is a favorite of many Windows users, while those on *nix can use Syslog.
  • Host: The hostname or IP address of the Syslog daemon authorized to receive syslog messages from the NG Firewall server. Do not set the Host to the NG Firewall itself. This will result in the hard drive filling up quickly and likely crashing the box.
  • Port: The UDP port to send syslog messages to the syslog daemon. 514 is the default, as this is the default syslog port.
  • Protocol: The protocol used to send syslog messages. The default is UDP.

Syslog Rules

WARNING: Syslog can be a very expensive operation. If configured to send all (or most) events, it can negatively impact the server's performance.

Syslog Rules determine which events are sent via syslog.

Unlike most rules, all Syslog rules are evaluated beyond the first matching rule.
  • Enable determine if the alert rule is enabled.
  • Class is the type of event this rule matches. Selecting the Class will determine what Fields are available in the conditions.
  • Conditions list the fields within the event object to be checked. If all of the conditions match, then the rule will match.
  • Enable Thresholds to limit the alert from firing until it reaches a certain frequency threshold.
  • Exceeds Threshold Limit is the frequency limit for which this condition will match. If the frequency is greater than this value, then the threshold conditions match.
  • Over Timeframe defines the time range, in seconds, to compute the frequency.
  • Grouping Field defines how to group thresholds by an attribute field in the events. This field is optional.
  • Remote Syslog determines if the event is sent via syslog.

To send all events via syslog, create one rule where Class = All and no conditions.

To send specific events to a syslog server, configure the Syslog Rules to send the specific events to the syslog server.

Email Template

You can customize the content of email alerts by editing the Email Template. Items surrounded by the percent symbol represent system variables. You can use these throughout the Subject or Body of the message. The table below describes each variable.

Variable Information
System company Your company name is defined in Branding Manager.
Alert description The event description of the associated alert rule.
System host The Hostname of your NG Firewall system.
Event class The event class of the associated alert rule.
Event summary The event summary of the associated alert rule.
Event values key value The extended event details of the associated alert rule.

The preview window shows in real time how your changes to the Subject or Body will appear in the email message content.

Local Directory

The Local Directory stores a list of users that the applications can use. It also supports RADIUS for 802.1x authentication from properly configured wireless network access points.

The RADIUS Server can be enabled to allow WiFi users to authenticate as any user configured in the Local Directory.

The RADIUS Proxy can be enabled to allow WiFi users to authenticate with credentials validated by a configured Active Directory Server.

Local Users

Local Users stores a list of users that the applications can use.

For example, Captive Portal and OpenVPN can select the local directory to authenticate users.


To add new users, click the Add button. You must supply a username, first name, last name, email address, and password. Only the administrator can set the password for a given user. Users can be imported or exported using the import/export buttons on the upper right.

A user can be specified with an expiration date. The user will no longer be authenticated if the expiration date has passed.

To select the Local Directory, configure apps such as Captive Portal and OpenVPN to authenticate against the Local Directory while requiring user authentication.

MFA and OpenVPN

You can enable TOTP-based multi-factor authentication for OpenVPN client connections. Select Enable MFA for OpenVPN when adding a user and click Generate new key.


After generating a key, click the gear icon to show the QR code. Select key of the generated code in any TOTP mobile app, such as Google Authenticator. The TOTP app generates a temporary that the user enters into their OpenVPN client.

Note: You must also enable MFA for client configurations in OpenVPN.

Warning:Typically, when passwords are stored, password hashes are saved, and the original cleartext password is forgotten, so administrators do not have access to user passwords. However, The passwords for users in the local directory are stored in cleartext because some applications and features (L2TP) depend on access to the cleartext password. Administrators do have access to cleartext user passwords, and caution is advised.

RADIUS Log

Use the Radius Log to view the diagnostic messages generated by the RADIUS server.


RADIUS Proxy

The Radius Proxy is an optional configuration of the RADIUS Server that enables authentication against an Active Directory server. Access points configured with WPA/WPA2 Enterprise authentication to the NG Firewall RADIUS Server can enforce login via Active Directory when joining the wireless network.

Prerequisites

The NG Firewall appliance must be able to resolve the fully qualified hostname of your Active Directory Primary Domain Controller. You can test name resolution using the DNS Test of the Troubleshooting utility. If the test fails, you must create a Static DNS Entry in the NG Firewall DNS Server.

Active Directory Server

Three steps are required to configure and verify your configuration with the RADIUS Proxy.
  1. Input the Active Directory Server details and click Save to apply and activate the settings.
    Note: The AD Workgroup should be in upper case.

  2. Click the Create AD Computer Account button to register the NG Firewall server with the Active Directory server. If the operation is successful, you should see the distinguishedName when Created and when Changed fields in the AD Account Status field.

  3. Enter a valid username and password in the Active Directory Test area and click Test Authentication. You should see a message indicating the test was successful.

RADIUS Server

The RADIUS Server enables wireless access points to enforce WPA/WPA2 Enterprise authentication. WPA/WPA2 Enterprise wireless networking provides an optimal level of network authorization by requiring each wireless device to authenticate with the unique credentials of an authorized user rather than a shared password. Users are authenticated against Local Users or Active Directory via the RADIUS Proxy.

Wi-Fi Authentication

To enable support for WPA/WPA2 Enterprise authentication, navigate to the RADIUS Server tab of the Local Directory and select Enable external access point authentication. In the RADIUS Password field, assign a strong password.


After you enable the NG Firewall RADIUS server, you need to configure your access point to use WPA/WPA2 Enterprise. The following parameters may be necessary to configure WPA/WPA2 Enterprise for your access point.
  • RADIUS Server IP address - the IP address of your NG Firewall server on the same LAN segment as your wireless access point.
  • RADIUS port number - the NG Firewall RADIUS authentication server listens on port 1812.
  • RADIUS accounting port - the NG Firewall RADIUS accounting server listens on port 1813. This optional parameter may not be supported or configurable on some access points. RADIUS accounting is used by the access point to inform the NG Firewall server about the login and logout activities of each authenticated user and their associated device address.
  • Shared Secret - the shared secret may also be called a password or key and is used to authorize communication between the access point and the NG Firewall RADIUS server.

Server Certificate

Clients must install your server's root certificate when they connect to the wireless network. See Certificates. Most devices supporting WPA/WPA2 Enterprise authentication prompt the user to install the certificate when joining the network for the first time.

Access Rules

By default, two Access Rules allow access to the RADIUS server from WAN or non-WAN interfaces. The access rules permit UDP protocol to ports 1812 and 1813. If your access point or domain controller does not belong to a local network, you must enable the rule Allow RADIUS on WANs.


Note: When upgrading to version 16.2, these rules are not automatically created. You must create them manually to permit access from your access point to the NG Firewall.

System

The System contains settings related to the server

System Reports
The Reports tab provides a view of all system performance reports, including CPU, memory, and disk usage.
Regional
The Regional tab configures the region/location-specific settings of the NG Firewall server.
Support
The Support tab configures the support settings and allows for rebooting and shutting down the server for support purposes.
Logs
The Logs tab configures the number of log files to retain for each log type.
Backup
You can export the NG Firewall configuration to a local file. This includes all the settings in Config and the settings from the applications.
Restore
Restore allows restoring settings from backups created in Config > System > Backup or the Configuration Backup application.
Protocols
The Protocols tab configures how certain protocol parsing and processing functions.
Shield
The shield monitors the session creation rate of the clients creating sessions. Each time the NG Firewall processes a session, the shield calculates the client's current session creation rate when initiating the session.

System Reports

The Reports tab provides a view of all system performance reports, including CPU, memory, and disk usage.

Reports

System reports can be accessed via the Reports tab at the top or the Reports tab within the settings. All pre-defined reports will be listed along with any custom reports that have been created.

Reports can be searched and further defined using the time selectors and the Conditions window at the bottom of the page. The data used in the report are obtained on the Current Data window on the right.

Table 1. Pre-defined Report Queries
Report Entry Description
CPU Load the CPU load over time.
Disk Usage The disk utilization over time.
Memory Usage The amount of free memory over time.
Swap Usage The swap utilization over time is a percentage of the total swap size.
Swap Usage Bytes The swap utilization over time.
Highest Active Hosts The highest number of active hosts.
Server Status Events All system status events.
The tables queried to render these reports:

Related Topics

Regional

The Regional tab configures the region/location-specific settings of the NG Firewall server.


Current Time

This field displays the current time on the NG Firewall Server.

Timezone

This is the configured timezone. It is important to have the correct timezone configured to adjust for any time changesthroughout the year.

Language

This is the configured language for the NG Firewall server. The administration UI and user-visible pages, such as the quarantine and block pages, will be displayed in this language. However, this will not change the language on certain strings like product names and all online services, such as the account management, help, and store pages.

Regional Formats

The appropriate format of numbers and dates may vary depending on your location. While language display settings contain the most appropriate formats for that language, you should override these values.
  • Use Defaults: Use the value provided with the language.
  • Override: Specify different format values for the following fields:
    • Decimal Separator: This string is used to separate decimal spaces. For example, a period (.) for 1.23.
    • Thousand Separator This string is used to separate thousands of places. For example, a comma (,) for 1,000.
    • Date Format This string is used to generate the date display.
    • Timestamp Format: This string is used to generate the time display.

    Date and Timestamp Formats can use the formatting fields described on the time and date formatting page.

Force Time Sync

This button allows you to force the server time with the internet (via NTP).

Attention:If your server time is significantly in the future (hours or days), force syncing the time may cause issues, as the server's time will go backward. Threads and processes that are sleeping until a certain calendar date will now awaken at the planned time as the server time has moved significantly backward. To avoid this, reboot after forcing the time to synchronize if the time is significantly off. Also, logs and reports may behave oddly, and certain periods will occur twice.

Support

The Support tab configures the support settings and allows for rebooting and shutting down the server for support purposes.


The NG Firewall server will maintain a secure connection with our cloud infrastructure if Connect to Command Center is enabled. This channel can be used for centralized management, monitoring, or hotfixes from the cloud.

Note: The NG Firewall server will connect to the Support system (outbound). This does not require you to change any firewall settings in front of the Arista server to allow inbound sessions.

Suppose you Allow secure access to your server for support purposes. If checked, the Edge Threat Management Support team will access your server.

Manual Reboot

This button will reboot the NG Firewall server.

Note: Rebooting should be done sparingly. It will not solve any persistent problems.

Manual Shutdown

This button will power off the NG Firewall server.

Setup Wizard

This button allows you to re-run the Setup Wizard, automatically launching on a new install.

Logs

The Logs tab configures the number of log files to retain for each log type.

Log Retention

Disk space used by logs: Shows the current usage on the disk occupied by the log files.

For each log type, the number of logs to retain: Sets the number of log files to keep for each log type. Choose a low value to limit the amount of space used by logs. The minimum value is 1.


Backup

Export the NG Firewall configuration to a local file. This includes all the settings in Config and the settings from the applications. It does not include the reporting data, the quarantine data, or any unique "configuration" like the server's UID. To export the configuration, go to Config > System > Backup tab and click Backup to file. Install the Configuration Backup app for automated configuration backup of configuration and other data.


Restore

Restore allows restoring settings from backups created in Config > System > Backup or the Configuration Backup application.


Restore from File

This allows you to upload the restored file.

First, select the Restore Options appropriate for your case.
  • Restore all Settings will restore all the settings in the backup file.
  • Restore all except keeping current network settings will restore all the settings in the backup file except the network settings. The current network settings will be maintained.

The first option is typically used to restore to a previous backup or recover from a failure.

The second option is useful if you maintain a 'standard configuration' and you want to maintain this standard configuration across multiple servers. In this case, all the servers maintain the same settings, but each has unique network settings.

After selecting the Restore Options, click Browse and select the backup file you want to restore. After selecting the backup file, click Restore from File to begin the restore process.

Restore Process

After starting the restore process, the backup file is unpacked and checked.

If the backup file requires certain applications that are not currently on the NG Firewall server, it will ask to download these applications first. After downloading those applications, the restore process is run again.

If the backup file is from an unsupported version, it will show an error. It is also suggested that a backup file from the same version that the file was created with be restored. For example, if the backup file was created with NG Firewall 16.2, restoring it on an NG Firewall running 16.2 is suggested.

Typically, the restored process's only supported versions will be the current version of NG Firewall and the immediately prior major version. For example, 16.2 will restore 16.2 and 16.1 backups, not 16.0. (Trivial versions are considered identical to the minor version for restore purposes. For example, 15.1.0, 15.1.1, and 15.1.2 are all considered 15.1 when restoring backups.)

After the restore process begins, the NG Firewall processes will reboot, and you will lose connection to the server. After reconnecting to the server, the settings and configuration are restored from the backup file.

Protocols

The Protocols tab configures how certain protocol parsing and processing functions.

Warning:These settings should not be changed unless support instructs them to do so.
Figure 1. Protocols Tab

The protocols that appear and the visibility of the Protocols tab depend on the current applications installed. Many applications use hidden applications dedicated to the processing and handling of important protocols like SMTP and HTTP. These hidden applications can be enabled/disabled in this tab.

If a protocol is disabled, sessions will still be treated as binary streams, not parsed and unparsed.

HTTP

If enabled, the HTTP-casing HTTP processing application runs. If disabled, the applications stop all special HTTP processing.

SMTP

If enabled, the SMTP-casing SMTP processing application runs. If disabled, the applications stop all special SMTP processing.

FTP

If enabled, the FTP-casing FTP processing application will run. If disabled, the applications stop all special FTP processing.

Shield

The Shield monitors the session creation rate of the clients creating sessions. Each time the NG Firewall processes a session, the Shield calculates the current session creation rate of the client initiating the session. If the client's session creation rate reaches a level that the Shield considers too aggressive, the session creation rate of that client is limited to that level.


This process protects the NG Firewall server and the network from DOS attacks.

Enable Shield

If checked, the Shield is enabled. If unchecked, it is disabled.

Warning: Do not disable the Shield. Doing so may cause performance and stability issues. This checkbox is provided to allow for troubleshooting. It is never suggested that the Shield be left disabled after any troubleshooting steps.

Note that Shield only looks at new session requests; it does not influence or process traffic in existing or scan bypassed sessions.

Shield Rules

Shield rules are evaluated at session creation time. The Rules documentation describes how rules are processed.

If one of the rules matches, the action from the first matching rule is applied. If no Shield rule matches, the session will be scanned.

The packet will be dropped if the session is scanned and the current session creation rate is too high. If it is not too high, the current session creation rate is adjusted to account for this new session, and the session is allowed.

The tables queried to render these reports:

Shield Reports

The Reports tab provides a view of all reports and events for all traffic handled by Shield.

Reports

This application's reports can be accessed via the Reports tab at the top or the Reports tab within the settings. All pre-defined reports and custom reports created will be listed.

Reports can be searched and further defined using the time selectors and the Conditions window at the bottom of the page. The data used in the report can be obtained on the Current Data window on the right.

Table 2. Pre-defined Report Queries:
Report Entry Description
Scanned Sessions The amount of scanned and blocked sessions over time.
Blocked Sessions The amount of blocked sessions over time.
Top Blocked Usernames The number of blocked sessions grouped by username.
Top Blocked Clients The number of blocked sessions grouped by client.
Top Blocked Ports The number of blocked sessions grouped by server port.
Top Blocked Servers The number of blocked sessions grouped by server.
Top Blocked Hostnames The number of blocked sessions grouped by hostname.
Scanned Session Events All sessions are scanned by Shield.
Blocked Session Events All sessions are blocked by Shield.
The tables queried to render these reports:
Related Topics

Email

Email contains all the email-related configurations of the NG Firewall server.

Safe List

The safe list lists email addresses considered safe or trusted.

Safe List

Several applications, such as Spam Blocker, Spam Blocker Lite, and Phish Blocker, scan SMTP messages.

Figure 2. Email Safe List

Administrators sometimes want to trust emails from certain addresses to avoid scanning messages to save resources or false positives. The safe list provides a convenient location to list safe and trusted email addresses that these applications will check before scanning emails.

Note: Virus Blocker and Virus Blocker Lite do not check the safe list because of the low false positive rate.

Global Safe List

This is a global safe list that applies to all email. If an email address is listed, all mail from that address will not be scanned in Spam Blocker, Spam Blocker Lite, and Phish Blocker.

Emails can be specified using Glob Matcher syntax, so you can safely list entire domains as "*@example.com."

Per-user Safe List

Each user/email address also has its safe list. For example, let's assume "This email address is being protected from spambots. You need JavaScript enabled to view it." has a quarantine that they manage via the quarantine application. In the quarantine application, they can add addresses to their safe list.

For example, This email address is being protected from spambots. You need JavaScript enabled to view it. may add "This email address is being protected from spambots. You need JavaScript enabled to view it." to their safe list. All emails from "This email address is being protected from spambots. You need JavaScript enabled to view it." to "This email address is being protected from spambots. You need JavaScript enabled to view it." will automatically be passed as safe listed, while emails from "This email address is being protected from spambots. You need JavaScript enabled to view it." to other users will be scanned as normal.

Per-user safe lists provide a mechanism to deal with false positives that won't affect the overall false negative rate of other users/emails.

Emails can be specified using Glob Matcher syntax so, for example, you can safely list entire domains as "*@example.com." Also, note that a user/email can add "*" to their Per-User safe list to disable spam/phish scanning for emails to them entirely.

Users can edit their own Per-user safe list in the quarantine web application. Administrators can purge user's safe lists in the administration UI.

Server

The Server tab shows the current information about the Arista server.


Unique ID

The first field shows the Unique ID (UID) of the Arista server. The UID is a 16 alphanumeric code uniquely identifying this server for licensing and tracking purposes.

Never share the UID of the server.

The UID is generated automatically upon installation, and each server must have a unique UID to function properly.

Cloning servers post-installation will create two servers with identical UIDs, which will result in problems and licensing issues.

Server Information

The second field shows the build version and server information.
  • Build shows the version of the Arista-vm.
  • Kernel shows the kernel version. Arista support uses the other fields.
  • Current "licensed" device count shows the current number of devices in the host table that count as "licensed" devices.
  • Highest "licensed" device count since reboot shows the highest value of licensed devices seen by this Arista since reboot.

Outgoing Server

This configures how the NG Firewall will send emails.

The NG Firewall server sends emails for several reasons:
  • The Quarantine facility sends users a daily digest of the spam they receive.
  • The Quarantine allows users to "release" emails from the quarantine.
  • The Reports sends daily summary reports to administrators about NG Firewall server activity.

The NG Firewall must be configured correctly to send emails to your environment for these functions to work correctly.


Outgoing Email Server

If the Sent email is checked directly, the NG Firewall will send emails like a regular email server. It does this by looking up the MX DNS record of the recipient domain and sending the message via SMTP to that address. This generally works with no further configuration. However, many residential and even commercial ISPs block port 25 to prevent spam, and this will prevent the NG Firewall from sending emails.

If the Sent email using the specified SMTP Server is checked, then NG Firewall will send the email using the configured server as an SMTP relay. For this to work, the SMTP relay must be configured to allow the NG Firewall to relay emails.
  • Server Address or Hostname is the IP address or hostname of the SMTP relay.
  • The server port is the port used to connect to the SMTP relay.
  • The NG Firewall will authenticate with the SMTP relay if Use Authentication is checked.
    • Login configures the username to use during SMTP authentication.
    • Password configure the password to use during SMTP authentication.

Email from Address

This is the "from" address of all emails sent from the NG Firewall server (excluding emails released from the quarantine).

Email Test

This sends a test email from the configured email address. If your email settings are correct, the specified recipient should receive the test email within a few minutes.

Quarantine

Spam Blocker,Spam Blocker Lite, and Phish Blocker sometimes determine if an email is spam or phish, and the email should be dropped. However, dropping an email can be dangerous as it may be a "false positive" and an important email. In this case, dropping the email would be very bad.


The quarantine action in these applications prevents important emails from getting lost. The quarantine action silently sends an email to the user's quarantine. All suspected spam/phish emails sit in quarantine, and the user is free to review the quarantined email to verify that nothing important was quarantined.

If something legitimate was quarantined (called a false positive), the user could Release the email to their inbox.

Quarantine Web Application

Each day, users/emails with new emails in their quarantine will be sent a Quarantine Digest email with a link to their quarantine. Alternatively, users can request a Quarantine Digest email by accessing https://NGFW_IP:HTTPS_PORT/quarantine/.

After clicking on the Click here to access your spam quarantine link, the user can view the Quarantine web application, which allows them to manage their quarantine and Safe List.


The Quarantine Messages tab shows the list of messages currently in quarantine. To release messages to the inbox, check the message(s) and click Release to Inbox. To release a message and automatically add the sender to your safe list:

  1. Click Release to Inbox & Add Senders to Safe List.
  2. Select the message(s) to delete and click Delete.
  3. Note that it is not necessary to delete messages; messages will automatically be purged from quarantine after the configured time elapses.

Safe List: This tab configures your safe (trusted) email addresses. Email from the listed address will not be scanned to determine if they are spam or phishing. If a user's email is falsely determined to be spam, their email address can be added to this list to ensure it does not happen again.

Forward or Receive Quarantines: Mailing lists or aliases often receive Quarantine Digests. This is annoying as all users on the list will receive the Quarantine Digest email. To avoid this, you can forward the quarantined mail to another user's quarantine, such as the email list administrator. Email will still be quarantined and released like normal, but the administrator can do it via their quarantine. Forward Quarantined Messages To configure where quarantined messages will be placed. Received Quarantined Messages From shows any other addresses from which you receive quarantined messages.

Quarantine Settings

The quarantine behavior can be configured via the administration UI in Config > Email > Quarantine .
  • Maximum Holding Time (days) configures how long an email will be held in a quarantine before it is automatically deleted.
  • Send Daily Quarantine Digest Emails configures if daily emails will be sent to users with new mail in their quarantine.
  • Quarantine Digest Sending Time configures when the daily digests will be sent if enabled.

User Quarantines: This shows a list of currently existing user quarantines. User quarantines are created dynamically when an email is quarantined for an email address. There is no need to delete quarantines; this will happen automatically when there are no messages. To release or purge (delete) a user's entire quarantine, select the appropriate row(s) and click the Purge Selected or Release Selected button at the top. To view a user's quarantine, click the Show Detail icon on the appropriate row. This will display a window showing all the existing messages in that user's quarantine. Messages are purged (deleted) or released by clicking on the message(s) and clicking the Purge Selected or Release Selected button at the top.

Quarantinable Addresses: This is a list of emails that will have quarantines automatically created on their behalf. Sometimes, you want to ensure that quarantine is not an option for some scanned mail. As such, you can put "*@mydomain.com" and only "@mydomain.com" email addresses, which will have quarantines created dynamically. If an email is scanned for another address and the action is quarantined, but it is not a quarantinable address, it will be marked instead.

Note: This should almost always be a list with one entry containing "*". This means all emails will have quarantines created for them if spam/phishing is caught for them. This is the default and suggested value. Most of the time, this is used to compensate for some other misconfiguration, like scanning email it should not be scanning (like outbound email). Changing this setting is not suggested.

Quarantine Forwards: As discussed above, it is often desirable to have distribution lists or aliases for their quarantined email to an administrator's email quarantine so the entire list does not receive quarantine digest emails. You can view/add/delete forwards in this table.

Example: you may want to forward quarantined mail for the distribution list "This email address is being protected from spambots. You need JavaScript enabled to view it." to "This email address is being protected from spambots. You need JavaScript enabled to view it." so that only "itadmin" will get messages about spam to the distribution list. "itadmin" can then manage spam to "This email address is being protected from spambots. You need JavaScript enabled to view it." in their quarantine.

Web Administration

Administration Interface

The Administration Interface is the main interface used to configure the NG Firewall.

Upon the first visit to the administration interface, a registration and welcome message is displayed. The message suggests applications that may be useful for your network. You can choose to install or manually install the recommended apps.

There are four main tabs in the administration interface in the main menu:
  1. Dashboard
  2. Applications
  3. Config
  4. Reports (only visible if the Reports app is installed.)
In the sub-menu, there are four views:
  1. Sessions
  2. Hosts
  3. Devices
  4. Users
Tip: Using Mozilla Firefox or Google Chrome browsers is recommended for administration.

Dashboard

The Dashboard provides an overview of the state of your NG Firewall. It is extremely useful for quickly viewing or monitoring what is happening on the network and the current status of the NG Firewall server.

Figure 1. NG Firewall Dashboard

By default, the Dashboard will show several widgets with varying information. However, the Dashboard is completely customizable. Widgets can be removed and added so the administrator sees exactly the information that is important to them on the Dashboard.

There are many different types of widgets available:

Name Information
Information Shows some information about the NG Firewall, like name, model, version, etc.
Resources Show an overview of current memory swap and disk usage.
CPU Load Shows a graph of recent CPU load.
Network Information Shows an overview of the network information, such as session count and device/host count.
Network Layout Shows an overview of the network layout based on the interface configuration.
Map Distribution Shows the current sessions' mapped geo-location on a world map, sized by throughput.
Report Shows any Report Entry from Reports.

Click Manage Widgets at the top to change what is displayed on the dashboard. From here, you can show or hide the built-in widgets or add new widgets from Reports by clicking on the Add button.

When adding a Report widget, specify a time frame (the number of hours worth of data to display) and a refresh interval (how often the widget refreshes on the dashboard).

When viewing a Report Entry in Reports, you can easily add it to your Dashboard by clicking the Add to Dashboard button.

Administration Notifications

Administration Notifications appear as an exclamation point icon at the top of the rack when logged into the Administration interface or in the "Notifications" widget on the dashboard.

Overview

When logging in, the server will run a series of tests, which can take a few minutes, and then it will display the administration alert icon if there are any alerts. Tests are only performed on login; to force a retest, refresh the browser or click refresh on the Notification widget on the dashboard.


Notifications are displayed to alert the administrator of common mis-configurations or issues.

Notifications

Text Description
Upgrades are available and ready to be installed. The server detected software upgrades that have yet to be applied. Upgrades can be applied in Config > Upgrade .
DNS connectivity failed: DNS Server IP The specified server's DNS settings are not providing DNS resolution. Check the DNS settings of your WAN interfaces in Config > Network > Interfaces . It is recommended that you use your ISP's DNS servers.
Failed to connect to Arista. [address:port] Arista failed to connect to the Arista servers successfully. Check your network settings to ensure they are valid and that Arista is online. Also, check that no firewall between Arista and the internet could block connectivity. Arista requires an active connection to the internet for proper operation.
Free disk space is low. [ xx% free ] Free disk space is running low. Contact Arista support for help determining what is using disk space and what to do about it. Please note that our recommended minimum hard disk size is at least 80 Gigs.
Disk errors were reported. Error text The disk (hard drive) returned some errors for certain commands. This usually means the disk has bad sectors which are non-responsive. In this case, the disk (hard drive) should be replaced immediately.
Rack Name contains two or more Application 1 The given rack contains two or more instances of the same application. While possible, this is never desired as it decreases performance and increases management complexity. Remove one of the duplicate applications.
Rack Name contains redundant apps: Application 1 and Application 2. Some applications in Arista are redundant and should be installed in a different rack simultaneously. For example, Spam Blocker is a super-set to Spam Blocker Lite. If both are run, no additional spam will be blocked, but messages will be scanned twice, incurring a performance hit. Remove the redundant application.
Bridge (Interface 1 <-> Interface 2) may be backward. Gateway (Gateway IP) is on Interface 2. Often, bridges can be plugged in with the WAN interfaces on the LAN and the LAN interface on the WAN. This works and passes traffic; however, several applications do not behave as expected. If shown, NGFW has detected that the gateway for the main bridge interface is not on the expected interface. It is recommended to go into Config > Network > Interfaces and unplug each interface one at a time, verifying and correcting the mapping of interfaces by swapping cables around.
Interface 1 interface NIC has a high number of RX/TX errors. This indicates that ifconfig shows a high number of RX or TX errors on the given interface card. This is typically a network layer or NIC issue. If possible, try another NIC or duplex setting in /admin/index.do#config/network/advanced/network_cards.
Spam Blocker [Lite] is installed, but an unsupported DNS server is used Spam Blocker and Spam Blocker Lite rely on DNSBL (DNS blacklists) to categorize spam. Several publicly available and often used DNS servers do not supply access to these services. For example, google (8.8.8.8, 8.8.4.4), open DNS (208.67.222.222, 208.67.222.220), level 3 (4.2.2.1,4.2.2.2) do not provide resolution for DNSBL queries. Configuring Arista to use your ISPs DNS servers for effective spam filtering is recommended. If spam filtering is not required, uninstall the application from the rack.
Spam Blocker [Lite] is installed, but a DNS server (X,Y) fails to resolve DNSBL queries. This means one configured DNS server does not properly resolve DNSBL queries. This will greatly degrade Spam Blocker and Spam Blocker Lite's ability to detect spam. Try configuring a different DNS server. To test this, manually run host 2.0.0.127.zen.spamhaus.org your_DNS_server in the terminal where "your_DNS_server" is the IP of your DNS server. If it does not return results, then DNSBL queries are not properly resolved by that server.
Web Filter is installed, but a DNS server (X,Y) fails to resolve categorization queries. This means one configured DNS server does not properly resolve Web Filter category queries. Web Filter uses DNS to categorize unknown sites. If the configured DNS servers do not properly respond to categorization queries, then Web Filter will not function correctly and may slow web traffic significantly.
A DNS server responds slowly. (X,Y,Z) This may negatively affect Web Filter performance. A DNS server responds slowly (X,Y,Z), which may negatively affect Web Filter performance. This means the specified DNS server (Y) on the interface (X) responded slowly (in Z milliseconds) to a Web Filter categorization request. Web Filter will automatically request categorization of unknown and never-before-seen URLs. If DNS performs poorly, Web Filter categorization will also be slow and may negatively affect web traffic latency as Web Filter categorizes websites.
Event processing is slow (x ms). Event logging is slow. This is shown when event logging takes more than 15ms on average. This can be caused by a slow disk or an extremely busy server. If you see this message, you can try a couple of things.
  1. Using a faster disk/disk controller allows the daemon to write events more quickly.
  2. Create less events by turning off apps and/or bypassing traffic that need not be scanned.
Event processing is delayed (x minute delay). The event logging daemon that logs events to the database is behind. This happens when "events" happen quicker than when the events can be written in the database. A slow disk or a busy network can cause this. Events will be stored in queued memory until they can be written to the disk. If the time it takes for an event to happen to be logged to the database reaches a time greater than 10 minutes, this warning will appear. This is not necessarily an issue, but the administrator should be aware when viewing reports and events that they will be delayed by x minutes. You can try a few things to resolve this alert:
  1. Using a faster disk/disk controller allows the daemon to write events more quickly.
  2. Create less events by turning off apps and/or bypassing traffic that need not be scanned.
Packet processing recently overloaded This warning means that at "nf_queue: full at * entries, dropping packets(s)" was found in /var/log/kern.log." This means packets were incoming faster than the server could handle them. This usually indicates some misconfiguration or performance issue or that some traffic needs to be Bypass Rules. This indicates that the server is undersized for the current task and needs more memory (swapping) disk I/O throughput or processing power. For further help with this alert, contact Arista support.
The shield is disabled. This can cause performance and stability problems. The shield is disabled in Config > System > Shield . While sometimes useful for testing, this configuration will cause performance and stability problems. To verify that Enable Shield is checked.
Route to unreachable address: 1.2.3.4 A static route exists in Config > Network > Routes , but the next hop is unreachable. All traffic for this route will be dropped.
Currently, the number of devices significantly exceeds the number of licensed devices. (x > y) The number of devices for which NGFW has recently processed traffic (x) is greater than the number of allowed devices (y) for the license existing on the NGFW server. o return to compliance, bypassing devices or getting a larger license may be necessary. Contact This email address is being protected from spambots. You need JavaScript enabled to view it. for help.
DNS and DHCP services are not functioning. This means that the DNS and DHCP service is not properly functioning. This serious issue must be resolved for Arista to function properly. The usual cause of this is invalid options or syntax in Config > Network > Advanced > DHCP & DNS , or in the interface settings in Config > Interfaces > Edit > DHCP Configuration > DHCP Options .
The timezone has been changed since boot. A reboot is required. The timezone has been reconfigured since boot-up, and a reboot is required as soon as possible.
An upgrade process has been interrupted. An upgrade has been interrupted. This is usually the result of rebooting during an upgrade using an alternate upgrade process, running multiple upgrades at once, or some other similar scenario. Contact Arista support. (Be sure Support access is enabled in Config > System > Support !)

Event Definitions

All event data is stored in the Mail messages in a relational database. As Arista and applications process traffic, they create Event objects that add and modify content in the database. Each event has it's class/object with certain fields that modify the database in a certain way.

The list below shows the classes used in the event logging and the attributes of each event object. These can add alerts in Reports or other event handling within Arista.

SpamLogEvent

These events are created by Spam Blocker, and the Database Schema table is updated when an email is scanned.

Attribute Name Type Description getAction
action SpamMessageAction The action getClass
class Class The class name getClientAddr
clientAddr InetAddress The client address getClientPort
clientPort int The client port getMessageId
messageId Long The message ID getPartitionTablePostfix getReceiver
receiver String The receiver getScore
score float The score getSender
sender String The sender getServerAddr
serverAddr InetAddress The server address getServerPort
serverPort int The server port getSmtpMessageEvent
smtpMessageEvent SmtpMessageEvent The parent SMTP message event isSpam
isSpam boolean True if spam, false otherwise getSubject
subject String The subject getTag getTestsString
testsString String The tests string from the spam engine getTimeStamp
timeStamp Timestamp The timestamp getVendorName
vendorName String The application name

SpamSmtpTarpitEvent

These events are created by Spam Blocker and inserted into the Database Schema table when a session is tarpitted.

Attribute Name Type Description getIPAddr
IPAddr InetAddress The IP address getClass
class Class The class name getHostname
hostname String The host name getPartitionTablePostfix getSessionEvent
sessionEvent SessionEvent The session event getSessionId
sessionId Long The session ID getTag getTimeStamp
timeStamp Timestamp The time stamp getVendorName
vendorName String The application name

PrioritizeEvent

The Bandwidth ControlDatabase Schema creates these events and updates the table when a session is prioritized.

Attribute Name Type Description getClass
class Class The class name getPartitionTablePostfix getPriority
priority int The priority getRuleId
ruleId int The rule ID getSessionEvent
sessionEvent SessionEvent The session event getTag getTimeStamp
timeStamp Timestamp The timestamp

VirusFtpEvent

Virus Blocker creates these events and updates the Database Schema table when Virus Blocker scans an FTP transfer.

Attribute Name Type Description getAppName
appName String The name of the application getClass
class Class The class name getClean
clean boolean True if clean, false otherwise getPartitionTablePostfix getSessionEvent
sessionEvent SessionEvent The session event getTag getTimeStamp
timeStamp Timestamp The timestamp getUri
uri String The URI getVirusName
virusName String The virus name, if not clean

VirusHttpEvent

These events are created by Virus Blocker and update the Database Schema table when Virus Blocker scans an HTTP transfer.

Attribute Name Type Description getAppName
appName String The name of the application getClass
class Class The class name getClean
clean boolean True if clean, false otherwise getPartitionTablePostfix getRequestLine
requestLine RequestLine The request line getSessionEvent
sessionEvent SessionEvent The session event getTag getTimeStamp
timeStamp Timestamp The timestamp getVirusName
virusName String The virus name, if not clean

VirusSmtpEvent

Virus Blocker creates these events and updates the Database Schema table when Virus Blocker scans an email.

Attribute Name Type Description getAction
action String The action getAppName
appName String The name of the application getClass
class Class The class name getClean
clean boolean True if clean, false otherwise getMessageId
messageId Long The message ID getPartitionTablePostfix getTag getTimeStamp
timeStamp Timestamp The timestamp getVirusName
virusName String The virus name, if not clean

FirewallEvent

Firewall creates these events, and the Database Schema table is updated when a firewall rule matches a session.

Attribute Name Type Description getBlocked
blocked boolean True if blocked, false otherwise getClass
class Class The class name getFlagged
flagged boolean True if flagged, false otherwise getPartitionTablePostfix getRuleId
ruleId long The rule ID getSessionId
sessionId Long The session ID getTag getTimeStamp
timeStamp Timestamp The timestamp

Events

Events control the handling of "events" in the NG Firewall.

When noteworthy actions occur within the NG Firewall and the apps, an "event" is logged. An event is an object that describes an action. For example, an HttpRequestEvent is logged when a client on the network makes an HTTP Request, and a SessionEvent is logged when a PC creates a network connection.

The Event Definitions page details all of the events and the attributes.

The platform and all apps log events through the Event Manager. The Event Manager will do several things with each event:
  1. Evaluate the Alert Rules below section and create, log, and send an alert if necessary.
  2. Evaluate Trigger Rules from the below section and take action if necessary.
  3. Evaluate Syslog Rules from the below section and send a syslog message if necessary.
  4. If installed, send the event to Reports to save it in the reports database.

Alerts

Alert rules are evaluated on all events logged and will log and/or alert the administrator when interesting or noteworthy events occur.

Unlike most rules, all Alert rules are evaluated beyond the first matching rule.

A JSON object represents each logged event. The alert rules are evaluated as each event is logged into the database. If an alert rule's conditions match the logged event, the action(s) configured in the alert rule is performed.
  • Enable determine if the Alert rule is enabled.
  • Class is the type of event this rule matches. Selecting the Class will determine what Fields are available in the conditions.
  • Conditions list the fields within the event object to be checked. If all of the conditions match, then the rule will match.
  • Enable Thresholds to limit the Alert from firing until it reaches a certain frequency threshold.
    • Exceeds Threshold Limit is the frequency limit for which this condition will match. If the frequency is greater than this value, then the threshold conditions match.
    • Over Timeframe defines the time range, in seconds, to compute the frequency.
    • Grouping Field defines how to group thresholds by an attribute field in the events. This field is optional.
  • Log Alert logs the event to the Alert Event Log.
  • Send Alert sends an email to all administrators' emails describing the event.
    • Limit Send Frequency limits the number of times a rule can send an alert email to once per the configured number of minutes. For some cases, like a low disk space alert, limiting the number of alerts sent is useful so that an alert is not sent every minute.

If the threshold limit exceeds 100 and The over-time frame is 60, then the threshold condition will only match when these rules and other conditions match approximately 100 times over any 60 seconds. If the Group Field is set to "CClientAddr," then the threshold load is grouped by the "CClientAddr" value in the event objects. The above example would mean that the Alert would only fire when a specific "CClientAddr" like "192.168.1.100" does something over 100 times within 60 seconds. The threshold value for other clients like "192.168.1.150" is tracked separately.

Adding Alert Rules

Writing and designing alert rules is an art.

Start by finding an event that describes the action you want to be alerted about. The Event Definitions describe all the event objects and the attributes associated with each object.

Set the Class to the event you want to alert about, then add conditions that check the fields to look for the events you are interested in.

Let's say we want to set up an alert when a specific user visits a specific website.

As a Class, select HttpRequestEvent. Then, as a field, add domain = example.com and sessionEvent.username = example_user.

We want to know if this user visits this website a single time, so we want to leave the threshold as is. We want it to log this alert, so we want to check Log, and we want to send an email, so we're going to check Send Email.

However, when a user visits a website, many separate HTTP requests are made to load all components. We do not want to receive 20 emails each time a user visits a single page on that website. We want to check the Limit Send Frequency to 20 minutes so we aren't flooded with emails.

Many other alert rules are not enabled by default, which can provide some common examples.

Triggers

Triggers are similar to Alert rules; however, instead of alerting when something interesting happens, trigger rules can "tag" a specific host, device, or user for a specific period.

Unlike most rules, all Trigger rules are evaluated beyond the first matching rule.

This allows the system to keep a state on the different hosts on the network, which can serve several purposes. For example, you can tag a specific host/device/user as using a specific application when the application is used.

Several rules are included but need to be enabled to provide some examples.
  • Enable determine if the alert rule is enabled.
  • Class is the type of event this rule matches. Selecting the Class will determine what Fields are available in the conditions.
  • Conditions list the fields within the event object to be checked. If all of the conditions match, then the rule will match.
  • Enable Thresholds to limit the alert from firing until it reaches a certain frequency threshold.
    • Exceeds Threshold Limit is the frequency limit for which this condition will match. If the frequency is greater than this value, then the threshold conditions match.
    • Over Timeframe defines the time range, in seconds, to compute the frequency.
    • Grouping Field defines how to group thresholds by an attribute field in the events. This field is optional.
  • Action Type determines the action taken.
    • Tag Host will tag the specified host with the specified tag.
    • Untag Host will remove the specified tag from the specified host.
    • Tag User will tag the specified user with the specified tag.
    • Untag User will remove the specified tag from the specified user.
    • Tag Device will tag the specified device with the specified tag.
    • Untag Device will remove the specified tag from the specified device.
  • Target identifies the specific host/device/user. If it is a single attribute name, 'cClientAddr,' it will look up to three layers deep within an object for any attribute named cClientAddr. If it is a fully qualified name like 'sessionEvent. ' cClientAddr,' it will look at that specific attribute within the specified sub-object.
    • Tag Name specifies the string (name) of the tag to be given or removed.
    • Tag Lifetime specifies the lifetime of the tag when adding a tag. After the lifetime expires, the tag will disappear.

Syslog

Syslog sends events via syslog messages to a remote syslog server. To use syslog, install a syslog receiver on another server, then enable syslog and configure it as necessary. Some syslog products are easier to set up than others. Kiwi, a third-party syslog daemon, is a favorite of many Windows users, while those on *nix can use Syslog.
  • Host: The hostname or IP address of the Syslog daemon authorized to receive syslog messages from the NG Firewall server. Do not set the Host to the NG Firewall itself. This will result in the hard drive filling up quickly and likely crashing the box.
  • Port: The UDP port to send syslog messages to the syslog daemon. 514 is the default, as this is the default syslog port.
  • Protocol: The protocol used to send syslog messages. The default is UDP.

Syslog Rules

WARNING: Syslog can be a very expensive operation. If configured to send all (or most) events, it can negatively impact the server's performance.

Syslog Rules determine which events are sent via syslog.

Unlike most rules, all Syslog rules are evaluated beyond the first matching rule.
  • Enable determine if the alert rule is enabled.
  • Class is the type of event this rule matches. Selecting the Class will determine what Fields are available in the conditions.
  • Conditions list the fields within the event object to be checked. If all of the conditions match, then the rule will match.
  • Enable Thresholds to limit the alert from firing until it reaches a certain frequency threshold.
  • Exceeds Threshold Limit is the frequency limit for which this condition will match. If the frequency is greater than this value, then the threshold conditions match.
  • Over Timeframe defines the time range, in seconds, to compute the frequency.
  • Grouping Field defines how to group thresholds by an attribute field in the events. This field is optional.
  • Remote Syslog determines if the event is sent via syslog.

To send all events via syslog, create one rule where Class = All and no conditions.

To send specific events to a syslog server, configure the Syslog Rules to send the specific events to the syslog server.

Email Template

You can customize the content of email alerts by editing the Email Template. Items surrounded by the percent symbol represent system variables. You can use these throughout the Subject or Body of the message. The table below describes each variable.

Variable Information
System company Your company name is defined in Branding Manager.
Alert description The event description of the associated alert rule.
System host The Hostname of your NG Firewall system.
Event class The event class of the associated alert rule.
Event summary The event summary of the associated alert rule.
Event values key value The extended event details of the associated alert rule.

The preview window shows in real time how your changes to the Subject or Body will appear in the email message content.

Reports

You can search and further define reports using the time selectors and the Conditions window at the bottom of the page. The data used in the report can be obtained on the Current Data window on the right.

Pre-defined report queries:

Report Entry Description
Admin Logins The number of total, successful, and failed admin logins over time.
Settings Change The number of settings changes over time.
Admin Login Events All local administrator logins.
All Settings Changes All settings changes are performed by an administrator.
The tables queried to render these reports:

All Settings Changes

All Settings Changes is a report that provides a detailed view of any settings changes an administrator performs when upgrades are applied. This is available on all systems in the Config > Administration > Reports tab .

The Reports tab shows the timestamp when the change was made, the username and hostname that made the change, and the settings files that were changed.

Click the Differences button to see the exact changes made to the files. This feature uses a color-coded ‘diff’-like feature to show the differences.

Red = Line was removed

Green = Line was added

Yellow = Line was changed

Port Forward Rule Example

The following shows an example of adding a port forward for DNS to the system.

First, you can see the rule was added on 8/3/15 by the user admin from IP 10.24.24.40. The settings file that changed was network.js with the appropriate version-YYYY-MM-DD-time.js file name.

You can see all the changes by clicking the Differences button. Only the DNS rule was added for this instance; the changes are recorded below.

Applications

Applications are plugins that add functionality to your NG Firewall server like "apps" on an iPhone or Android device.

On the Apps tab, you'll see the installed apps. Across the top is a drop-down menu to switch to different policies. Policies can be controlled via the Policy Manager app.


You can install apps by clicking the Install Apps button at the top. It will display the apps that can currently be installed. To install an app, click its icon. You can install as many apps as you like at the same time. After installing the desired apps, you can click the Done button at the top to return to the app view.

Once installed, the application's settings can be configured by clicking the Settings button or the app icon, depending on the skin. Applications install with the suggested configuration, which is the default setting and is on/enabled in most cases. An application that is off/disabled will not process any network traffic. To enable a disabled application, edit the settings and click Enable on the first tab inside the settings.

After clicking Settings, you will see tabs for different settings sections and typical buttons marked OK, Cancel, and Apply. Apply saves any changes. OK, it saves any changes and closes the window. Cancel closes the window without saving settings. On the left side, a Remove button will remove the application from the current policy. The Help button will open the help for the tab currently being viewed.

NG Firewall has two types of Applications:
  • Filter Applications All the Applications above the Services pane in the interface can have one instance per policy.
  • Service Applications All the Applications below the Services pane are global and exist in all virtual racks.

Many networks only need one policy, which means all traffic gets processed by the same apps and configuration, but multiple policies (sometimes called "racks") are possible for bigger networks. Check out the Policy Manager application for more information about running multiple racks.

To learn more about each application, select the links below.

Filter Applications

Service Applications


Reports Policy Manager Directory Connector Web Monitor WAN Balancer


Captive Portal IPsec VPN OpenVPN WireGuard VPN Branding Manager


Configuration Backup Live Support      
         

Devices

Devices view all current "devices" or unique MAC addresses on the local network(s).

Each row represents a single device (unique MAC address) seen on any LAN interface.

As the NG Firewall scans and processes network traffic, the platform and many apps will save information about devices on the network. This information is stored in the "Device Table," and the Devices view provides a view of the device table.

Controls


The device view, by default, shows all devices and some basic information about each session.
  1. Refresh refreshes the grid with the current active sessions.
  2. Reset View resets the view to the default view. Any changes to the default view are saved in your local browser session.
  3. Add can be used to add devices to the device table manually.
However, As devices are discovered, they are automatically added to the device table.
  1. Export exports the current device table to a JSON file.
  2. Import imports a JSON file into the device table.
Mousing over any column head and using the drop-down menu on the column head allows you to access more controls.
  1. Sort Ascending sorts the selected column in ascending order.
  2. Sort Descending sorts the selected column in descending order.
  3. Columns allow the removal or addition of columns to the current view.
  4. Filter provides a way to filter current data on this column with the provided value.
  5. Save saves any changes manually made by the administrator.

Unlike Sessions and Hosts, the device table is saved and permanent. The administrator can edit, modify, and save the values of the attributes for each Device.

Columns

Property Description
MAC Address The MAC address of this Device
MAC Vendor The Vendor of the MAC address of this Device, if known
Interface The interface on which this Device was last seen
Last Hostname The last Hostname of this device that was learned automatically (via DHCP, DNS, or Directory Connector)
Hostname The manually configured Hostname for this device - this will be blank unless set by the administrator
Username The manually configured username for this device - this will be blank unless set by the administrator
HTTP User Agent The HTTP User Agent of this device (according to a recent HTTP request)
Last Seen Time The last time this device was seen on the network
Tags The tags of this device

Hosts

Hosts provide a view of all current "hosts" or unique IP addresses on the local network(s).

Each row represents a single host (unique IP address) seen on any LAN interface.

As the NG Firewall scans and processes network traffic, the platform and many apps save information about a host on the network. This information is stored in the "Host Table," and the Hosts view provides a view into the host table.

Controls

The host view, by default, shows all hosts and some basic information about each session. To view all the information for a session, click the session, and all attributes are displayed in the property grid on the right side.
  1. Refresh refreshes the grid with the current active sessions.
  2. Auto Refresh toggles automatic refreshing of the grid.
  3. Reset View resets the view to the default view. Any changes to the default view are saved in your local browser session.
  4. Filter provides the ability to filter all sessions with many key attributes quickly.

Mousing over any column head and using the drop down menu on the column head allows you to access more controls.

  1. Sort Ascending sorts the selected column in ascending order.
  2. Sort Descending sorts the selected column in descending order.
  3. Columns allow the removal or addition of columns to the current view.
  4. Filter provides a way to filter current data on this column with the provided value.

Columns

Property Description
MAC Vendor The Vendor of the MAC address of this Host if known
Interface The interface on which this Host was last seen
Creation Time The creation time of this Host entry
Last Access Time The last time an app or the platform accessed this Host entry
Last Session Time The last time this host attempted to create a session
Address The IP address of this Host
MAC Address The MAC address of this Host if it is known
MAC Vendor The Vendor of the MAC address of this Host if known
Interface The interface on which this Host was last seen
Creation Time The creation time of this Host entry
Last Access Time The last time an app or the platform accessed this Host entry
Last Session Time The last time this host attempted to create a session
ast Completed TCP Session Time The last time this host successfully completed a TCP session to a WAN address
Entitled Status False if this host is not entitled to premium functionality because the limit is exceeded True otherwise
Active True if this host is considered "active," False otherwise
HTTP User Agent The HTTP User Agent of this host (according to a recent HTTP request)
Captive Portal Authenticated True if this Host is authenticated with Captive Portal (at least one)
Tags The tags of this Host
Tags String The tags of this Host
Hostname The official Hostname of this host
Hostname Source The source of the official Hostname of this host
Hostname (DHCP) The hostname of this host according to DHCP (Hosts often specify their hostname when retrieving a DHCP lease)
Hostname (DNS) The hostname of this host according to reverse DNS
Hostname (Device) The hostname of this host's MAC address according to Devices
Hostname (Device Last Known) The last known hostname of this host's MAC address according to Devices
Hostname (OpenVPN) The hostname according to OpenVPN
Hostname (Reports) The hostname according to the Name Map in Reports
Hostname (Directory Connector) The hostname according to Directory Connector
Username The official Username associated with this host
Username Source The source of the official Username
Username (Directory Connector) The username according to Directory Connector
Username (Captive Portal) The username according to Captive Portal
Username (Device) The username of this host's MAC address according to Devices
Username (OpenVPN) The username according to OpenVPN
Username (IPsec VPN) The username according to IPsec VPN
Quota Size The size of this host's quota (in bytes)
Quota Remaining The amount of quota remaining (in bytes)
Quota Issue Time The original issue time of this host's quota
Quota Expiration Time The expiration time of this host's quota
Refill Quota Refill Quota action will refill this Host's quota
Drop Quota Refill Quota action will remove this Host's quota

Sessions

Sessions provide a view of the current sessions (also known as connections).

Each row represents a single network session/and its properties.

As the NG Firewall and all the apps learn more about a session, many will "attach" data to the session so it is globally visible and accessible to other apps. The Sessions view provides a view into everything known about each session.

The Sessions view provides a real-time view of the network and can also be very useful for debugging. The controls allow you to view the current sessions of a specific application, host, user, website, or policy. This can be used to view activity or verify that traffic is being handled properly by the proper policy.

Controls

The sessions view, by default, shows all active sessions and some basic information about each session. To view all the information for a session, click the session, and all attributes will be displayed in the property grid on the right side.
  1. Refresh refreshes the grid with the current active sessions.
  2. Auto Refresh toggles automatic refreshing of the grid.
  3. Reset View resets the view to the default view. Any changes to the default view are saved in your local browser session.
  4. Filter provides the ability to filter all sessions with many key attributes quickly.

Mousing over any column head and using the drop down menu on the column head allows you to access more controls.

  1. Sort Ascending sorts the selected column in ascending order.
  2. Sort Descending sorts the selected column in descending order.
  3. Columns allow the removal or addition of columns to the current view.
  4. Group this Field will group the session data by the selected column.
  5. Filter provides a way to filter current data on this column with the provided value.

Columns

Property Description
Creation Time The creation time of the session (if scanned)
Session ID The session ID (if scanned)
Mark The netfilter connmark
Protocol The protocol of the session (TCP/UDP)
Bypassed True if the session is bypassed, False if it is scanned
Policy The policy handling the session (if scanned)
Hostname The hostname for the client address (if known)
NATd True if the client address of the session was rewritten (NAT), False otherwise
Port Forwarded True if the server address of the session was rewritten (port-forward), False otherwise
Tags The tags attached to the session (inherited from Hosts, Devices, and Users)
Tags String The list of all tags attached to the session.
Local Address The IP address of the "local" (non-WAN) participant or the Client Address if no local address.
Remote Address The IP address of the "remote" (WAN) participant or the Server Address if there is no remote address.
Bandwidth Control Priority The priority of the session is set by Bandwidth Control.
QoS Priority The priority set by QoS.
Pipeline The application processing order (pipeline) of the session (if scanned).
Client Interface The network interface of the client (source).
Client Address (Pre-NAT) The IP address of the client (initiator) of the session.
Client Port (Pre-NAT) The port of the client (initiator) of the session.
Client Address (Post-NAT) The IP address of the client (initiator) of the session post-NAT.
Client Port (Post-NAT) The port of the client (initiator) of the session post-NAT.
Client Country The country code of the client IP address.
Client Latitude The latitude of the client's IP address.
Client Longitude The longitude of the client IP address.
Server Interface The network interface of the server (destination).
Server Address (Pre-NAT) The IP address of the server (receiver) of the session pre-NAT.
Server Port (Pre-NAT) The port of the server (receiver) of the session pre-NAT.
Server Address (Post-NAT) The IP address of the server (receiver) of the session.
Server Port (Post-NAT) The port of the server (receiver) of the session.
Server Country The country code of the server IP address.
Server Latitude The latitude of the server IP address.
Server Longitude The longitude of the server IP address.
Speed (KB/s) Client The data rate of data sent by the client (updated every 60 seconds).
Speed (KB/s) Server The data rate of data sent by the server (updated every 60 seconds).
Speed (KB/s) Total The data rate of the session (updated every 60 seconds).
Application Control Lite Protocol The protocol according to Application Control Lite.
Application Control Lite Category The category according to Application Control Lite.
Application Control Lite Description The description of the protocol according to Application Control Lite.
Application Control Lite Matched? True if Application Control Lite matched the session.
Application Control Protochain The protochain of Application Control
Application Control Application The application of Application Control
Application Control Category The category of the application of Application Control
Application Control Detail The details of the application of Application Control
Application Control Confidence The confidence of the match of Application Control
Application Control Productivity The productivity of the application of Application Control
Application Control Risk The risk of the application of Application Control
Web Filter Category Name The category of the last web request according to Web Filter
Web Filter Category Description The description of the category of the last web request according to Web Filter
Web Filter Category Flagged True if this category of the web request is flagged, False if not, null otherwise
Web Filter Category Blocked True if this category of the web request is blocked, False if not, null otherwise
Web Filter Flagged True if the last web request is flagged, False if not, null otherwise
HTTP Hostname The HTTP hostname is an HTTP session.
HTTP URL The HTTP URL of the last HTTP request of this session.
HTTP User Agent The HTTP User Agent of the last HTTP request of this session.
HTTP URI The HTTP URI of the last HTTP request of this session.
HTTP Request Method The HTTP Request Method of the last HTTP request of this session.
HTTP Request File Name The HTTP Request filename is the last HTTP request of this session.
HTTP Request File Extension The HTTP Request filename extension (.exe) of the last HTTP request of this session.
HTTP Request File Path The HTTP Request file path of the last HTTP request of this session.
HTTP Content Type The HTTP Content Type of the last HTTP response of this session.
HTTP Referrer The HTTP Referrer of the last HTTP request of this session.
HTTP Response File Name The HTTP Response filename is the last HTTP response of this session.
HTTP Response File Extension The HTTP Response filename extension (.exe) of the last HTTP response of this session.
HTTP Content Length The HTTP content length of the last HTTP response of this session.
SSL Subject DN The Subject DN of the SSL certificate of this session.
SSL Issuer DN The Issuer DN of the SSL certificate of this session.
SSL Inspected True if SSL Inspected, False if not inspected, null otherwise.
SSL SNI Hostname The SNI hostname is specified in the request for this session (if specified).
FTP Filename The name of the last file downloaded in this session via FTP.
FTP Data Session True if this is an FTP data session; it is null otherwise.

Users

Users provide a view of all current users or unique usernames on the local network(s).

The User Management documentation describes the basics of users and user management.

Each row represents a single user (unique username) seen on any LAN interface.

As the NG Firewall scans and processes network traffic, the platform and many apps will save information about users on the network.

This information is stored in the "User Table," and the Users view provides a view into the user table.

Controls

The user view, by default, shows all users and some basic information about each session.
  • Refresh refreshes the grid with the current active sessions.
  • Reset View resets the view to the default view. Any changes to the default view are saved in your local browser session.
  • Add can be used to add users to the user table manually.
However, As users are discovered, they are automatically added to the user table.
  • Export exports the current user table to a JSON file.
  • Import imports a JSON file into the user table.
Mousing over any column head and using the drop down menu on the column head allows you to access more controls.
  • Sort Ascending sorts the selected column in ascending order.
  • Sort Descending sorts the selected column in descending order.
  • Columns allow the removal or addition of columns to the current view.
  • Filter provides a way to filter current data on this column with the provided value.
  • Save saves any changes manually made by the administrator.

Unlike Sessions and Hosts, the user table is saved and permanent. The administrator can edit, modify, and save the values of the attributes for each User.

Quotas

User bandwidth quotas are assigned through the Bandwidth Control app after configuring the setup wizard. In the Users view, you can:
  • View the status of user quotas.
  • Override the default quota.
  • Refill the quota.
  • Drop the quota.

Columns

Table 1. Columns
Property Description
Username The username of this entry
Creation Time The creation time for this user entry
Last Access Time The last time this user entry was accessed
Last Session Time The last time this user created a network session
Quota Size The size of this host's quota (in bytes)
Quota Remaining The amount of quota remaining (in bytes)
Quota Issue Time The original issue time of this host's quota
Quota Expiration Time The expiration time of this host's quota
Quota Refill Refill Quota action will refill this Host's quota
Quota Drop Drop Quota action will remove this Host's quota
Tags the tags of this user

Local Users

Local Users stores a list of users that the applications can use.

For example, Captive Portal and OpenVPN can select the local directory to authenticate users.


To add new users, click the Add button. You must supply a username, first name, last name, email address, and password. Only the administrator can set the password for a given user. Users can be imported or exported using the import/export buttons on the upper right.

A user can be specified with an expiration date. The user will no longer be authenticated if the expiration date has passed.

To select the Local Directory, configure apps such as Captive Portal and OpenVPN to authenticate against the Local Directory while requiring user authentication.

MFA and OpenVPN

You can enable TOTP-based multi-factor authentication for OpenVPN client connections. Select Enable MFA for OpenVPN when adding a user and click Generate new key.


After generating a key, click the gear icon to show the QR code. Select key of the generated code in any TOTP mobile app, such as Google Authenticator. The TOTP app generates a temporary that the user enters into their OpenVPN client.

Note: You must also enable MFA for client configurations in OpenVPN.

Warning:Typically, when passwords are stored, password hashes are saved, and the original cleartext password is forgotten, so administrators do not have access to user passwords. However, The passwords for users in the local directory are stored in cleartext because some applications and features (L2TP) depend on access to the cleartext password. Administrators do have access to cleartext user passwords, and caution is advised.

Local Directory

The Local Directory stores a list of users that the applications can use. It also supports RADIUS for 802.1x authentication from properly configured wireless network access points.

The RADIUS Server can be enabled to allow WiFi users to authenticate as any user configured in the Local Directory.

The RADIUS Proxy can be enabled to allow WiFi users to authenticate with credentials validated by a configured Active Directory Server.

Report Viewer

Reports provide a graphical view of your NG firewall's network traffic and actions. Various reports are available within applications and base system components. The Report Viewer allows you to manipulate the reports to drill down, customize, and export data in many ways.

Reports


Report Viewer Panels

There are a few panels in the Report Viewer:
  • The top panel: This panel (below the navigation menu) allows you to specify which data is viewed. By default, there is a time frame and no conditions, so reports will show all the data for the specified time frame. Conditions can be viewed to view more specific data, such as a specific host, user, domain, application, web category, etc.
  • The left panel: This allows you to choose the report you want to view. At the bottom, you can quickly use the search box to find reports with the specified string in the title. You can also import and create new reports using the Add/Import button.
  • The chart panel: This panel shows the specified report and includes several action buttons at the top.
  • The data panel: The data panel, hidden by default, can be displayed by clicking the Data View button in the chart panel. This will show the raw data used to generate the chart and allow the user to export the data by clicking the Export Data button at the bottom.

Conditions

The Conditions panel appears at the top panel and can filter data displayed in reports. For example, to view a specific host's report, you can add a condition for Client = 192.168.1.100, and then all reports available will only show data where the client is 192.168.1.100. Multiple conditions can be added to drill down and inspect data. Conditions can also be added quickly by clicking on slices in pie charts.

The Add Condition drop-down contains many commonly used conditions, or you can browse the full list of tables and columns by clicking on the More button to add conditions for any database column.

Note: Conditions will not apply to all reports. For example, if viewing a specific user's report by adding a condition where Username = foobar, many reports will be greyed out and unviewable. This is because the data used to generate those reports is irrelevant to the specific user (it does not contain a username column). For example, the CPU usage report is a system report irrelevant to a specific network user, so there is no way to filter that data by user.

Condition Operators

The second field in the condition is the logical operator that will evaluate the condition value defined in the last field. In most use cases, the default = operator is what you want to use. However, several other operators are available that make the reports and alerts much more powerful.

Conditions Example - Policy by Policy ID

You may often want to see the traffic related to a policy within the Policy Manager. The Quick Add feature can accomplish this easily by adding a condition.
  1. In the Conditions panel, select Add.
  2. Choose Policy ID and specify equals and the policy ID in question.
  3. The conditions are applied and will remain applied as you switch between reports.

Conditions Example - Web Filter Categories

From pie charts, you can quickly add a condition from the Current Data window. This is handy when using the Web Filter category selection, which we'll use for this example. Once the condition is applied, use the other reports to drill down to find more information about the traffic, such as which user might be responsible.
  1. Open Report Viewer or the Web Filter Reports tab.
  2. Select the Top Categories report (by size or requests). In our example, Games were at the top.
  3. Click the Games pie slice, and when prompted to add a condition, click Yes.
  4. All reports can now be viewed for Games-only traffic.
  5. For example, the Top Clients (by request) will show the clients that visited the most gaming sites.
  6. For example, the web usage (scanned) will show gaming web usage throughout the network day.