Getting Started
Arista's Edge Threat Management (ETM) Next Generation (NG) Firewall simplifies network security with a single, modular, and software platform designed to fit the evolving needs of your organization.
Hardware Requirements
This section provides information on hardware requirements for running an NG Firewall.
Hardware Requirements
- The NG Firewall must be installed onto a dedicated machine with at least two Network Interface Controllers (NICs).
- The NG Firewall is installed on the hard drive of a PC, erasing all data on that drive during the process. Be aware of this before starting the installation.
Purchasing an NG Firewall Appliance
You can purchase a server pre-installed with our software directly from us. See our Installing the NG Firewall Software Appliance page for more information.
Using your own Hardware
One of the great things about NG Firewall is that it is software-based, meaning you can install it on any desktop or server PC that fits the bill. When assembling an NG Firewall server, you must account for several variables—the hardware you're installing onto, the number of users, and their workloads. The table following provides some recommended hardware specs by network size.
Remember that these are only guidelines: each network is different, each user is different, and each configuration is different.
| Resource | Processor | Memory | Hard Drive | Notes |
|---|---|---|---|---|
| Minimum Spec | 1 core | 2 GB | 40 GB | Platform only (no apps) |
| 1-50 devices | 2 cores | 4 GB | 40 GB | Arista ETM z4 equivalent |
| 51-150 devices | 4 cores | 8 GB | 80 GB | |
| 151-500 devices | 4 or more cores | 16 GB | 160 GB | |
| 501-1500 devices | 4 or more cores | 16 GB | 250 GB | Arista ETM z12 & Q12 equivalent |
| 1501-5000 devices | 6 or more cores | 32 GB | 500 GB | Arista ETM z20 & Q20 equivalent |
Hardware Compatibility
If you are using NG Firewall on your own hardware, you will need to do the research to determine if it is compatible. Generally speaking, if a particular piece of hardware is known to work well in recent versions of Linux, then it has a good chance of working with NG Firewall.
You will need to order the equipment and install NGFW on it to know for sure. If it works, it is compatible. If it does not, you can try tweaking BIOS settings and possibly swapping parts and/or monitor and disk configurations. If it still does not work, the hardware is likely incompatible.
For users who want to avoid going through this process, buying an appliance is suggested as that is the only hardware we can guarantee will work and the only hardware we support.
We do not suggest USB NICs. In our experience, they perform poorly and need to be more reliable.
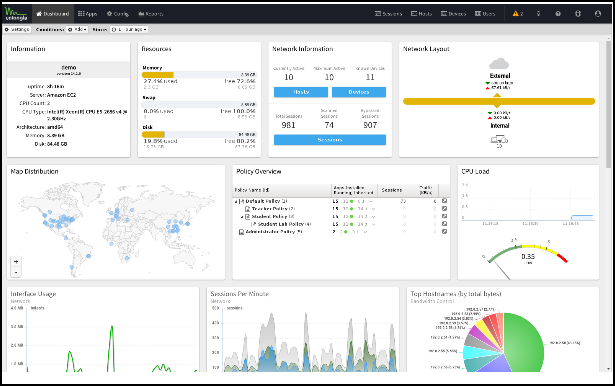
Dashboard
The Dashboard provides an overview of the state of your NG Firewall. It is extremely useful for quickly viewing or monitoring what is happening on the network and the current status of the NG Firewall server.
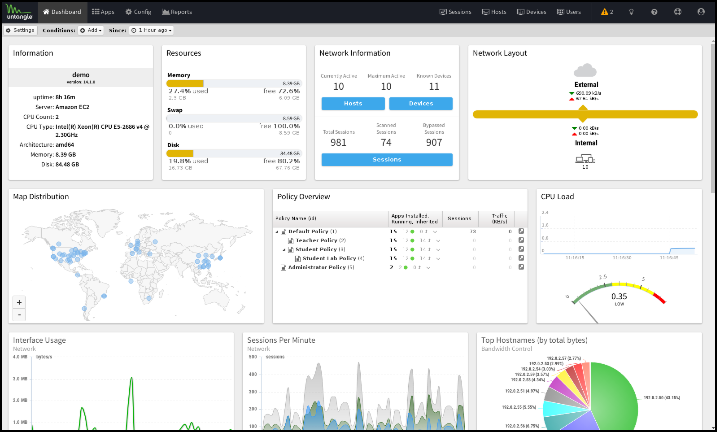
By default, the Dashboard will show several widgets with varying information. However, the Dashboard is completely customizable. Widgets can be removed and added so the administrator sees exactly the information that is important to them on the Dashboard.
There are many different types of widgets available:
| Name | Information |
|---|---|
| Information | Shows some information about the NG Firewall, like name, model, version, etc. |
| Resources | Show an overview of current memory swap and disk usage. |
| CPU Load | Shows a graph of recent CPU load. |
| Network Information | Shows an overview of the network information, such as session count and device/host count. |
| Network Layout | Shows an overview of the network layout based on the interface configuration. |
| Map Distribution | Shows the current sessions' mapped geo-location on a world map, sized by throughput. |
| Report | Shows any Report Entry from Reports. |
Click Manage Widgets at the top to change what is displayed on the dashboard. From here, you can show or hide the built-in widgets or add new widgets from Reports by clicking on the Add button.
When adding a Report widget, specify a time frame (the number of hours worth of data to display) and a refresh interval (how often the widget refreshes on the dashboard).
When viewing a Report Entry in Reports, you can easily add it to your Dashboard by clicking the Add to Dashboard button.
NG Firewall Installation
Next Generation (NG) Firewall is next generation firewall/unified threat management (NGFW/UTM) software bringing together everything your network needs to stay healthy in one box: web content and spam filtering, virus scanning, VPN connectivity, multi-WAN failover capability, and much more.
This guide will be a quick primer on getting your NG Firewall installed, and running. Hopefully, it will also answer some common configuration questions without causing too much confusion. If you already have an NG Firewall in your network, you can skip to any relevant section and read from there. If you're new to the NG Firewall, we recommend reading this section to help familiarize yourself with the software and how it works - it will probably save you a headache or two later on.
What is an NG Firewall?
We strive to make deployment and administration easy with a friendly web-based GUI to help you monitor and filter traffic on your network. The NG Firewall provides a suite of applications free of charge with the option of subscribing to additional applications that best suit your organization. Our website has a full list of features. Current pricing for paid applications, packages, and appliances can be found in the store.
Deploying the NG Firewall
- Cloud Appliance: A virtual appliance available for Amazon Web Services or Microsoft Azure. Learn more about the AWS and Azure public cloud appliances here.
- Virtual Appliance: A virtual appliance optimized for VMware deployments in private cloud infrastructure. You can download the virtual and software appliances from the ETM Dashboard. The virtual appliance is available as an OVA formatted file. See NG Firewall Virtual Appliance on VMware for installation details.
- Hardware Appliance: An Arista Edge Threat Management network appliance with the NG Firewall preinstalled. Learn more about the zSeries appliances here.
- Software Appliance: An installable version of the NG Firewall for most x86 based devices. The software appliance is an ISO formatted file you can image to a USB drive. See Creating a bootable USB installer for imaging instructions.
Installing the NG Firewall Software Appliance
The software appliance method installs to the primary storage of a device, erasing all data on that drive in the process. Be aware of this before starting the installation. Also, note that NG Firewall requires at least two NICs to be installed before you start the installation.
Most users install NG Firewall on the server before the server is placed in-line on their network. To do this, plug one interface of your NG Firewall into your network as you would any other computer, and then start the installer. This ensures that NG Firewall will have access to the internet during installation.
Power down the server, insert the ISO or USB installer, and power on the server. Ensure the boot options are set to boot from the inserted CD or USB media. Once the installation has started, follow the directions on the screen to complete the installation process.
During the installation, you may need to answer a few questions, such as confirming writing to the storage device. If you encounter issues while installing NG Firewall onto your server, read the Troubleshooting Server Installation.
UEFI Installation
As of release 16.0, NG Firewall can be installed via BIOS or UEFI. When booting via CD or USB, the installer automatically detects whether it was booted via BIOS or UEFI and tweaks the install process accordingly. To tell whether the installer was booted via BIOS or UEFI, check the installer's menu title. When booted via BIOS, the installer menu title will be "NG Firewall installer boot menu". When booted via UEFI, the installer menu title will be "NG Firewall UEFI Installer."
Serial Console Installation
As of version 16.5, you can install and manage NG Firewall via a serial console port. This is useful if your device does not have video output and supports serial management. This method uses a dedicated ISO installer that you must download. Your system must be configured to use S0 as the serial interface and a baud rate of 1115200.
Account Registration
NG Firewall will prompt you to sign in or register a new account in ETM Dashboard. Registration is required to install any applications and takes only a second.
- Install free or paid applications on your NG Firewall.
- Manage your licenses, renewals, servers, and contact info all from one dashboard.
- Easily transfer licenses between servers.
If you signed in with an existing account, the system will check for any unused subscriptions in your account and ask if you would like to apply them to this system.
Once you have completed the process, continue with the steps below. Your account can always be accessed by visiting https://edge.arista.com or clicking My Account in the lower left-hand corner of the UI.
Install Applications
Installing applications is covered in the NG Firewall User Guide. You should finish reading this section and get everything working before configuring/tuning the application settings.
Configure Other Subnets
NG Firewall will route all traffic according to its routing table, even when installed as a Transparent Bridge. This means NG Firewall must have the proper routing table for all subnets on your network.
If you have other subnets on the network aside from those configured in the Setup Wizard, you will need to configure NG Firewall to know about these networks. For example, if you are running as a bridge with NG Firewall having an address 192.168.1.2 with a netmask 255.255.255.0, you also have a 192.168.20.* network and also a 10.0.*.* network, you will need to tell NG Firewall where to reach these hosts.
- Add a route in telling NG Firewall how to reach those subnets. If 10.0.*.* is local on Internal, you must create a 10.0.0.0/16 route to "Local on Internal." If 10.0.*.* lives behind another router on your network, like 192.168.1.100, then you must add a route to send all 10.0.0.0/16 traffic to 192.168.1.100.
- Add an alias on the appropriate interface. In , click Edit on the appropriate interface and add an alias IP. This tells NG Firewall that this IP range is local and can be reached locally on that interface. It also provides NG Firewall with a local address on those subnets should any of those clients need to reach NG Firewall using a local IP.
Each subnet on your network must be configured so NG Firewall knows how to reach them. The "Ping Test" in is used to verify that NG Firewall can reach the configured subnets.
More in depth information about how the network is configured is found in Network Configuration.
Configure Other Interfaces
In the setup wizard, you configured both the Internal and External interfaces. If you have more than 2 interfaces, the 3rd and beyond are Disabled by default.
If you plan to use them, they must be configured, and it is suggested that you choose a name reflecting its use.
- Additional WAN interfaces (if you have multiple internet connections) for failover/balancing
- To do this, configure it as a WAN interface with the ISPs provided values. Read more about WAN Failover and WAN Balancer for more information about failover/balancing.
- Other internal networks
- To do this, configure it as a non-WAN interface with a static internal IP. For example, if you used 192.168.1.1/24 on your internal, you could use 192.168.2.1/24 on your 3rd interface. This is useful on larger networks, guest networks, and wireless networks.
- Public segment for public servers (DMZ)
- If you have servers with public addresses, you can stick them on the additional interface(s) and bridge those interfaces to your WAN. Then, configure them with IPs on the same subnet as the WAN interface.
- Additional NICs for existing networks
- If you want additional NICs for your Internal (for example), you can bridge the 3rd interface to your Internal and plug in additional internal machines to that NIC. This behaves similarly to a switch, but traffic going through the NG Firewall to reach other internal hosts is scanned by the apps.
- Configuring a WiFi interface
- If your hardware platform includes a supported WiFi adapter, you can configure your WiFi interface. Be sure to select the appropriate Regulatory Country option for your country.
More in depth information about how the network is configured is found in Network Configuration.
Some NG Firewall applications and functions rely on sending emails like reports and spam quarantine digests. Email sending is configured in . By default, email will be sent directly using DNS MX records like a mail server. However, some ISPs and networks block port 25 to prevent spam, and in this case, you must configure a SMTP relay (and the appropriate authorization credentials if required).
Hostname
You can configure the hostname (and domain) for the NG Firewall server in .
Port Forward Rules
Suppose the NG Firewall is installed as a router and has internal servers with services that need to be publicly accessible. In that case, you need to configure port forward rules to forward that traffic to the appropriate server. You can configure port forward rules in .
Bypass Rules
Unlike many next-generation firewalls, NG Firewall scans All TCP and UDP traffic on all ports at the application layer by default, except for VoIP traffic. This is ideal for most deployments, but if you are running a very large (1000s of users) network, it probably makes sense to bypass traffic that you are not interested in scanning. Traffic can be bypassed in . More is described in the Network documentation.
Public Address
If you use OpenVPN, quarantine, or other publicly accessible services on NG Firewall, you may wish to configure the "public address" of NG Firewall so that it sends the appropriate URL to remote users. Public Address is configured in .
External Administration
If you'd like to be able to administer NG Firewall via HTTPS remotely, you will need to enable HTTPS access on WAN interfaces in the Filter Rules.
Installing the NG Firewall on the Network
At this point, NG Firewall should be ready to drop into the network if it is not already in place.
If NG Firewall is configured in bridge mode, an easy way to test is to install it with only one or a few computers behind it - plug the External interface into your network, then plug a switch with a few computers into the Internal interface so they must go through NG Firewall. Only those computers will be filtered, allowing you to test without disturbing the rest of your network.
- The NG Firewall is designed to drop into your network with minimum disruption. When testing, we recommend putting the system in place and keeping most defaults unless you're having problems. This way, you can get a feel for how it works before making major changes that may affect system operation.
Using the NG Firewall
The next step is installing the applications and configuring the NG Firewall to meet your needs. The NG Firewall User Guide provides in depth documentation of the various functions of NG Firewall and the applications.
Welcome to the NG Firewall!
Setup Wizard
The Setup Wizard will open automatically when the NG Firewall first boots.
Suppose you do not have a keyboard/mouse/video connected to the NG Firewall server. In that case, the Setup Wizard can be reached by plugging into a DHCP-configured laptop into the internal interface and opening a browser to http://192.168.2.1/.
Once installed, the setup wizard can be repeated at any time and found in the NG Firewall GUI at .
Welcome Page
For versions 16.3 and newer, the Setup Wizard begins with a welcome page. You can create an ETM Dashboard account or log in with an existing one to get started. Your ETM Dashboard account is free and is necessary to activate a trial or complete license on the device. Your account is also linked to the Dashboard, enabling you to remotely manage your Arista Edge Threat Management appliances.
By logging in or creating your ETM Dashboard account, the Add Appliance wizard opens automatically and includes the UID of your appliance. The Add Appliance wizard guides you through the remainder of the setup steps for your new NG Firewall appliance.
If your NG Firewall device is not connected to the Internet or requires specific configuration to connect, the wizard allows you to Configure the Internet Connection. If you cannot connect to the Internet, you can continue with the local setup wizard by following these instructions: Offline Setup Wizard.
The next steps include installing the desired apps and possibly tuning the configuration of your NG Firewall.
Offline Setup Wizard
Suppose your NG Firewall appliance cannot connect to the Internet and your appliance is not configured. In that case, the local Administration Interface presents you with a Setup Wizard to configure essential parameters. If your appliance is online and connected to the Internet, essential parameters are configured through the ETM Dashboard.
The steps below explain navigating through the local Setup Wizard if your appliance is offline.
Language Selection
Before you begin the setup wizard, select your preferred language.
Setup Wizard - Welcome
The next screen welcomes you to the Setup Wizard. Click Next to continue.
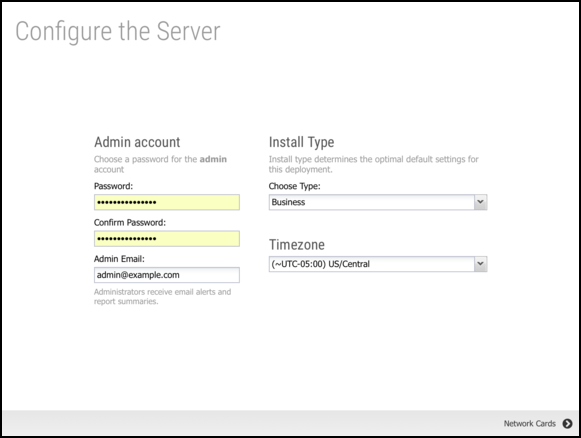
Setup Wizard - Step 1 - Configure the Server
The first step is to set a password for the administrator account and select a timezone. You can also set the admin email to receive alerts and reports. Select the installation type that closest matches your deployment.
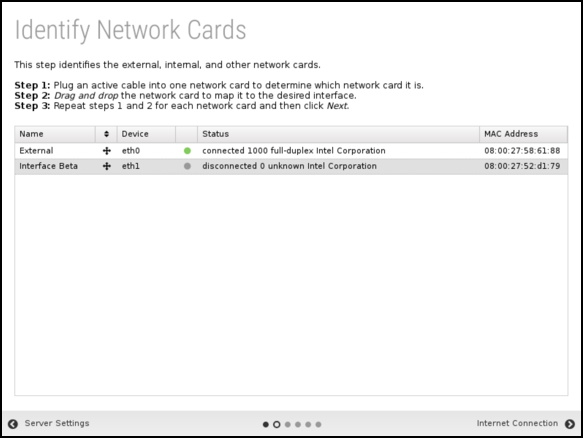
Setup Wizard - Step 2 - Identify Network Cards
The second step shows you the network cards. If this is an appliance from Edge Threat Management, you can continue to the next step. If this is a custom server, verify that the physical network cards are mapped to the correct (desired) interface. You can verify connectivity by disconnecting or connecting the cable to the physical interface. The status icon changes immediately between grey or green to show the link state.
Setup Wizard - Step 3 - Configure The Internet Connection
The third step configures your External (WAN) interface.

The default selection is Auto (DHCP). If an address was successfully acquired, the automatically assigned address is displayed. Otherwise, click Renew DHCP to acquire an IP address. Click Test Connectivity to verify Internet access.
If your Internet connection requires a static IP address or uses PPPoE, select the appropriate option and enter the parameters assigned by your Internet Service Provider.
Setup Wizard - Step 4 - Internal Network Interface
The fourth step will configure your "Internal" interface (DHCP server and NAT configuration). You have two choices.
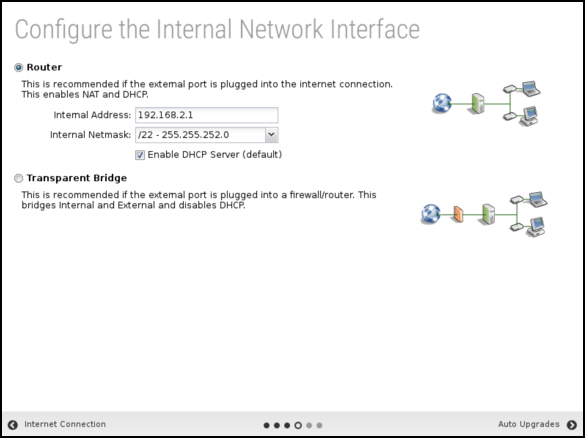
You can configure the internal interface with a private static IP address such as 192.168.2.1 and enable DHCP serving and Network Address Translation (NAT) so all internal machines have private addresses and share one public IP. This is commonly referred to as Router mode.
You can also configure the internal interface to be bridged to the external. In this mode, the internal interface does not have its address; it simply shares the external address. This is commonly referred to as Transparent Bridge mode.
Router
In Router mode, the NG Firewall will be the edge device on your network and serve as a router and firewall. In this case, you'll need to set up your external and internal interfaces correctly for traffic to flow, which should have been done while installing them.
Transparent Bridge
In Transparent Bridge mode, the NG Firewall is installed behind an existing firewall and sits between your existing firewall and the main switch. When in Bridge mode, the NG Firewall is transparent, meaning you won't need to change the default gateway of the computers on your network or the routes on your firewall—just put the NG Firewall between your firewall and the main switch, and that's it. You do not change the configuration of existing clients or the existing firewall!
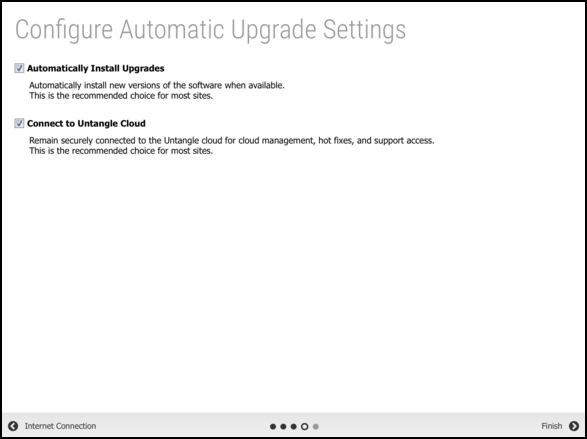
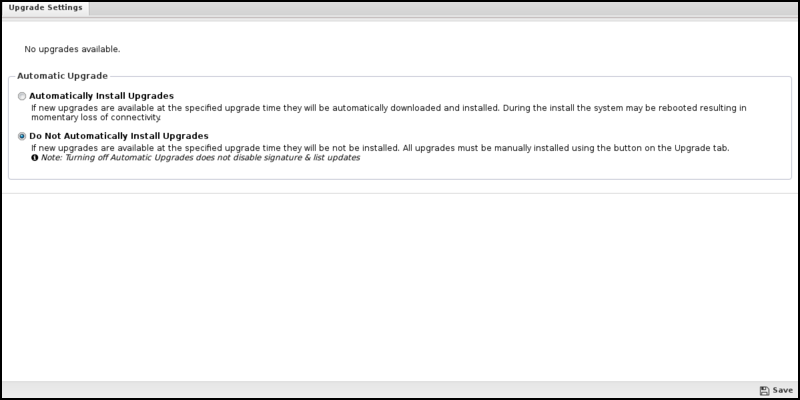
Setup Wizard - Step 5 - Configure Automatic Upgrade Settings
In the fifth step, Automatic Upgrades are configured. If Automatic Upgrades is enabled, NG Firewall automatically checks for new versions and performs the upgrade between 1 am and 2 am every morning. You can adjust the upgrade schedule after the setup is complete from the Upgrade.
This step also includes an option to manage the appliance from the Dashboard.
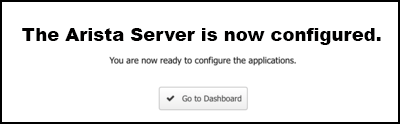
Setup Wizard - Finished
That's it!
Upgrade
The upgrade allows the server to upgrade and contains upgrade-related settings.
Upgrade Settings
Upgrades show the currently available upgrades, if any. If upgrades are available, an upgrade can be started by pressing the Upgrade button at the top under Status.
To see changes, see the Logs.
After the upgrade begins, it will download the new packages (which may take some time), and then the upgrades will be applied. Do not reboot or power off the server during the upgrade.
If Automatically Install Upgrades is checked, NG Firewall will automatically check for new versions and upgrade if available.
An automatic upgrade schedule is configured when the NG firewall automatically upgrades if upgrades are available. The NG Firewall will automatically upgrade at the specified time on the days of the week that are checked.
Troubleshooting Server Installation
Video Issues
- The monitor flashes and then displays a black screen with a message or login prompt
- The monitor displays noise after the bootup is complete
- The monitor displays correctly, but the screen is much too big, requiring scrolling with the mouse.
Figure 11. Monitor Problem

- Restart the server and select a different boot mode in the bootup kernel selection menu.
- Try various BIOS settings that may affect the video.
- Try another monitor and reboot after switching. The monitor should be plugged in before powering on Arista.
- If you are using a keyboard-video-monitor switch (KVM), remove it and connect the peripherals directly.
- Try another video card.
- Re-burn the CD/ISO slower, or re-create the USB/IMG and reinstall.
Also, note that changing resolutions is supported but can sometimes lead to issues. If this is the case, reboot the server in Video Safe Mode.
UEFI Issues
The Arista UEFI Installer does not support UEFI SecureBoot, so SecureBoot must be disabled in your hardware's firmware menu before installing.
Unfortunately, not all UEFI implementations are written equally, which may cause issues when installing NG Firewall via UEFI on some hardware. If the NG firewall fails to install successfully via UEFI, check if your hardware's firmware can be configured for earlier BIOS boot and attempt to install it using the normal installer. Otherwise, check out the Debian project's UEFI page for tips on troubleshooting UEFI-based installs.
Network Configuration
The most critical configuration in the NG Firewall is properly configuring your network settings in .
For simple networks, the configuration completed during the Setup Wizard is sufficient. However, some networks have multiple WANs, multiple LANs, subnets, VLANs, VRRP, etc. This describes how networking operates and is configured in the NG Firewall.
Cardinal Rules
Several key rules regarding how an NG Firewall operates should be understood before deploying one in an advanced/complex network.

NG Firewall MUST be installed in-line. The NG Firewall is a gateway product, and it is designed to be in-line with network traffic. Some network administrators want to deploy some of the functionality of the NG Firewall without installing it in-line. This differs from how the NG Firewall is designed and will likely not work.
For example, a Spam Blocker filter SMTP through the NG Firewall. It will not be stored and forwarded to your email server like some products. Web Filter will filter web traffic as it passes through the NG Firewall. It does not operate as an explicit proxy that you "point" to clients' browsers to send web traffic. All applications and functionality are designed to operate in a context where the NG Firewall is installed in line with the network traffic flow.
NG Firewall MUST have a working internet connection. Many of its apps rely on cloud services, and NG Firewall must have a working and consistent connection with the internet. This includes unfiltered HTTPS, HTTP, and DNS access to various cloud services. With a valid internet connection and configuration, many functions of the NG Firewall will work properly.
NG Firewall routes ALL traffic according to its routing table. Obviously, this is how all routers operate. They receive packets on an interface and then look up the routing table/rules to see where to send them. Where the NG Firewall differs is that it is often installed as a bridge or with some interfaces bridged together. In the NG Firewall context, two bridged interfaces share a configuration (some products are called "zones"). Traffic passing between bridged interfaces is still subject to this cardinal rule.
This is often a surprise to people on complex networks as, effectively, you will need to tell the NG Firewall where to send all the traffic on your network if you want it to go to the correct place. If you have a subnet for which the NG Firewall doesn't have a route, it will be sent to the default gateway, even if it is internal. For the NG Firewall to operate correctly, you must configure it with a complete routing table so it knows how to reach all hosts on your network.
Placing NG Firewall on the Network
- Install NG Firewall as the gateway/firewall for the network.
- Install the NG firewall behind an existing gateway/firewall in the traffic flow.
Installing an NG Firewall as the gateway/firewall is recommended. It is usually the simplest approach, allowing the NG Firewall to leverage its full feature set, including WAN Failover and WAN Balancer. This also makes it convenient to handle other separate internal networks (like wireless segments) that may only be connected at the gateway. Also, if you have tagged VLANs, it is much simpler to run the NG Firewall as an endpoint for those VLANs. This is commonly referred to as router mode.
However, often, organizations don't want to replace the existing gateway/firewall or can't because a different organization controls it.In these cases, installing the NG Firewall as a "bridge" behind the gateway allows the NG Firewall and the apps to scan and process network traffic without providing the routing functions of your firewall. This is commonly referred to as bridge mode.
Also, you can stick the NG Firewall in front of an existing firewall. Typically, firewalls/gateways use NAT, which allows all internal hosts to share external IPs. This means that by the time the traffic reaches the NG Firewall outside the firewall, the source address of all internal communication will have the firewall's public address. As such, the NG Firewall can not differentiate between internal hosts, so much of the functionality of the NG Firewall (Web Filter, Reports, Shield) is severely compromised. Installing an NG Firewall outside a NAT device is never recommended.
Configuring the Interfaces
After choosing a place to deploy the NG Firewall, the second major step is configuring the interfaces. The interface documentation documents all the configuration options. The Setup Wizard already configures the external and internal interfaces. The Setup Wizard has already configured the external and internal.
- Configure additional subnets on the external/internal.
- Configure additional interfaces
- Configure any tagged VLANs
If you have tagged VLANs (802.1q) on your network, you must add VLAN Tagged Interfaces.
Bridging
When two interfaces are bridged in the NG Firewall, they effectively share a configuration. Some products select the concept of "zones." In this terminology, bridging two interfaces puts those interfaces in the same "zone" or "network space."
Standard Bridge Mode
The most common scenario is in bridge mode, where the External is bridged to the Internal. This is extremely useful when there is an upstream firewall.
For example, if the firewall is 192.168.1.1, you can configure External as 192.168.1.2/24 with 192.168.1.1 as the gateway. The internal hosts all have 192.168.1.* addresses and can continue to select 192.168.1.1 as a gateway (192.168.1.2 will also work as a gateway).
Remember that even when bridging, the NG Firewall routes ALL traffic according to its routing table. If you have other subnets besides 192.168.1.* like 192.168.2.*, you must add aliases or routes for them; otherwise, that traffic will go to the default gateway.
DMZ Bridge
Another common scenario for bridging is when the NG Firewall has a public IP (1.2.3.2 in this example), but you have other public servers with public IPs (1.2.3.*). You could use Port Forward Rules to put those servers on the private network. But let's assume you wanted to keep them configured with public IPs to keep them separate from the internal and avoid any NAT/port forwarding issues.
In this case, you can bridge a "DMZ" interface to your external, which essentially shares the configuration and "zone" with the external. This means you can place servers with public IPs on that segment, and they can continue to select 1.2.3.1 as a gateway.
Additional Port
You can also select bridge mode to provide alternate ports to existing interfaces/zones. Be careful, as traffic between the two goes through the NG Firewall!
For example, if Interface 2 is configured as 192.168.1.1/24 and Interface 3 is bridged to Interface 2, they are both effectively 192.168.1.1.Interface 3 becomes an additional port for the Interface 2 network.
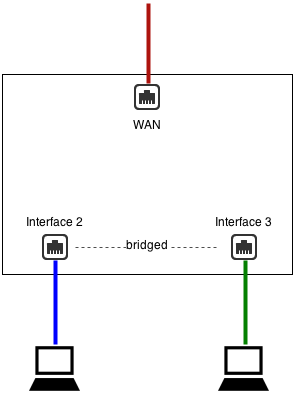
This is almost identical to a configuration without Interface 3, where Interface 2 is plugged into a switch with two free ports.
- In scenario 1, traffic between Interface 2 and Interface 3 goes through NG Firewall and is routed via NG Firewall's routing table
- In scenario 1, traffic between Interface 2 and Interface 3 goes through NG Firewall and is scanned by the apps (if not bypassed via Bypass Rules)
What "Bridged" Really Means.
When two interfaces are bridged in the NG Firewall, they are in the same zone or connected to the same network space. As the cardinal rules explain, the NG Firewall routes all traffic according to its routing table, even those crossing between two bridged interfaces. This is sometimes called brouting or a brouter, unlike how a traditional layer-2 bridge/switch behaves.
This means that packets coming inside one side of a bridge will NOT necessarily exit on the other side. It also means that packets destined with a specific route will be routed according to NG Firewall's routing table. All traffic is routed according to NG Firewall's routing table. It also means MAC addresses are not maintained across segments, even if they are bridged together as packets are brouted.
This may cause you to wonder how the NG Firewall works in the traditional "Bridge Mode." The answer is simple: for outbound traffic to the internet, NG Firewall will route that to its default gateway, which was probably where the traffic was headed anyway and definitely where it should go. For inbound traffic, the NG Firewall knows where each local host on the bridged segment lives and routes it directly. So, inbound and outbound traffic flowed as expected.
Things get complicated when networks have more complicated routes and do not configure the NG Firewall with those routes. Assume the NG Firewall is installed in traditional bridge mode on a 192.168.1.1/24 network. Let's assume the network also has another internal network of 192.168.2.1/24 behind an internal router 192.168.1.100. A route on the existing firewall already tells it that 192.168.2.* can be reached behind 192.168.1.100 if the user inserts the NG Firewall in bridge mode and configures it as 192.168.1.2. The entire 192.1* network will work, but none of the traffic on 192.168.2.* will work. Why? Because the NG Firewall routes *all* traffic according to its routing table. The firewall will route 192.168.2.* traffic to 192.168.1.100. When that traffic passes through the NG Firewall, it will not route it to 192.168.1.100 hypen. It will route it according to its routing table. Since it knows nothing about 192.168.2.* and those addresses aren't local, it will be sent back to the default gateway, as such, the 192.168.2.* The network will be completely offline as return traffic from the internet will not reach those hosts. Traffic will flow as expected after a 192.168.2.0/24 route to 192.168.1.100 is added to the NG Firewall. The routing table on the NG Firewall must reflect the network layout.
Another common scenario is bridging two separate networks with one NG Firewall server. Let's look at an example with 4 interfaces: network1External, network1Internal, network2External, network2Internal. Network1Internal is bridged to network1External. Network2Internal is bridged to network2External. The problem with this scenario is that the NG Firewall routes all traffic according to its routing table. If traffic comes in on network2Internal and is bound for the internet, it will NOT be sent out to network2External because that's where it was originally headed. It will be routed according to NG Firewall's routing table, which is the default route of NG Firewall, probably network1External's gateway! To set up this scenario, one must use WAN Balancer and routes to ensure that traffic coming in network2Internal is routed via network2External. This is true whether or not the separate network is a separate physical network or a separate VLAN network.
Understanding how NG Firewall routes traffic is key to using bridge mode effectively. While bridging can often be convenient, it can also create headaches for complicated setups.
Network Address Translation
Network Address Translation (NAT) rewrites packets' source addresses. It is typically used by many internal hosts with internal IPs (192.168.*.*, 10.*.*.*, such as, like) that can share one or several public IPs.
- If you check NAT traffic exiting this interface (and bridged peers) on any WAN interface configuration.
- If you check NAT traffic coming from this interface (and bridged peers) on any non-WAN interface configuration.
- If you add a NAT Rule
- NAT Rules
NAT Traffic Exiting this Interface (and Bridged Peers)
The first option is NAT traffic exiting this interface (and bridged peers). As described in the Interfaces documentation, this option will NAT any traffic exiting this interface and any of its bridged peers. This is enabled by default on WANs.
This means that any traffic exiting that WAN interface or bridged peers will be NAT'd to auto, which is the current primary address of that WAN interface. Traffic between this interface and any bridged peers will not be NAT'd. Checking this option also blocks all traffic coming to this WAN that is not to a local process or explicitly forwarded with a Port Forward Rules.
NAT Traffic Coming from this Interface (and Bridged Peers)
The second option is NAT traffic coming from this interface (and bridged peers), as described in the Interfaces documentation, will NAT any traffic coming from this interface and any of its bridged peers. This is not enabled by default.
This means that all traffic from these interfaces will get NATd to auto, which is the primary address of whichever interface the traffic exits. Traffic between this interface and any bridged peers will not be NATd. Checking this option also blocks all traffic to this non-WAN except traffic forwarded with a Port Forward Rules.
When and Where to Perform NAT
The first and second options are identical if the NG Firewall has only two interfaces. When there are multiple internal subnets, you must configure where you want to NAT to have the desired behavior.
If you want internal networks to speak with each other (e.g., 192.168.1.100 should be able to reach 192.168.2.100 on a different interface), you do not want to NAT between those networks.
As such, you should uncheck NAT traffic coming from this interface (and bridged peers) on both LAN interfaces and check NAT traffic exiting this interface (and bridged peers) on the WAN(s).
If you want internal networks to be separate so they can not speak to each other, you want to check NAT traffic from this interface (and bridged peers) on the non-WAN interfaces. This means NAT will be performed on all traffic from these LANs, and inbound sessions will be blocked unless explicitly forwarded using Port Port Forward Rules.
NAT Rules
The third option explicitly configures what should be NATd to what address with NAT Rules. These rules do not explicitly block any inbound traffic like the two NAT options. NAT rules can be used with the two NAT checkboxes; any matched NAT rule will take precedence. Most networks need only one of the first two options. Still, sometimes there are scenarios where a NAT rule is desired, such as 1:1 NAT, or when you want to guarantee that certain traffic (like SMTP exiting an email server) uses another address other than the primary WAN address.
If no NAT option is enabled (all unchecked and no NAT rules), the NG Firewall will route like a typical router without performing any NAT operation.
It also includes Filter Rules to block inbound sessions to this non-WAN or bridged peers that are not explicitly port forward, excluding sessions between bridged peers in that zone.
Virtual LANs
Virtual LANs or VLANs are used to see rule descriptions. Multiple subnets share the same wire while maintaining complete separation, including broadcast domains.
VLANs have several uses. You often want multiple internal subnets on a network but want to run only one physical ethernet network through a building. VLANs allow you to run multiple networks on the same physical wire while guaranteeing they are separate and secure. You must have VLAN-enabled switches and products throughout the network to do this. VLANs can also be useful if you have limited ethernet ports on the NG Firewall and want to overload a single NIC with two purposes. This requires that the NIC be connected to a VLAN-enabled switch.
To create a VLAN interface, click the Add Tagged VLAN Interface button at the bottom of the interfaces grid on the . This will create a new virtual interface. First, you must name this interface and select the Parent Interface. The Parent Interface is the physical interface on which this VLAN virtual interface exists. Then, we must configure an 802.1q Tag, an integer between 1 and 4094 inclusive. After this, you will configure the interface just like any interface.
This new VLAN interface is just like a physical interface in all ways. This means you can configure this VLAN interface exactly like any physical interface. It is completely separate from the physical parent interface. Any packet coming in on the physical parent interface with the 802.1q tag matching the configured value (1-4094) will be considered by the NG Firewall to be coming in the VLAN interface. Any packet sent to the virtual VLAN interface will be sent to the physical parent interface with the configured 802.1q tag. All untagged packets on the physical parent interface will be processed like normal through the physical parent interface; only 802.1q tagged packets with the matching 802.1q tag will be processed by the VLAN interface.
After configuring the NG Firewall with the appropriate tagged VLAN interfaces, you must configure some VLAN-enabled managed switches to properly process the packets as desired. For example, how to configure a port based vlan on an hp procurve, describing how to configure an HP ProCurve switch.
Example: We want two separate LANs on our network but only have one wire or network card. As such, we need a VLAN-enabled switch. Configure the internal interface with the IP and configuration from LAN 1. Create a tagged VLAN interface with 802.1q tag 3. Configured the new VLAN interface with the IP and configuration for LAN 2. Now configure your VLAN switch to send VLAN 3 packets to the appropriate ports with LAN 2 hosts. In this scenario, we select the same wire but have two separate LANs with separate broadcast domains.
Configuring VLAN on NG Firewall in Bridge Mode
- You must create two virtual interfaces for each VLAN you want to set up.
- One as a child to the external interface.
- One as a child to the internal interface.
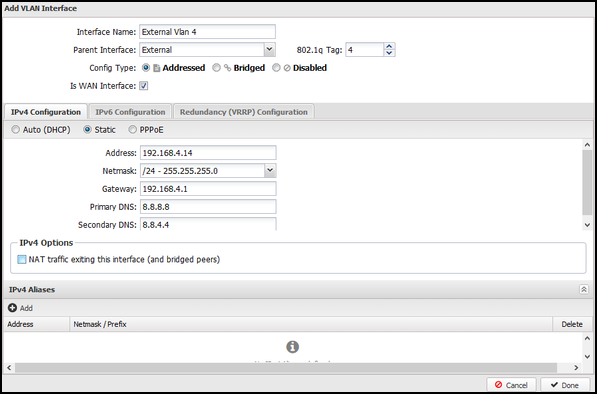
- To set up the external VLAN interface
- Click Create a tagged VLAN interface.
- Give the interface a name that's easily identifiable by you.
- Set the Parent Interface to External.
- Set the 802.1q tag.
- The config type must be "Addressed."
- Under IPv4 configuration, assign a unique static IP to the interface.
- Enter the IP address for the VLAN gateway.
- Enter the DNS servers you would like to use.
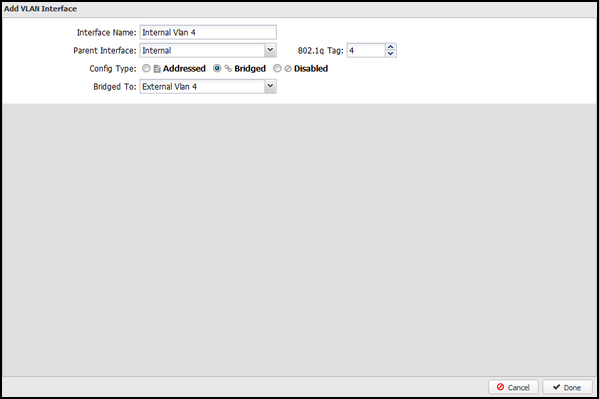
- To set up the internal VLAN interface
- Click Create a tagged VLAN interface.
- Give the interface a name that's easily identifiable by you.
- Set the Parent Interface to Internal.
- Set the same 802.1q tag that you configured on the external VLAN interface.
- The config type must be "Bridged."
- Bridge this interface to the external VLAN interface.
- Go to WAN Balancer and set the weights to send 100% of network traffic to your untagged external interface.
- Click over to the Route Rules tab and create a new rule.
- Source Interface : [Internal VLAN interface].
- Destination WAN : [External VLAN interface].
Virtual Redundancy Router Protocol
Virtual Redundancy Router Protocol (VRRP) provides network-level redundancy.
Multiple NG Firewalls can be run in parallel in a high-availability configuration. In this configuration, one NG Firewall will be the "primary," and one or more NG Firewalls will be the "secondary." If the primary fails, one of the remaining secondary NG Firewalls will take over the primary role such that network traffic continues to flow without interruption.
The NG Firewall uses Virtual Redundancy Router Protocol or VRRP to handle the switching between NG Firewall servers. All NG Firewall servers must be on and configured with a shared VRRP Virtual Address. The primary is the only NG Firewall to answer/handle traffic routed to the VRRP Virtual Address. If the primary fails, an "election" is held over VRRP, and the next-highest-priority secondary will begin handling traffic to the VRRP Virtual Address.
All NG Firewall interfaces must be configured statically, and there must be no bridged interfaces. Parallel NG Firewalls configured as bridges will create a bridge loop!
VRRP Basic Example
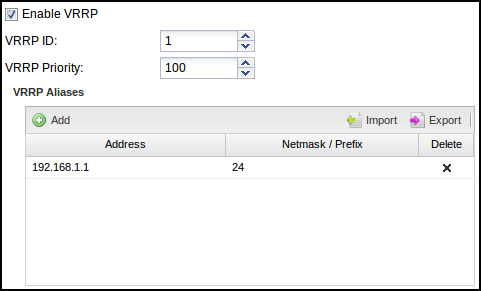
A common configuration is running two NG Firewalls to act as the gateway for the internal network. For example, let's assume NG Firewall 1, the primary, has a public IP of 1.2.3.4 and an internal IP of 192.168.1.2. Let's assume NG Firewall 2 has a public IP of 1.2.3.5 and an internal IP of 192.168.1.3. Both run in "router" mode, doing NAT and acting as a gateway. Note that all IPs must be unique! This configuration requires each NG Firewall to have its external IP!
Now we configure NG Firewall 1 to have a VRRP Virtual Address of 192.168.1.1 on the Internal interface and also configure NG Firewall 2 to have a VRRP Virtual Address of 192.168.1.1 on its Internal interface. They both share the same VRRP Virtual Address. Each NG Firewall in the group must have the same VRRP ID. So let's give NG Firewall 1 a VRRP ID of 1 and NG Firewall 2 a VRRP ID of 1. We want NG Firewall 1 to be the primary when it's on and working without issues, so give it a higher priority of 100. NG Firewall 2 is the secondary, so it should be given a lower priority: let's give it a lower priority of 50.
Configure your internal hosts to use the VRRP Virtual Address (192.168.1.1) as the gateway. In this configuration, the primary will route all traffic to 192.168.1.1, just like a regular address. Should the primary fail within a few seconds, the secondary will become the new primary and start routing traffic.
Note: You should configure the DHCP server to hand out 192.168.1.1 as the default gateway. Suppose NG Firewall is providing DHCP. Configure NG Firewall 1 as the "authoritative" with 192.168.1.1 as the "Gateway Override." Configure NG Firewall 2 in the same way but as non-authoritative. This way, NG Firewall 1 will handle all DHCPs unless they are down, in which case NG Firewall 2 will handle DHCPs.
VRRP External Example
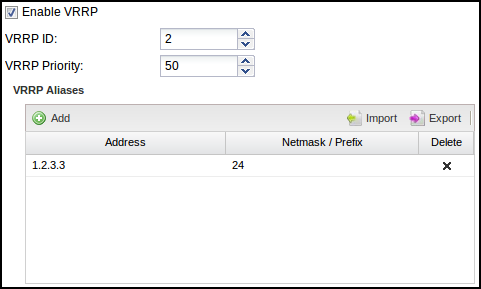
The above example works great for outbound traffic, but if you have inbound traffic being port forwarded, that traffic might fail if the NG Firewall owning that address fails. VRRP can also be used to provide redundancy for inbound traffic. For example, similar to above, let's assume you have NG Firewall 1 with 1.2.3.4 and NG Firewall 2 with 1.2.3.5.
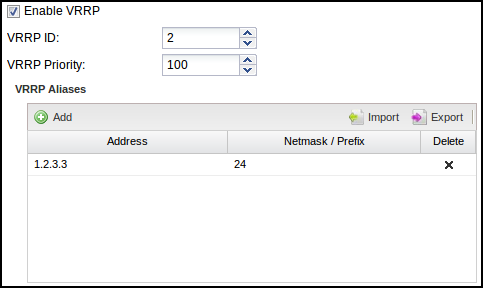
You can configure both with a shared VRRP Virtual Address of 1.2.3.3. Now configure port forwards on both NG Firewalls for traffic destined to 1.2.3.3 to the appropriate internal host. Only the primary will handle traffic to 1.2.3.3. If the primary fails, the secondary will take over traffic handling 1.2.3.3 and port forwarding. External hosts can still reach local services should the primary fail.
In this scenario, NAT Rules can also be configured if outbound traffic should use the same address regardless of which server handles the traffic.
VRRP Combined Example
It is also possible to combine VRRP on multiple interfaces. For example, combine the above two examples. VRRP can be used to provide redundancy on both interfaces. VRRP IDs must be unique for each server. For example, the external on both should be VRRP ID 1, and the internal on both should be VRRP ID 2. In this scenario, VRRP is "grouped" such that if the server loses its "primary" status on one interface, it will also release its primary status on other interfaces.
.png)
.png)
For example, in the picture above, if the Internal interface on NG Firewall 1 is unplugged, then NG Firewall 2 will become the primary and start responding to 192.168.1.1. NG Firewall 1 will also release its primary status on the external interface so that NG Firewall 2 will also handle 1.2.3.3. This is to avoid scenarios where NG Firewall 1 is primary on the external address and NG Firewall 2 is primary on the internal address.
NG Firewall User Guide
The NG Firewall User Guide
- Administration Interface
The Administration Interface is the main interface used to configure the NG Firewall.
-
The Dashboard provides an overview of the state of your NG Firewall. It is extremely useful for quickly viewing or monitoring what is happening on the network and the current status of the NG Firewall server.
- Applications
The Administration Interface is the main interface used to configure the NG Firewall.
- Config
The config tab holds all the settings related to the configuration of the NG Firewall server itself and settings for platform components that apps may interact with.
- Reports
Reports provide users with detailed statistics of the traffic and activity on your network.
Administration Interface
The Administration Interface is the main interface used to configure the NG Firewall.
Upon the first visit to the administration interface, a registration and welcome message is displayed. The message suggests applications that may be useful for your network. You can choose to install or manually install the recommended apps.
- Dashboard
- Applications
- Config
- Reports (only visible if the Reports app is installed.)
Dashboard
The Dashboard provides an overview of the state of your NG Firewall. It is extremely useful for quickly viewing or monitoring what is happening on the network and the current status of the NG Firewall server.
By default, the Dashboard will show several widgets with varying information. However, the Dashboard is completely customizable. Widgets can be removed and added so the administrator sees exactly the information that is important to them on the Dashboard.
There are many different types of widgets available:
| Name | Information |
|---|---|
| Information | Shows some information about the NG Firewall, like name, model, version, etc. |
| Resources | Show an overview of current memory swap and disk usage. |
| CPU Load | Shows a graph of recent CPU load. |
| Network Information | Shows an overview of the network information, such as session count and device/host count. |
| Network Layout | Shows an overview of the network layout based on the interface configuration. |
| Map Distribution | Shows the current sessions' mapped geo-location on a world map, sized by throughput. |
| Report | Shows any Report Entry from Reports. |
Click Manage Widgets at the top to change what is displayed on the dashboard. From here, you can show or hide the built-in widgets or add new widgets from Reports by clicking on the Add button.
When adding a Report widget, specify a time frame (the number of hours worth of data to display) and a refresh interval (how often the widget refreshes on the dashboard).
When viewing a Report Entry in Reports, you can easily add it to your Dashboard by clicking the Add to Dashboard button.
Applications
Applications are plugins that add functionality to your NG Firewall server like "apps" on an iPhone or Android device.
On the Apps tab, you'll see the installed apps. Across the top is a drop-down menu to switch to different policies. Policies can be controlled via the Policy Manager app.
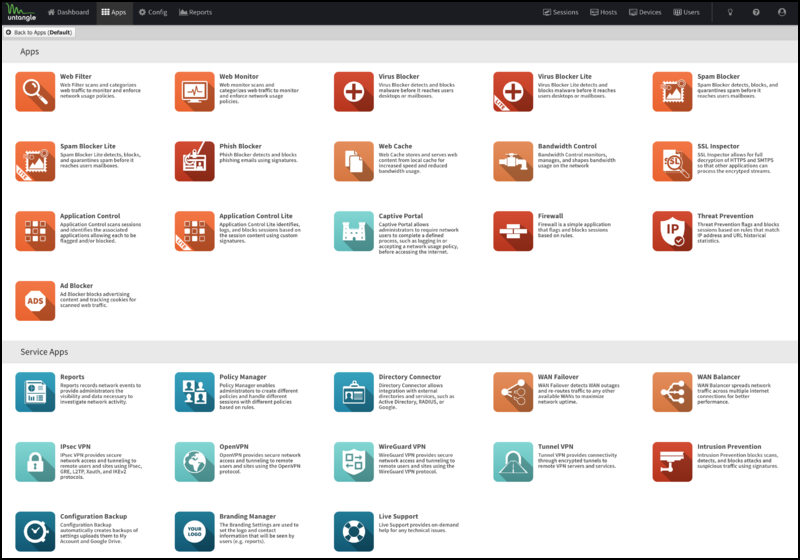
You can install apps by clicking the Install Apps button at the top. It will display the apps that can currently be installed. To install an app, click its icon. You can install as many apps as you like at the same time. After installing the desired apps, you can click the Done button at the top to return to the app view.
Once installed, the application's settings can be configured by clicking the Settings button or the app icon, depending on the skin. Applications install with the suggested configuration, which is the default setting and is on/enabled in most cases. An application that is off/disabled will not process any network traffic. To enable a disabled application, edit the settings and click Enable on the first tab inside the settings.
After clicking Settings, you will see tabs for different settings sections and typical buttons marked OK, Cancel, and Apply. Apply saves any changes. OK, it saves any changes and closes the window. Cancel closes the window without saving settings. On the left side, a Remove button will remove the application from the current policy. The Help button will open the help for the tab currently being viewed.
- Filter Applications All the Applications above the Services pane in the interface can have one instance per policy.
- Service Applications All the Applications below the Services pane are global and exist in all virtual racks.
Many networks only need one policy, which means all traffic gets processed by the same apps and configuration, but multiple policies (sometimes called "racks") are possible for bigger networks. Check out the Policy Manager application for more information about running multiple racks.
To learn more about each application, select the links below.
Filter Applications


Service Applications
 |
 |
 |
 |
 |
| Reports | Policy Manager | Directory Connector | Web Monitor | WAN Balancer |
 |
 |
 |
 |
 |
| Captive Portal | IPsec VPN | OpenVPN | WireGuard VPN | Branding Manager |
 |
 |
|||
| Configuration Backup | Live Support | |||
Config
The Config tab holds all the settings related to the configuration of the NG Firewall server itself and settings for platform components that apps may interact with.
This is a list of all sections available under the Config tab in the Administration UI.
Network
The Network Configuration documents how networking in NG Firewall functions and is commonly configured.
Administration
Local Directory
Local Directory stores a list of users that applications can use. It also supports RADIUS for 802.1x authentication from properly configured wireless network access points.
The RADIUS Server can be enabled to allow WiFi users to authenticate as any user configured in the Local Directory.
Upgrade
The upgrade allows the server to upgrade and contains upgrade-related settings.
Upgrade Settings
Upgrades show the currently available upgrades, if any. If upgrades are available, an upgrade can be started by pressing the Upgrade button at the top under Status.
To see changes, see the Logs.

After the upgrade begins, it will download the new packages (which may take some time) and then apply the upgrades. Do not reboot or power off the server during the upgrade.
If Automatically Install Upgrades is checked, NG Firewall will automatically check for new versions and upgrade if available.
An automatic upgrade schedule is configured when the NG firewall automatically upgrades if upgrades are available. NG Firewall will automatically upgrade at the specified time on the days of the week that are checked.
Upgrade FAQs?
- When will I get the upgraded version?
- Upgrades are rolled out gradually to NG Firewall deployments, sometimes over several weeks. If you want the upgrade immediately, email This email address is being protected from spambots. You need JavaScript enabled to view it. your UID and request that they add it to the Early Upgrade list.
- When is the new version available for my NG Firewall?
- When a new version is available, the Upgrade button will appear on your NG Firewall's Upgrade page. If the automatic upgrade setting is enabled, your NG Firewall will upgrade automatically once the upgrade is available on the day and time specified.
- Does the upgrade require a reboot?
- If a reboot is needed, the upgrade will reboot automatically once installed. There is no need for a manual reboot. Most upgrades will not reboot as there is no kernel change.
- How long does the upgrade take?
- It's difficult to be precise since customer platforms, Internet connection speed, and upgrade complexity vary. Generally, upgrades take less than 20 minutes. If the database version is changed as part of the NG Firewall upgrade, the process will take longer as the database will need to be converted. There are extreme cases where the upgrade takes over an hour.
- Do I need to reinstall?
- No, the upgrade process will seamlessly update all the NG Firewall components.
- Where can I get what is changed in the new version?
- Release changes are posted on the Logs page.
System
About
Reports
The reports tab is only visible if the Reports app is currently installed. To read more about reports, view the reports documentation.
Reports
Reports provide users with detailed statistics of the traffic and activity on your network.

About NG Firewall Reports
These reports can be viewed online through the administration interface or the separate reporting interface available to non-administrators reporting-only users.
Customizable report summaries can be sent via email. They include basic information and a link to view the online reports if the user has access.
Reports can backup your data in multiple formats to Google Drive for long term storage.
Settings
This section discusses the different settings and configuration options available for Reports.
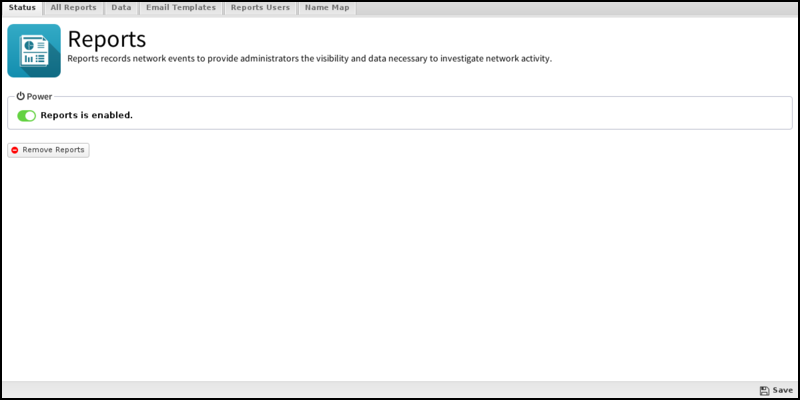
Status
You can click View Reports to open up Reports on this tab in a new browser tab.
All Reports
This is the full list of all currently existing reports, including all the default reports and any custom reports that have been added.
To edit a report, click View and then click Settings.
To delete a custom report, click View and then click Delete.
To create a new custom report, click View on a similar existing report, then click Settings. Then, change the name and click Save as New Report.
To create a report from scratch, go to Reports and click Create New in the lower left. When creating reports from scratch, each field must be carefully chosen and tuned until the desired data is provided. This process can be time-consuming and difficult. Working with a similar report is suggested to require the desired result. Additionally, you can ask for help via support or the forums and import the report if someone can craft it for you.
If creating a report from scratch, the settings and fields and their purposes are described below.

Report Entry
A report has many settings describing how to craft a SQL query and display the data. Here are the fields:
| Name | Value | Available | Description |
|---|---|---|---|
| Report Type | Text, Pie Graph, Time Graph, Time Graph Dynamic, Event List | The type of graph | |
| Title | Text | All | The report title |
| Category | Any existing category/application | All | The category in which the report is located |
| Description | Text | All | A brief description of the report |
| Text String | Text | Text | The text used to create the Text Report Type |
| Pie Group Column | Text | Pie Graph | The column to "group by" in top X charts (usually user, host, and so on) |
| Pie Sum Column | Text | Pie Graph | The column to sum in the top X charts (usually count, bytes, and so on) |
| Order By Column | Text | Pie Graph | The column to order by |
| Graph Style | Pie, Pie 3D, Donut, Donut 3D, Column, Column 3D | Pie Graph | The render style of the pie graph |
| Pie Slices Number | Integer | Pie Graph | The number of slices to display |
| Units | Text | Pie Graph | The units being displayed (usually bytes, sessions, and so on) |
| Graph Style | Line, Area, Stacked Area, Column, Overlapped Column, Stacked Columns | Time Graph | The render style of the time graph |
| Time Data Interval | Auto, Second, Minute, Hour, Day, Week, Month | Time Graph | The time aggregation unit or resolution |
| Approximation | Average, High, Low, Sum | Time Graph | The method used to aggregate/combine data points |
| Units | Text | Time Graph | The units being displayed (usually bytes, sessions, and so on) |
| Series Renderer | None, Interface, Protocol | Time Graph | The renderer used to display human-readable names |
| Dynamic Column | Text | Time Graph Dynamic | The column to select for/group by |
| Dynamic Value | Text | Time Graph Dynamic | The value to sort by and display |
| Dynamic Limit | Integer | Time Graph Dynamic | The number of series to show |
| Aggregation Function | Count, Sum, Min, Max | Time Graph Dynamic | The function used to aggregate dynamic values grouped by dynamic column |
| Graph Style | Line, Area, Stacked Area, Column, Overlapped Column, Stacked Columns | Time Graph Dynamic | The render style of the time graph |
| Approximation | Average, High, Low, Sum | Time Graph Dynamic | The method used to aggregate/combine data points |
| Units | Text | Time Graph Dynamic | The units being displayed (usually bytes, sessions, and so on) |
| Series Renderer | None, Interface, Protocol | Time Graph Dynamic | The renderer used to display human-readable names |
| Colors | Color Picker | All | The color palette to use |
| Display Order | Integer | All | The integer used to determine the report's position in the category list |
Data
- Data Retention: This value controls how long report data is kept on disk. Note that increasing the number increases the amount of disk space needed for data storage.
Note:NG Firewall version 16.3 and above stops reporting data when free space falls below 5 GB.
- Delete All Reports Data: This option is useful if you are running low on disk space and wish to free space by wiping the reports database.
- Google Drive Backup: If your system is connected to your Google account, you can configure Reports backups to Google Drive.
- Upload Data to Google Drive. If enabled, and the Google Connector in Directory Connector is enabled, your daily data will be uploaded to Google Drive each night for safe storage.
- Upload CSVs to Google Drive. If enabled, and the Google Connector in Directory Connector is enabled, your daily CSV files will be uploaded to Google Drive each night for safe storage.
- Google Drive Directory configures which subdirectory data will be uploaded to Google Drive.
- Import/Restore Data Backup Files: Imports data from a previous backup into the database.
Note:This directly imports the SQL contents. If you have upgraded and the database schema has significantly changed since the time of the back, the import will not work correctly.
Figure 15. Reports - Data Tab

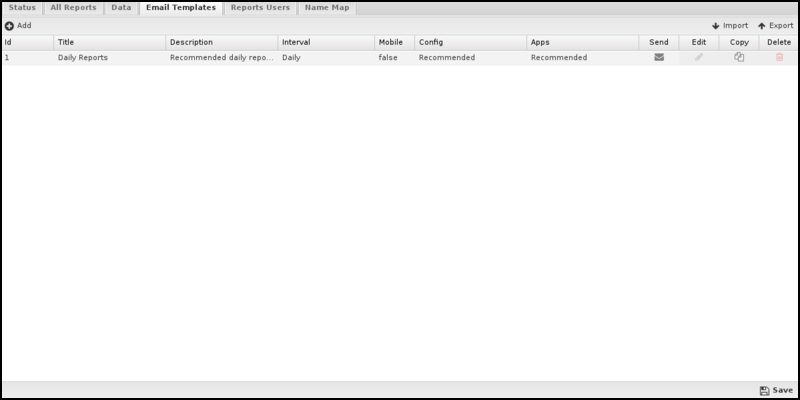
Email Templates
- Interval: Daily, Weekly, Monthly, Week to Date, Month to Date. This determines the time interval that the report will cover. Beware that enough data is available via the Retention settings to provide the data for the configured interval.
- Mobile: Generate chart images that are more appropriate for a mobile device.
- Reports: Select those reports under the Config and Application sections. Text and chart reports are allowed, but not event list reports. Applications' reports will be included only if that application is installed.
Additionally, you can copy the settings for an existing report.
The default Daily Reports template includes common text and chart reports for your system. This template is fixed and cannot be changed or modified.
Email Templates must be associated with Report Users.
Reports Users
- The report user's email address (and Username) is the email address. Admin is a special case that determines whether administrators will receive emails and alerts.
- Email Alerts determines if this report user will receive email alerts.
- Email Reports determines if this report user will receive email report summaries.
- Email Templates determines which email report summaries this user will receive if Email Reports is enabled.
- If Online Access is enabled, a URL to online reports is included in emailed report summaries for this user.
- Change Password changes the password for this report's user.
Figure 17. Reports Users Tab

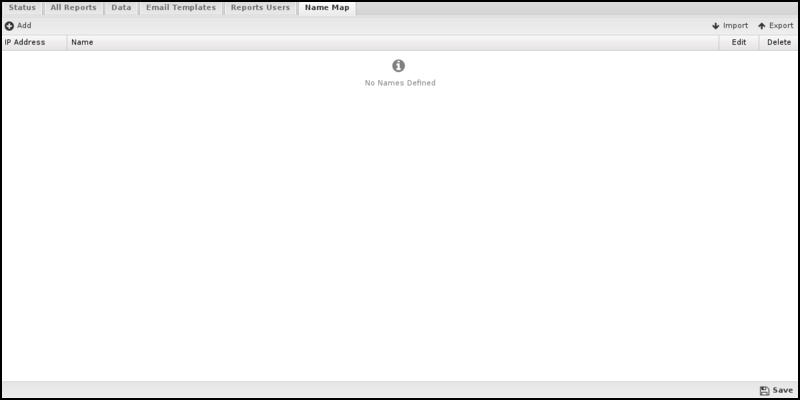
Name Map
You can use the Name Map to configure the hostname for hosts manually. The NG Firewall can often determine the IP hostname automatically via DHCP or other methods. You can view the names of active hosts in the Hosts.
However, when the NG Firewall cannot automatically determine a hostname for an IP, the Name Map provides a way to name them manually.
Accessing Reports
If users are set up to receive email report summaries, they only need to view or download the HTML attachment to see an overview report. If they need more information or would like to drill down to specific users or machines, they can select the link in the email, which will open Reports on the NG Firewall if it is accessible from their location.
- Outside the NG Firewall network: Browse to the NG Firewall's IP address/reports using HTTPs, such as https://1.2.3.4/reports.
- Inside the NG Firewall network: Browse to the IP of the NG Firewall /reports, such as https://192.168.1.1/reports.
Note that to view Reports from outside the network, you'll need to check Allow HTTPS on WANs at . If you have changed the External HTTPS Port, you'll need to use the proper HTTPS port when connecting from the outside.
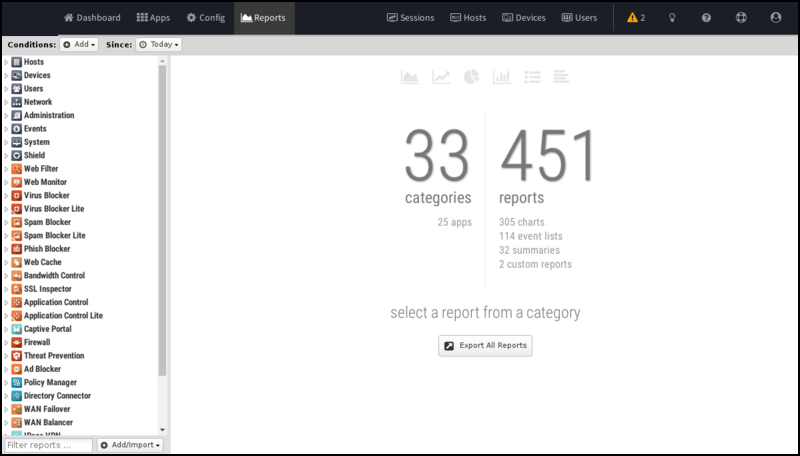
Report Viewer
Reports provide a graphical view of your NG firewall's network traffic and actions. Various reports are available within applications and base system components. The Report Viewer allows you to manipulate the reports to drill down, customize, and export data in many ways.
- The top panel: This panel (just below the navigation menu) allows you to specify which data is viewed. By default, there is a time frame and no conditions so that reports will show all the data for the specified time frame. Conditions can be viewed to view more specific data, such as a specific host, user, domain, application, web category, etc.
- The left panel: Allows you to choose the report you want to view. At the bottom, you can quickly use the search box to find reports with the specified string in the title. You can also import and create new reports using the "Add/Import" button.
- The chart panel: This panel shows you the specified report. It also includes several action buttons at the top.
- The data panel: The data panel, hidden by default, can be displayed by clicking the Data View button in the chart panel. This will show the raw data used to generate the chart and allow the user to export the data by clicking the Export Data button at the bottom.
Conditions
The Conditions panel appears at the top panel and can filter data displayed in reports. For example, to view a "specific" host's report, you can add a condition for Client = 192.168.1.100, all reports available will only show data where the client is 192.168.1.100. Multiple conditions can be added to drill down and inspect data. Conditions can also be added quickly by clicking on slices in pie charts.
The Add Condition drop-down contains many commonly used conditions, or the full list of all tables and columns can be browsed by clicking on the More button to add conditions for any database column.
Condition Operators
The second field in the condition is the logical operator that will be used in evaluating the condition value defined in the last field. In most use cases, the default "=" operator is what you want to use. However, several other operators are available that make the reports and alerts a lot more powerful.
Conditions Example - Policy by Policy ID
- In the Conditions panel, select Add.
- Choose Policy ID and specify equals and the policy ID in question.
- The conditions are applied and will remain applied as you switch between reports.
Conditions Example - Web Filter Categories
- Open the Report Viewer or the Web Filter Reports tab.
- Select the Top Categories report (by size or requests). In our example, you can see Games was at the top.
- Click the Games pie slice, and click Yes when prompted to add a condition.
- All reports can now be viewed only for game traffic.
- For example, the Top Clients (by request) will show the clients that visited the most gaming sites.
- For example, the web usage (scanned) will show "Gaming" web usage throughout the network day.
Related Topics
NG Firewall Virtual Appliance on VMware
NG Firewall can be virtualized through an NG firewall virtual appliance in VMware running on VMware ESX or ESXi.
- Demo virtual appliance: Suitable for installation on a laptop or desktop to have a working instance of the platform running inside your Windows, OS X, or Linux OS for testing or demonstration purposes. This is supported using VMware Player, Fusion, Server, or Workstation and requires only one physical network interface. Use this mode if your VMware host machine has only one physical network interface.
- Production virtual appliance: To be used as a network gateway. This mode requires at least two physical network interfaces (three if you want or need an external DMZ). We recommend you use either VMware ESX or ESXi Server. Use this mode if you have two or more physical network interfaces to connect to external, internal, and (optionally) DMZ networks.
NG Firewall Support and VMware
Arista Edge Threat Management wants you to have a successful deployment. Unfortunately, our support staff lacks the expertise in VMware ESX to ensure that we can help you install and configure VMware. However, we will certainly help you with your NG Firewall configuration, provided it's running on ESX.
That being said, we'd like to inform you that systems like the NG Firewall that require a lot of real-time processing could be better candidates for virtualization. VMware works by "time-slicing" the physical CPUs in the host system. While the VMware server is off processing other virtual machines, the NG Firewall server cannot process traffic. At the same time, network traffic continues to arrive. This traffic stacks up and presents itself to the NG Firewall VM as "bursty." This exacerbates any high-load issues that may be present. The exact threshold of where it will be unsuitable is hard to say. It is a combination of traffic level, types of traffic, and user expectations.
In summary, we do not recommend virtualizing the NG Firewall. Suppose you choose to install the NG Firewall in a virtual environment. In that case, the support team will assist you with any issues related to the NG Firewall and its applications. Still, they will need help with virtualization set up/connectivity issues or issues caused by virtualization (high load, slow speeds, etc.).
How to Install on ESX or ESXi
Before you get Started
- VMware ESX server version 6.5.0 Update 3 or newer.
- One virtual NIC and vSwitch per NG Firewall Interface.
Download the NG Firewall Virtual Machine
- Download the NG Firewall Virtual Appliance:
- Log into your Edge Threat Management account.
- Click GET STARTED at the top right-hand corner.
- Select the latest version and download the ISO file.
Deploy Image to ESX Server
- Once the image is downloaded, open your VMware vSphere Client and login to your server.
- Once logged in, click .
- In the Deploy OVF Template, mark Deploy from file and hit Browse.
- Browse to the location where you saved your image and click Open.
- Then, click Next.
- Read The Template Details and click Next.
- In the “Name and Location screen,” you may change the name or leave it as the default. Click Next.
- In the “Resource Pool screen,” If you use Resource Pools, select the appropriate pool for the new NG Firewall VM and click Next.
Note: You can always move the VM to another Resource Pool after it's installed. .
- In the Datastore screen, Select what datastore you want to use and click Next.
- In the Ready to Complete screen, verify everything looks OK and click Finish.
- Wait for the Deploying Progress Meter.
- When it is done, click Close.
Verify/Configure Physical NIC to vSwitch mappings.
- Setup/confirm your vSwitch Settings. Click the ESX host, then select the Configuration tab and .
- It is best practice to place your Management Network on its vSwitch. (This is not a Must, but if you can make sure that the NG Firewall does not exist on the same vSwitch as any Management Interface).
- On the vSwitches that the NG Firewall will connect to activate promiscuous mode, click on Properties.
- Ensure that Promiscuous has the status Accept; otherwise, select Edit, go to the Security Tab, and change Reject to Accept. You must do this on all vSwitches that the NG Firewall Virtual Machine connects to.
Configure the Virtual Machine for your Network
- Right click the new Virtual Machine and select.
- You must add new virtual NICs and connect them to the appropriate vSwitches.
Warning: Two Bridged Interfaces to the same vSwitch will crash your ESX server. Each NG Firewall NIC should be connected to its vSwitch. Each vSwitch should be connected to its own Physical NIC or at least separated by VLAN tagging at the physical NIC level.
- This example shows that the new NICs are connected to different vSwitches labeled LAN and DMZ.
- Under , check the Synchronize guest time with host and click OK.
Celebrate! You're at the End
Now you are ready to Power on your NG Firewall VM.
More Information and Troubleshooting
For information about using your new NG Firewall software, see our NG Firewall User Guide.
Recovery Utilities
- Remap Interfaces: This option remaps the mapping between "Interfaces" and "NICs" so that the physical network cards can be mapped to their desired use/configuration.
- Configure Interface: This option allows for basic interface configuration. Once the appliance is accessible online, further configuration is possible through the web-based administration interface.
- Ping: A basic ping test for testing network connectivity.
- Upgrade: Launch an upgrade process that will upgrade all software if upgrades are available.
- Reboot: Reboot the server.
- Shutdown: Shutdown the server.
- Reset to Factory Defaults: Delete all settings and return to the factory defaults.