Getting Started
Which Option to Use when Downloading NG Firewall Software
The NG Firewall software is free to download and works on multiple platforms. But how do I know which download I need?
- Select the Serial Installer version if you intend to install using a serial console connection. Here are more details on the serial console: Managing wSeries and eSeries appliances via Serial Console.
- Select the ISO Installer version for all other install types (hardware or virtual environment).
Edge Threat Management Dashboard Overview
Arista's Edge Threat Management (ETM) Dashboard is a cloud-based central management platform that lets you centrally manage your Micro Edge and NG Firewall deployments from a browser. All features of ETM Dashboard are available to licensed Micro Edge and NG Firewall deployments.

- Slack, PagerDuty, VictorOps, or email notifications based on essential activities.
- Mobile app to manage appliances and subscriptions from a mobile device.
- Central reporting of Micro Edge and NG Firewall deployments.
- Secure remote access via Single Sign-On to any of your Edge Threat Management appliances.
- License management of your Edge Threat Management appliances.
- Automatic daily backup and optional configuration restore.
- Configuration templates with real-time sync.
- Host and device management with integration to Bitdefender, Malwarebytes, and Webroot.
To log in or to create a free ETM Dashboard account, navigate to https://edge.arista.com/cmd.
Logging into the Arista Edge Threat Management Dashboard
You can manage all of your networks using Arista's cloud-based ETM Dashboard.
Creating an Account
To log into the ETM Dashboard, you must have a login account. If you do not have an account yet, click Create an Account at the bottom of the page to set one up.
Logging into the ETM Dashboard
- Go to https://launchpad.edge.arista.com.
- Enter your email address in the Email Address field and click Continue to log in with an ETM Dashboard account.
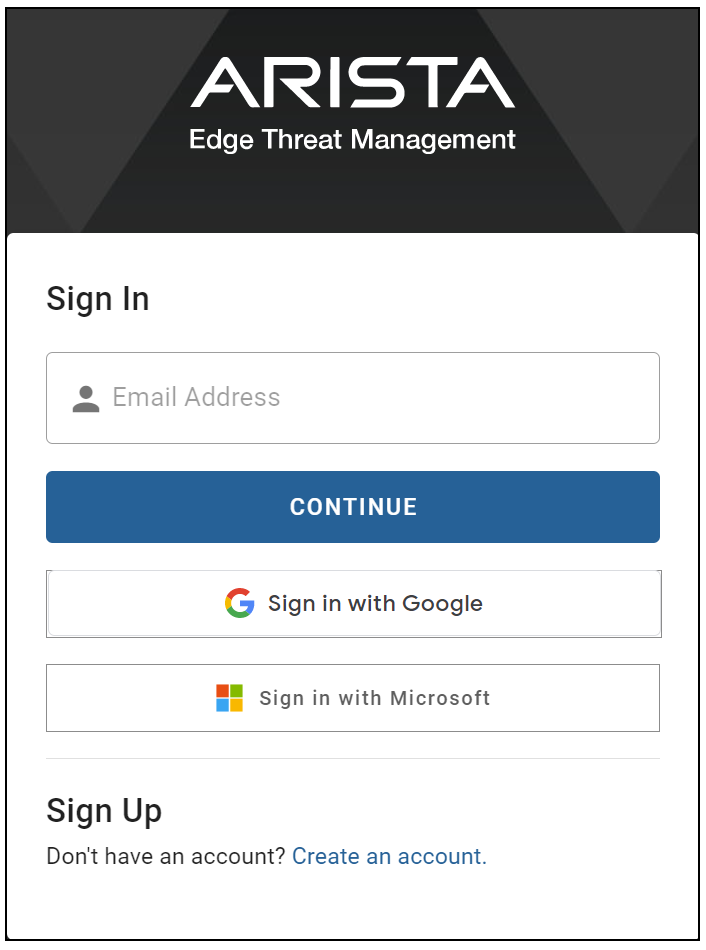
- A Password field appears on the page. Enter your password and click Log In to enter your account.
Logging into ETM Dashboard using Single Sign-On with Google or Microsoft Accounts
If you have an existing Google or Microsoft account and want to Single Sign-On (SSO) to log into your ETM Dashboard account, you can do so by clicking the appropriate button (below the Log In button). This redirects you to the service provider's login page. If your SSO account requires multi-factor authentication (MFA), you will receive the code via your usual method and complete the MFA through the SSO login page.
Once logged into that service, you are logged into your ETM Dashboard account.
You can also require SSO to access your ETM Dashboard account. This option is located in :
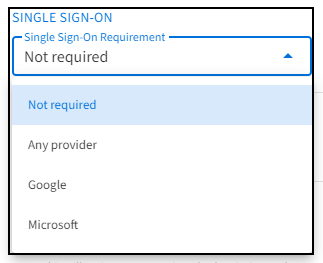
| Not required | SSO is available, but it is not required to log into this ETM Dashboard account. |
| Any provider | You must use SSO to access this ETM Dashboard account, but either Google or Microsoft SSO is allowed. |
| You must select Google SSO to log into this ETM Dashboard account. | |
| Microsoft | You must select Microsoft SSO to log into this ETM Dashboard account. |
Logging into ETM Dashboard using SAML, OAuth2, or OpenID Single Sign-On Accounts
Refer to this article to configure these Identity Provider connections: Configuring SAML, OAuth2, or OpenID Login in the ETM Dashboard.
Enter your Organization Name in the Email or Organization field to log into your account.
Click Continue to be redirected to your Identity Provider's SSO login page, where you will complete your login. When you successfully log into your IdP's system, you will be logged in and redirected to your ETM Dashboard account.
The Edge Threat Management Dashboard
The Edge Threat Management (ETM) Dashboard is a high-level view of all networks and appliances associated with your Arista ETM Dashboard account.
.png)
Viewing the Dashboard
When logging into the ETM Dashboard, you are directed to the Dashboard. From the Dashboard, you can see the status and locations of your managed networks. You can also view reports, audit histories, recent threats, and more via the Dashboard Widgets.
By default, the ETM Dashboard shows all Dashboard Widgets. You can configure which Widgets to see in your Preferences. See Enabling and Disabling Dashboard Widgets for more details.
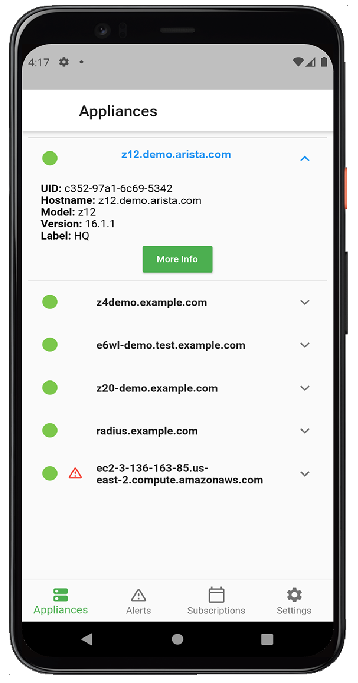
Getting Started with Edge Threat Management Mobile App
Arista Go is a mobile app for Android and iOS-based devices that extends ETM Dashboard functionality to your mobile device, enabling you to manage your networks and Edge Threat Management appliances from anywhere.
- Review recent alerts related to your Edge Threat Management appliances and managed networks.
- Review the connection status and details of your Edge Threat Management appliances.
- Review the subscriptions associated with your Edge Threat Management appliances.
Installing Arista Go
- On your mobile device, open the browser and navigate to https://play.google.com/store/apps/details?id=com.untangle.go (Android) or https://apps.apple.com/us/app/untangle-go/id1561237778 (Apple iOS). Alternatively, open your Google Play or Apple App Store app and search for "Untangle Go."
- Review the app details to ensure they meet your device's requirements.
- Click Install or Get, depending on your device.
Pairing the app to your ETM Dashboard Account
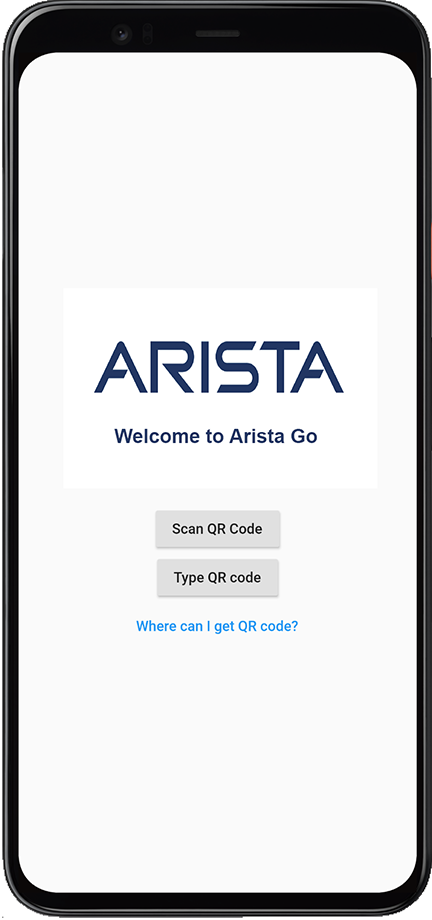
- After Arista Go installs, launch the app.
- If you want to receive ETM Dashboard alerts, allow notifications when prompted.
- On the next screen, choose how to pair your device. If you decide to Scan the QR code, the app asks permission to use your phone’s camera. If you prefer not to consent to your camera, choose Type QR code.
- To obtain your QR code, log into your ETM Dashboard account and navigate to .
- Click Pair Device.
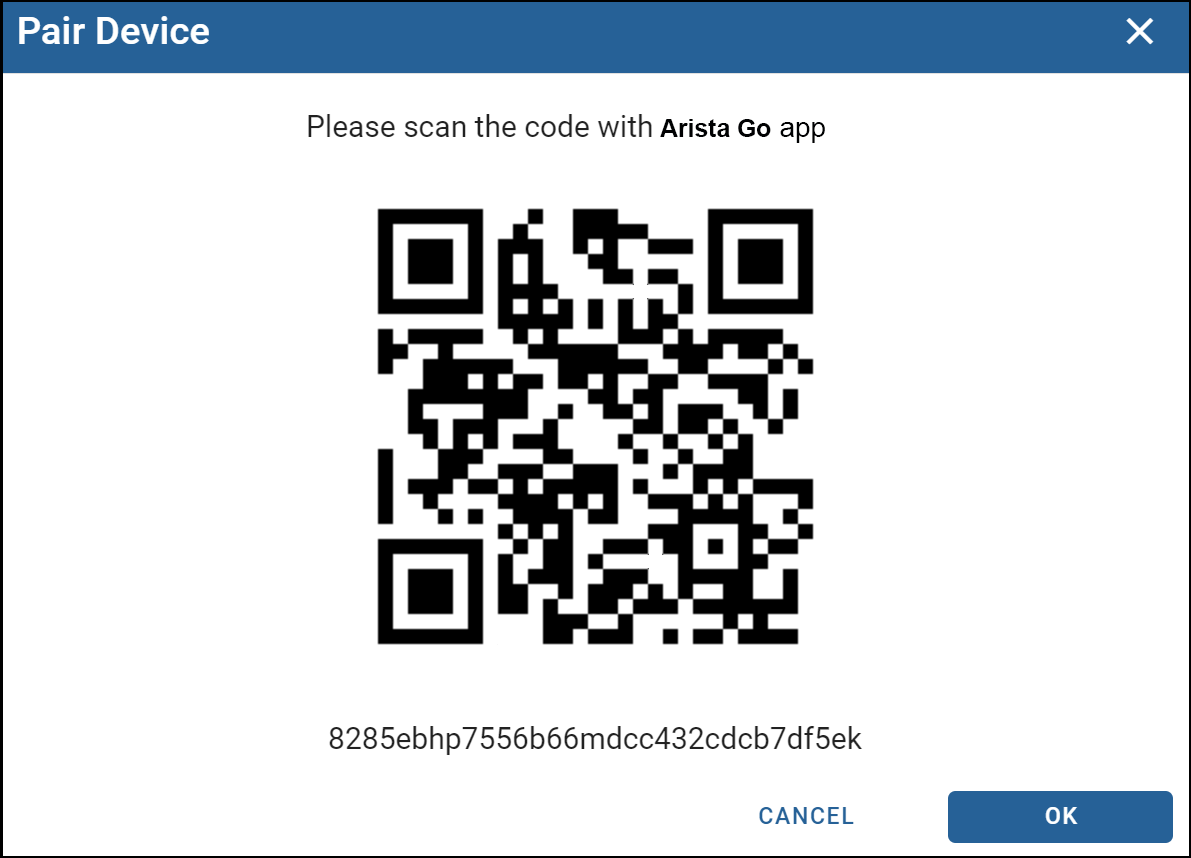
- Direct your phone’s camera at the QR image, or type the QR code below the image if you prefer not to use the camera.
- After your account is paired, you can manage your appliances using the app.
Unpairing your Device
- Open the app and navigate to Settings.
- Click Unpair device.