The configuration guide is no longer being updated. Please refer to the CloudVision Help Center going forward.
Optional SAN IP field in CVP Certificate
ZTP boot can be done without specifying the SAN IP in the certificate’s field. If the
certificate is issued by a public CA without a SAN IP, it will require us to use CVP’s
FQDN to set up a secure connection. Using an IP address you can set up a secure
connection with CVP, because the ZTP app now resolves the DNS name to the correct IP
address. Although the SAN IP field in the certificate is now optional, DNS is still
mandatory.
Creating a certificate without SAN IP
Go to settings and click on certificate Click on +Add, to add the new certificate
Certificate form, asking for details will appear Fill the details without specifying
SAN IPs
From Settings select Certificate.
Click on +Add, to add the new certificate.
Complete the Certificate form, without specifying a SAN IP address.
Click OK at the prompt will confirming that a SAN IP has not been
provided.
Clicking OK on the next prompt stating the existing certificate will be
replaced.
The configuration guide is no longer being updated. Please refer to the CloudVision Help Center going forward.
Rotating Internal Certificate Authority
The streaming agent used by EOS devices and other applications that communicate
with each other in CloudVision uses mutual TLS certificates signed by a local
certificate authority (CA). To prevent the CA from expiring in the future, you should
rotate the CA. Once rotated, by default, the CA becomes valid for a hundred years. This
process re-signs the certificates used by each EOS device's streaming agent and internal
applications that communicate with CloudVision. The streaming agent version on all
devices must be at least 1.26.0 to use this feature.
You get the first notification through an event message around 90 days prior to
the certificate expiry.
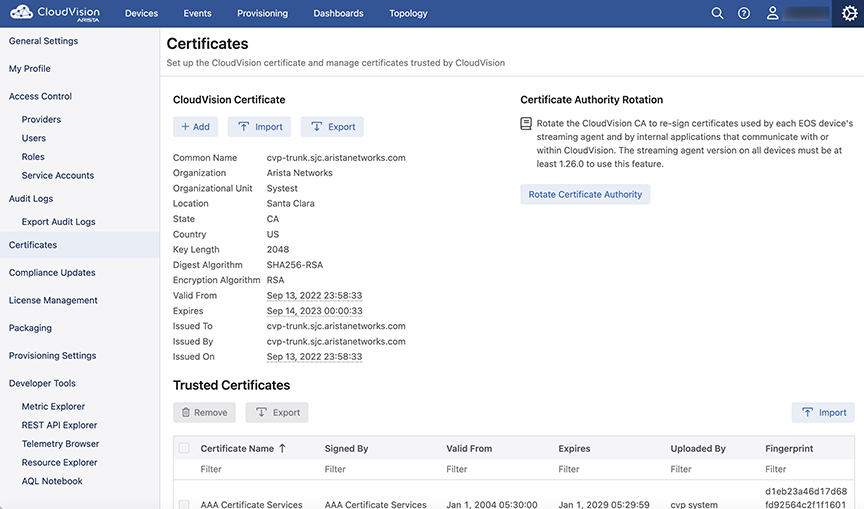
To rotate a certificate, go to Settings (gear icon) >
Certificates on the CloudVision portal. The CA rotation process takes several
minutes, and it is necessary to plan a maintenance window before rotating a CA. See the
images below.
Figure 1. Certificate Authority Rotation page
Click Rotate Certificate Authority.
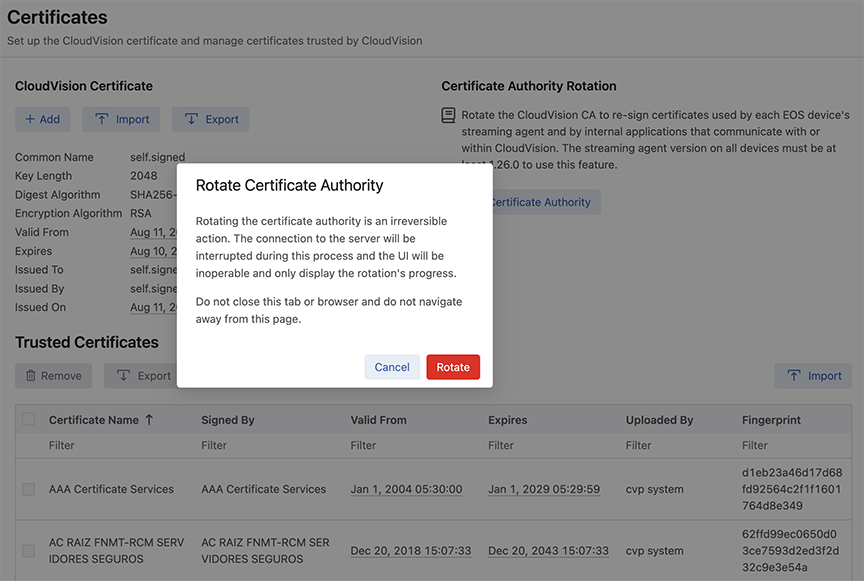
Figure 2. Confirmation Page to Rotate CA
Click Rotate.
Note: During this process, the CloudVision portal becomes
inaccessible, and the page displays only the progress of the rotation. Do not close the
window or the browser, and do not navigate away from the page. The rotation process
takes several minutes (more than 10 minutes). Wait until the rotation process is
completed when the browser tab gets refreshed. See image below.
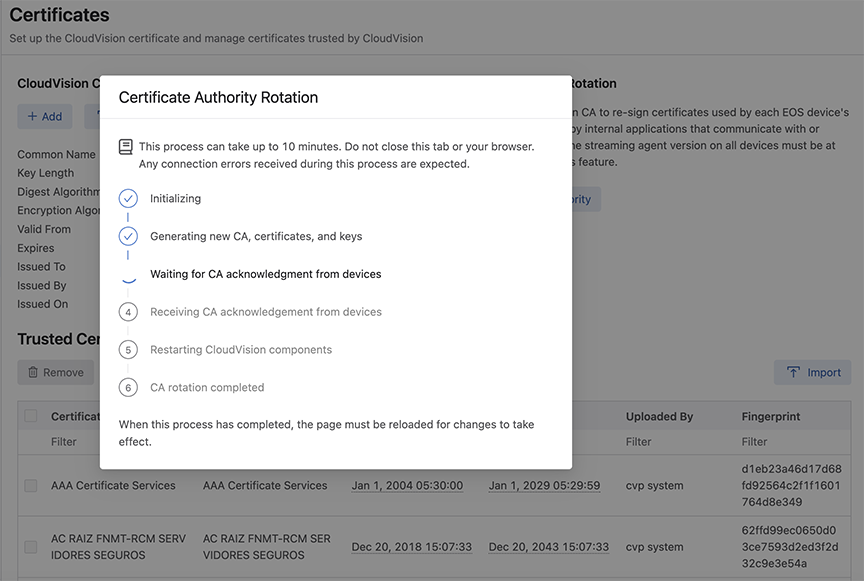
Figure 3. CA Rotation Status Window
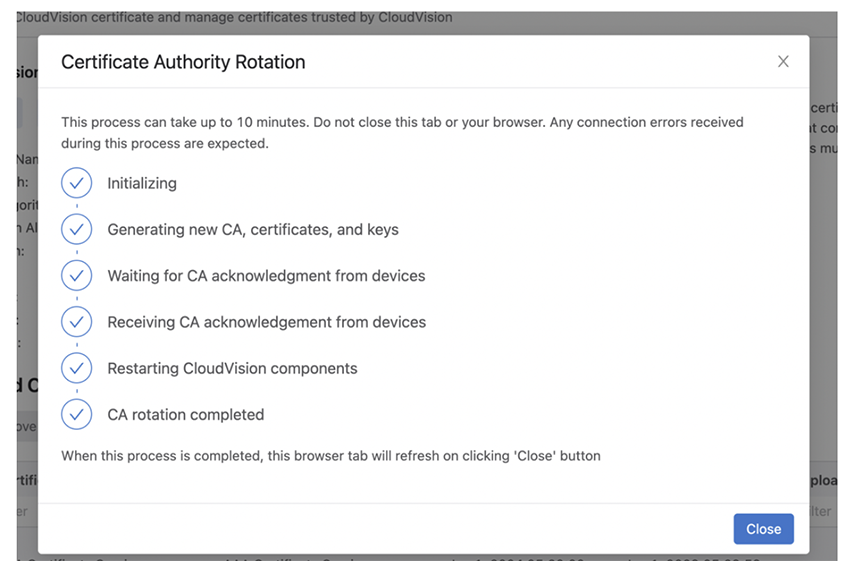
Once the rotation process is complete, click Close at the bottom of the page. Figure 4. CA Rotation Complete Status
The browser tab refreshes, and the CA rotation is completed. The new CA is now
valid for one hundred years and the devices get automatically re-enrolled, and the
devices stop streaming momentarily to CloudVision while NGINX reboots.
If you see any errors during the CA rotation process, you can retry the rotation. If the
rotation process fails after multiple retries, then you must contact Arista Support team
(TAC) for a resolution.
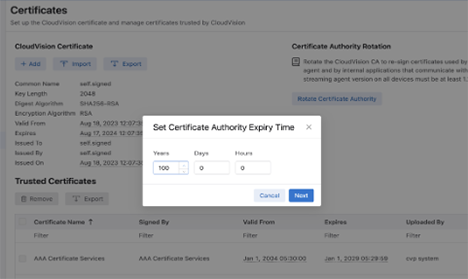
Certificate Authority Expiry
When rotating a certificate authority (CA) you can now define how long the
certificate is valid for.
The default value is 100 years. The minimum value that you should enter here is 24
hours. Any new value you enter will be used as the default value in any future
rotations.
Figure 5. Set Certificate Expiry
Once the rotation is completed, the new Certificate Authority will be valid for the
time you have set.
The configuration guide is no longer being updated. Please refer to the CloudVision Help Center going forward.
External Certificate Authority Configuration
Use an External Certification Authority (ECA) to ensure secure communication
and authentication with CloudVision. By default, Streaming Agent and other applications
communicate with CloudVision using mutual-TLS certificates signed by a local certificate
authority (CA). You now have the option to integrate CloudVision with Venafi, an
external CA, to sign and verify these certificates.
When executing a CA rotation, CloudVision will become inaccessible for up to 10
minutes. Only the progress of the rotation will be displayed. If you close the tab or
browser or navigate away from this screen, you will not be able to monitor the progress
of the configuration.
To rotate an external certificate authority
Navigate to Settings > Certificates.
Note: All devices must be running Streaming Agent
version 1.33.0 or higher to configure an external CA. Version 1.33.0 is
available from EOS version 4.32.1F. View Streaming Agent and EOS
versions for all devices in Devices > Inventory.
Select Internal to change to authentication via CloudVision’s local CA.
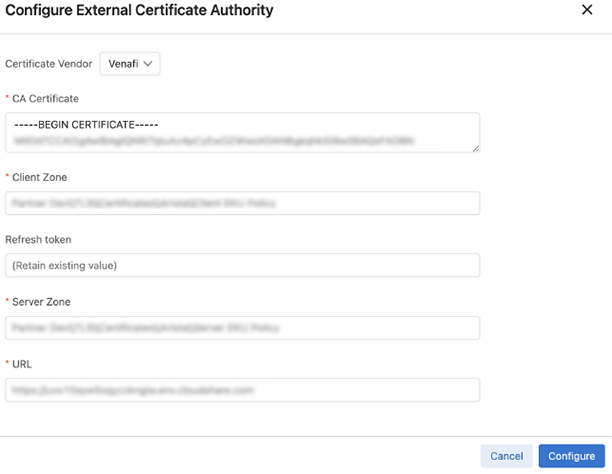
CA Certificate: Paste the certificate generated by the
external CA authority
Client Zone: Retrieve Client Zone details from your Venafi
setup
Refresh Token: Supply an API Key from your Venafi setup
Server Zone: Retrieve Server Zone details from your Venafi
setup
URL: Retrieve the URL from your Venafi setup
Enter the details for the certificate authority.
Figure 2. Certificate Authority Details
Click Configure.
The CA rotation will then begin. You will
see a modal displaying its process.
The browser tab will refresh, and the CA configuration will be complete. Devices will
briefly stop streaming to CloudVision while the web server reboots. They will re-enroll
automatically and streaming will resume.
Note: Devices that were inactive during the transition to external
CA, will have to be re-onboarded.
The configuration guide is no longer being updated. Please refer to the CloudVision Help Center going forward.
System Recovery
System recovery should be used only when the CVP cluster has become unusable and other
steps, such as performing a cvpi watchdog off, cvpi stop all, and then, cvpi
start all, cvpi watchdog on have failed. For example, situations in
which, regardless of restarts, a cvpi status all continues to show
some components as having a status of UNHEALTHY or NOT RUNNING.
There are two ways to completely recover a CVP cluster:
The configuration guide is no longer being updated. Please refer to the CloudVision Help Center going forward.
Accessing Snapshots
Snapshots are stored under the CVP dataset, which you can access any
time for detailed analysis. The Snapshots page displays all valid snapshots
created over time. Each valid snapshot provides the following additional
information:
Name - The name of the template (you assign the name when you
create the template).
Capture Time - The date and time when the snapshot was last
captured.
Last Executed By - The user that captured the snapshot.
It also allows navigating to snapshots of the corresponding snapshot
template.
Figure 1. Snapshots Page
You can navigate to the Snapshots page through one of the following
paths:
Inventory > Device_ID > Snapshots
Network Provisioning > Right-click on the required device
>
Snapshot.
The configuration guide is no longer being updated. Please refer to the CloudVision Help Center going forward.
Accessing Snapshot Configurations
The Snapshot Configuration page displays all snapshot templates created
over time. It further allows you to edit current snapshot configuration,
navigate to the Snapshots page, view the status of each snapshot configuration,
and create a new custom snapshot configuration.
Figure 1. Snapshot Configuration Page
You can navigate to the Snapshot Configuration page through one of the
following paths:
The configuration guide is no longer being updated. Please refer to the CloudVision Help Center going forward.
Defining Custom Snapshot Templates
To ensure that snapshots contain the information you need for
effectively monitoring changes in the state of devices over a certain period of
time, CloudVision allows you to define custom snapshot templates.
A snapshot template defines commands, outputs of which need to be
captured as part of the snapshot using that template. When you create a
snapshot template, associate a list of devices, and set an execution frequency
with it, the snapshot service starts capturing and storing snapshots for that
template based on the scheduled frequency.
Complete the following steps to define a new custom snapshot template:
Navigate to
Inventory >
Device_ID > Snapshots > Snapshot Configuration.
The Snapshot Configuration page displays currently
available snapshot templates.
Click the
(or create a new configuration) hyperlink at the lower right
side of the page.
The Snapshot Configuration page displays the Add Snapshot
Configuration section. Figure 1. Add Snapshot Configuration Section
In the
Name field, type the name of the custom snapshot template.
In the
Commands field, enter the EOS CLI commands to be executed by
the snapshot.
If necessary, click the
Devices drop-down and select required devices.
Under
Interval, Specify the frequency for capturing snapshots in
either minutes, hours, or days.
Click
Save.
The Snapshot Configuration page immediately displays the
latest configuration along with the list of current configurations.
Note: A snapshot configuration that is created without a device is
saved and marked as unscheduled. Snapshot templates with bash commands are
marked as invalid. However, these unscheduled and invalid templates can still
be selected while creating a Change Control to capture pre and post change
control snapshots.
The configuration guide is no longer being updated. Please refer to the CloudVision Help Center going forward.
Viewing Snapshots Differences
You can take snapshots of single devices only. The exact set of
information and presentation of the information in the snapshot is determined
by the snapshot template you choose when capturing the snapshot.
Complete the following steps to view snapshots of a device:
Go to the
Network Provisioning page.
Locate the device for which you want to view snapshots.
Right-click on the device icon, then click
Snapshot.
Figure 1. Initiate Viewing Snapshot
The
All Snapshots page displays all valid snapshots.
Note:
You can also navigate to the
All Snapshots page through
Telemetry > Devices >
Device_ID > Snapshots.
Click on the snapshot template name for viewing the corresponding
snapshot.
Figure 2. All Snapshots Page
Click the date and time breadcrumb for viewing all snapshots of
the corresponding template.
Figure 3. View All Snapshots
Click the required snapshot to view the corresponding output.
Figure 4. Select Snapshot
Click Compare against a previous time for viewing corresponding
snapshot differences.
The page displays corresponding snapshot differences.
Figure 5. Compare Snapshots
Note:Snapshot differences are displayed in color codes to quickly
identify significant changes in the state of the device over time. Click the
Split tab for viewing snapshot differences in different windows.