Account and Organization Management
- Configuring SAML, OAuth2, or OpenID Login in the ETM Dashboard
- ETM Dashboard Organization
- Enabling or Disabling Automatic Sign-on to Appliances
- Enabling and Disabling Dashboard Widgets on the ETM Dashboard
- Switching Themes on the ETM Dashboard
- Two-Factor Authentication on the ETM Dashboard
- General Data Protection Regulation (GDPR)
- Request a Copy of your Data
- Deleting an ETM Dashboard Account
Configuring SAML, OAuth2, or OpenID Login in the ETM Dashboard
Single Sign-On (SSO) provided by an Identity Provider (IdP) is an increasingly common, security-focused practice.
- Centralize control of user login policies and credentials.
- Consolidate user accounts that require access to multiple cloud-based services.
- Enforce stringent password policies and multi-factor authentication
- Simplify user login to reduce password fatigue.
- Reduce the threat of data breaches by moving authentication off-site.
The ETM Dashboard supports login using SAML, OAuth2, or OpenID federated accounts. To select these options, you must have an existing account with an Identity Provider (or IdP) such as Okta, Duo, or OneLogin.
Single Sign-on is configured in .
Who is Affected?
- The account owner.
- Anyone who has been invited to manage the account as a user.
Before you Begin
The Organization Name attribute identifies and initiates this specific SAML or OAuth2 login process; you can think of it as a username. It can include letters, numbers, or punctuation. You can use capital letters when configuring the Organization Name, but it is not case-sensitive at the login point. For example, you could enter "Example Company" as your organization and still log in with "example company."
Your Organization Name must be unique. You will receive an error message if a given name is not available for use.
This Organization Name is specific to this SSO option and does not need to match the name associated with your ETM Dashboard organization.
Configuring SAML Login
Set the Organization Login Type to "SAML."
Provider attributes
The attributes under the Configuration heading inform the ETM Dashboard about connecting to and authenticating against your SAML provider.
The Login URL, Entity Id, and Encryption Certificate fields are required. The Signing Certificate field is only used when the provider gives you a different certificate.
Testing SAML login
The Test SAML button will appear after you have saved your settings. This will validate that the ETM Dashboard can connect to your provider.
Downloading SP Metadata
The Download SP Metadata button will appear after you have saved your settings. The resulting data is uploaded to your Identity Provider to authorize ETM Dashboard to use their SSO login.
Removing SAML
Click the Delete button to remove this configuration. This option can change the SAML connection or switch to a different provider.
To disable this authentication method, set the Organization Login Type to "Disabled" instead.

Configuring OAuth2 / OpenID Login
Set the Organization Login Type to "OAuth2 / OpenID".
Provider Attributes
The attributes under the Configuration heading inform the ETM Dashboard about connecting to and authenticating against your Oauth2 or OpenID provider.
All fields are required.
Sign-in Redirect URI's
Testing OAuth2 or Open ID
The Test OAuth2 button becomes available afteryou save your OAuth2 / OpenID settings. This will validate that the ETM Dashboard can connect to your provider.
Removing OAuth2 / OpenID
Click the Delete button to remove this configuration. You can use this option to change to the OAuth2 / OpenID connection or switch to a different provider.
To disable this authentication method, set the Organization Login Type to "Disabled" instead.

Logging into the ETM Dashboard using Identity Provider SSO
- Go to the ETM Dashboard login page at https://launchpad.edge.arista.com.
- Enter your Organization Name.
- Click Continue.
- You are redirected to your IdP's login page to authenticate.
- You are redirected to your ETM Dashboard account when your login is complete.
ETM Dashboard Organization
Your ETM Dashboard account may be invited to other ETM Dashboard accounts and permitted to manage Edge Threat Management appliances or subscriptions owned by the inviting account. This additional account access is called an Organization.
Enabling or Disabling Automatic Sign-on to Appliances
The ETM Dashboard enables you to remotely connect to the administration GUI of your NG Firewall and Micro Edge deployments. This remote connection uses a secure proxy that does not require exposing any ports on your firewall. By default, this proxy connection authenticates you automatically, so you do not need to provide credentials to access the web administration.
Disabling Automatic Sign-On for Remote Access
Sometimes, you may prefer to authenticate using local firewall user database credentials.
- Log in to ETM Dashboard.
- Go to My Organization.
- Click Settings.
- Uncheck Enable Automatic Login For Remote Access. Click Save to apply the change.

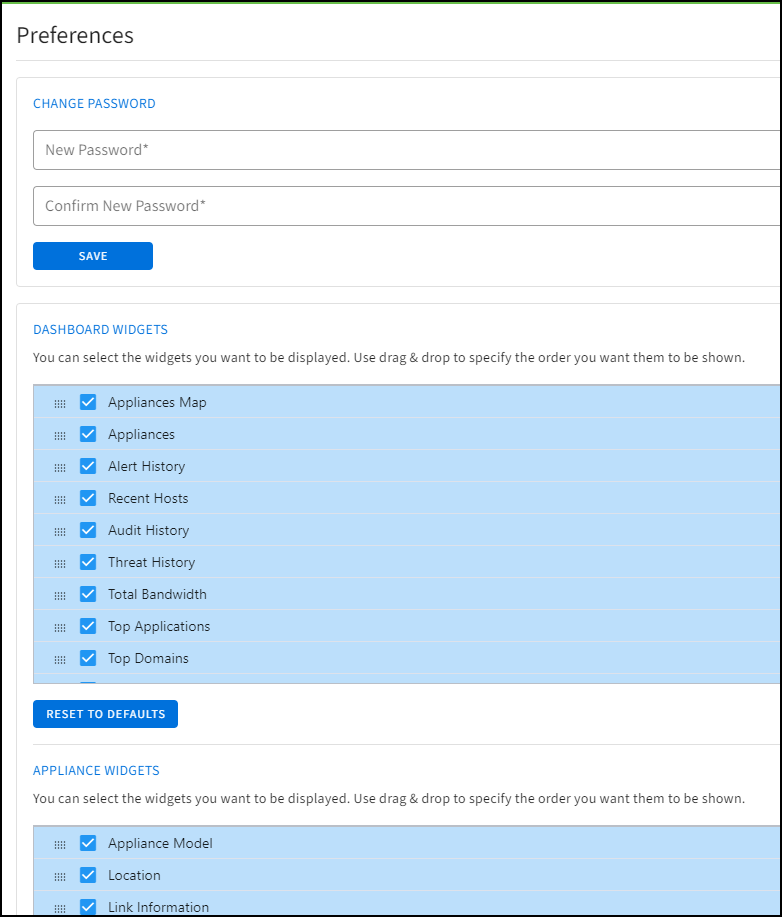
Enabling and Disabling Dashboard Widgets on the ETM Dashboard
The ETM Dashboard gives you a high-level overview of your managed networks and appliances. This information is presented through a variety of small windows called Widgets. Based on your preference, you can modify the default set of Widgets you see on the main Dashboard and Appliances dashboard.
Managing Dashboard Widgets
- Go to My Account.
- Click Preferences.
- In the Dashboard Widgets section, select the Widgets you want to see on the Dashboard.
- Click Save.
Switching Themes on the ETM Dashboard
The ETM Dashboard supports different themes you can select based on your preference. A theme defines the color scheme of the ETM Dashboard, including buttons, grids, headings, and so on.
Switching Themes
- Go to .
- In the Choose Theme settings, select a different theme.
- Click Save.


Two-Factor Authentication on the ETM Dashboard
You can enable two-factor authentication to secure your ETM Dashboard account. If enabled, the system requires the user to enter a one-time-use verification code before logging onto the ETM Dashboard. The code allows you to access your account after you authenticate with your regular username and password.
If enabled, two-factor authentication requires PIN confirmation upon each login. If you frequently connect using the same system and browser, you can opt to "remember me" during PIN verification. This option uses a secure cookie to authenticate your browser after login. The cookie is valid for 30 days.
Enabling Two-Factor Authentication
- On the ETM Dashboard, click My Account in the menu along the left-hand side of the page.
- Click Preferences.
- In the Two-Factor Authentication section, select"Enable Two-Factor Authentication."
- Select your preferred delivery method under the Verification Method. See the following for more information on delivery methods.
- Click Save to apply the change.

Delivery Method Options
ETM Dashboard provides two options to receive your one-time code.
- Email will send the code to the account's primary email address.
- A time-based one-time password (or "TOTP") will send the code to a TOTP application of your choice, such as Google Authenticator.
Pairing a TOTP application with ETM Dashboard
Selecting the Time-based One-Time Password delivery option will reveal the "show QR code" button. Click that button to display the QR code. On your mobile device, open the TOTP authentication app you want to pair with the ETM Dashboard and select its "pair" or "scan" feature. Scan the code on your screen to complete pairing.
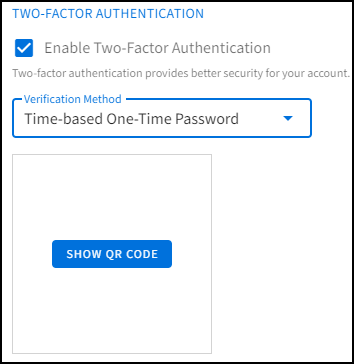
After you have paired an app with the ETM Dashboard, that app is a necessary part of the login procedure. If you uninstall the app or remove the paired account and fail to disable two-factor authentication in the ETM Dashboard, you will lose access to your account. In that instance, contact Support for assistance.
Logging onto the ETM Dashboard

On the Verification Code pop-up, you will have the option to remember the device from which you are logging in. Enable this option to postpone further verification requests for 30 days.
General Data Protection Regulation (GDPR)
We have recently made changes to comply with the EU's General Data Protection Regulation (GDPR). As per the GDPR, the following articles will help guide you through deleting your account and all associated data or requesting a copy of all data.
You can view Arista Edge Threat Management's Privacy Policy here:
Request a Copy of your Data
You can select this process to request a copy of all data stored by your ETM Dashboard account. This excludes data from any NG Firewall or Micro Edge appliances associated with the account, such as settings or Reports data.
Requesting your Data
- Login to the ETM Dashboard.
- Click My Organization in the menu along the left-hand side.
- Select Settings.
- Click the blue Request Copy button at the bottom of the Settings page.

- You should then receive a message acknowledging the request. A copy of the data will be sent to the account owner's email address.
Deleting an ETM Dashboard Account
Follow the process outlined in this article to remove your ETM Dashboard account and all associated data altogether.
Deleting your ETM Dashboard Account
- Login to ETM Dashboard.
- Click My Organization in the menu at the left-hand side of the page.
- Click Settings.
- At the bottom of the Settings page is an option labeled Delete Account.

- Click the red Delete Account button.
- A confirmation dialogue will appear asking that the word DELETE be entered before proceeding.
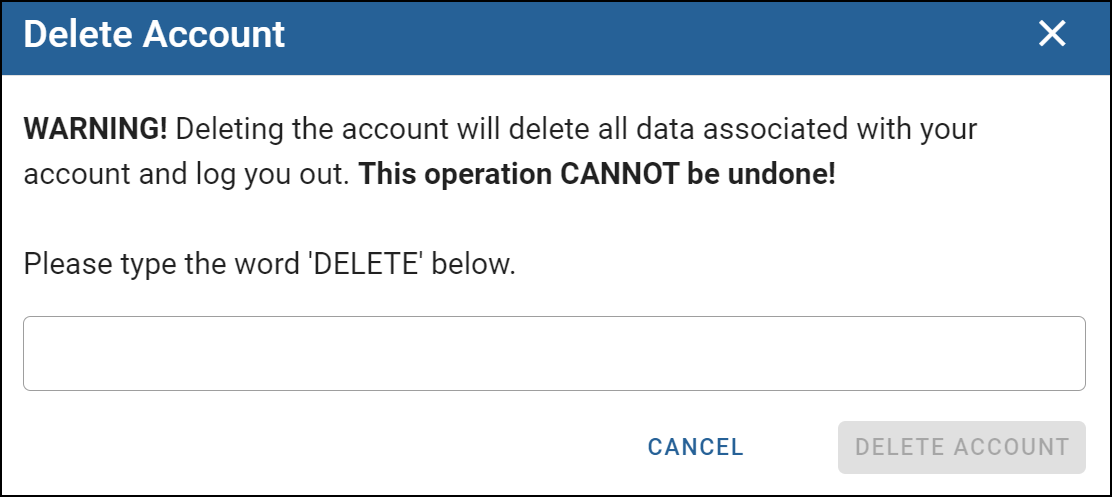
- Click the Delete Account button.
- You will then be logged out of the ETM Dashboard, and your account will no longer exist.