The configuration guide is no longer being updated. Please refer to the CloudVision Help Center going forward.
CloudVision Profiles
Profiles are assigned to user accounts to customize their landing page on CloudVision and
present information relevant to them. You can use built-in profiles or create custom
ones. Profiles are assigned in Users to user accounts.
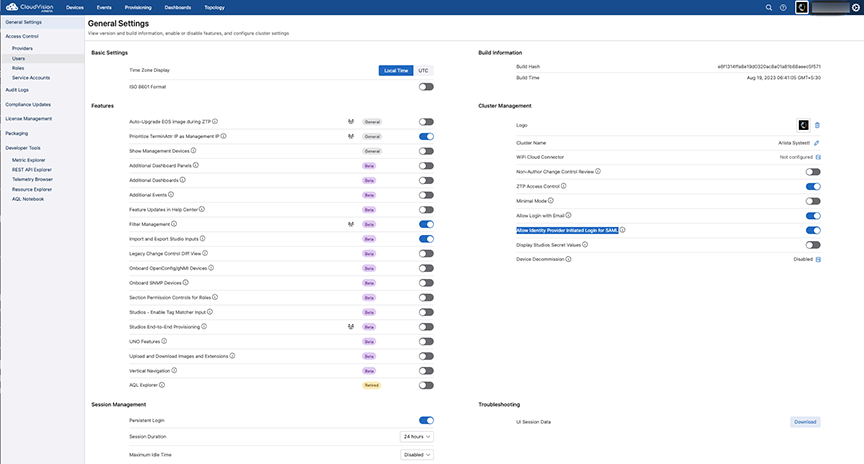
The Profiles section is located under Settings > Profiles.
A table shows information about the configured profiles:
Name: The name of the profile. This is supplied by the user
Description: An optional description of the profile
Users: The number of users that have this profile assigned to
them
Created by: The user who created the profile
Last Edited: The date and time when the profile was last
modified
The three most recently edited or created profiles are highlighted at the top
of the page.
You can filter the table to show all profiles, built-in profiles that come
preconfigured with CloudVision, or custom-made profiles. You can also search the table
for a specific profile.
Figure 1. Profiles Section
Built-In Profiles
There are currently two built-in profiles: Datacenter Monitoring and Campus
Monitoring. You will need to enable the Campus Features toggles in General Settings
to view the Campus Monitoring profile.
You cannot edit built-in profiles.
Campus Monitoring: Set the default landing page to the
Campus Health Overview dashboard.
Datacenter Monitoring: Set the default Landing page to Inventory.
Creating a Profile
You will create a custom profile when you want to apply a specific landing page for
yourself or another user.
Click New Profile.
Figure 2. New Profile
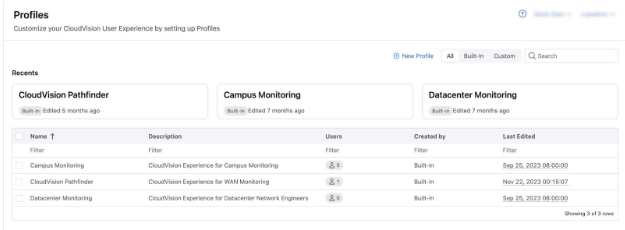
In the Create Profile panel, give your profile a name and optional description,
before selecting a landing page from the dropdown.
Figure 3. Create Profile Panel
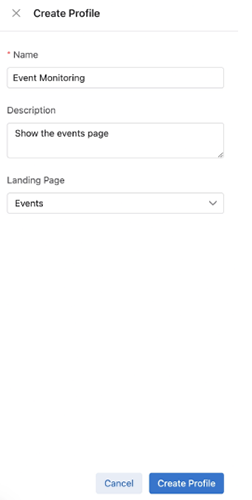
If you select a section of CloudVision that has multiple sub-sections
underneath it, such as Dashboards or Devices, a second dropdown will appear
to specify which your page selection.
Figure 4. Create Profile - Multiple Sub-sections
Click Create Profile to create your profile.
You will see the details
of your new profile in the table. The Recents section above the table will
also be updated to show details of your new profile.
You can now assign your new profile to a user.
Assigning a Profile
You will assign a profile when you want to change the landing page that a user sees upon
login.
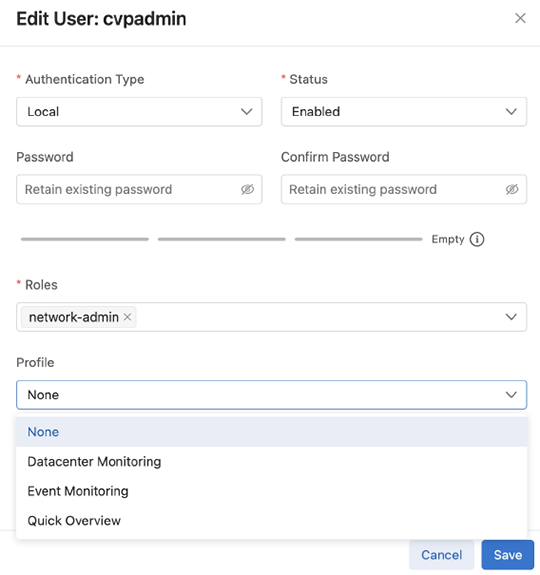
Navigate to Settings > Users.
Select a user you want to assign a profile to from the table.
Select a profile from the Profile dropdown.
Figure 5. Assigning a Profile
Click Save.
The user account will now be assigned the profile and have its landing page
updated.
The configuration guide is no longer being updated. Please refer to the CloudVision Help Center going forward.
Settings and Tools
The Settings and Tools screen configures CVP general settings. Click on the gear icon
at the upper right corner of the CVP application to open the Settings and Tools
screen.
The configuration guide is no longer being updated. Please refer to the CloudVision Help Center going forward.
License Management
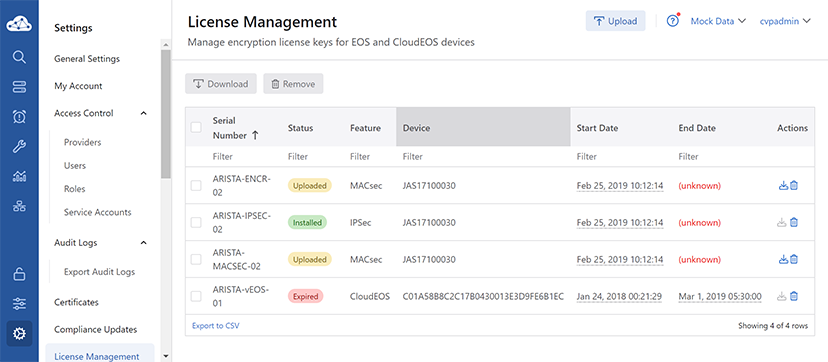
The License Management screen manages license key for EOS and Cloud EOS (formerly
vEOS) devices. See the figure below.Figure 1. License Management Screen
CVP performs the following functions to monitor license keys:
Generates events for monitoring and responding to license expiration
Issues warnings when subscription license keys might expire within either 30 days or
90 days
Triggers an error event when a license key expiration is less than a week
Generates a critical event for an expired license key
Note: You can customize the rules for license key expiring events.
You can perform the following functions through the License Management screen:
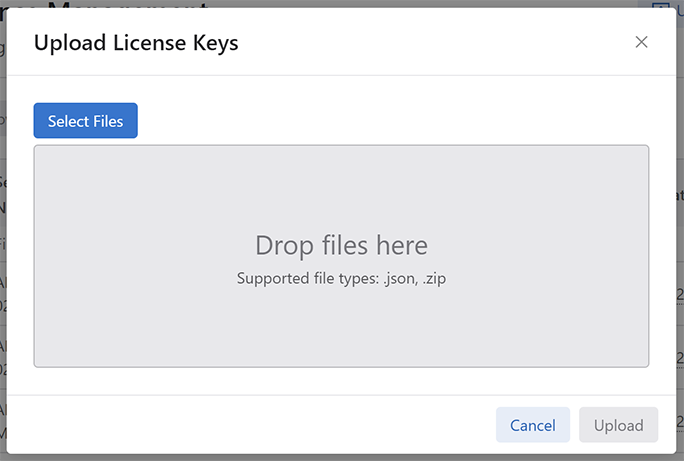
Navigate and select the preferred file on your local system through the
Open window.
On the Upload Licenses dialog box, click
Upload.
CVP now lists the uploaded license key file under the licenses
table.
Note: CVP automatically installs the license key
once it is uploaded. Alternatively, click the install icon next to the
uploaded license key for installing the specific license
key.
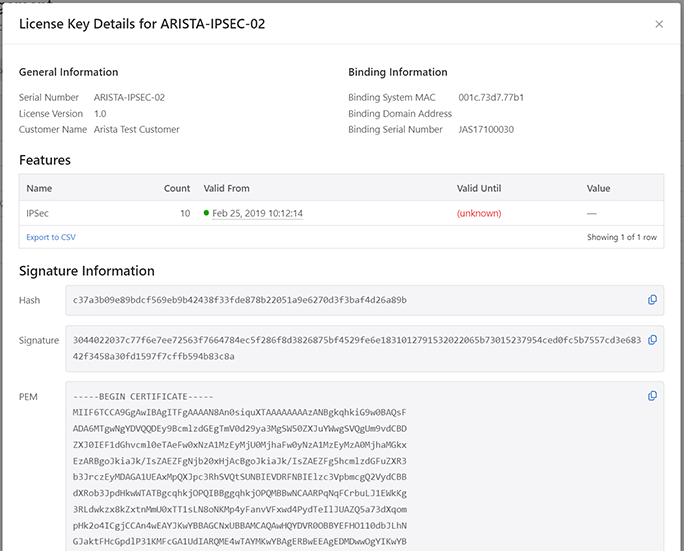
Viewing License Key Details
Click on the required license key for viewing the specific license key details. See
the figure below.Figure 3. License Key Details Screen
The License Details dialog box displays the following information:
General Information - It includes the following license key issue information:
Serial Number - The license key number, generally used
for tracking the order associated with the license key
License Version - License version is available when the
license key underwent changes due to various processing, such as a
change in public keys or the hash
Customer Name - The name of the license key owner
Binding Information - The license key can be of two types
Site-Wide License - The license key is bound to
multiple devices
Device Specific - The license key is bound to a device
with the specified MAC address
Features - Lists the count of specified features associated with the
license key, its validity, and its value
Signature Information - The license key signature includes its hash,
signature, and PEM certificate
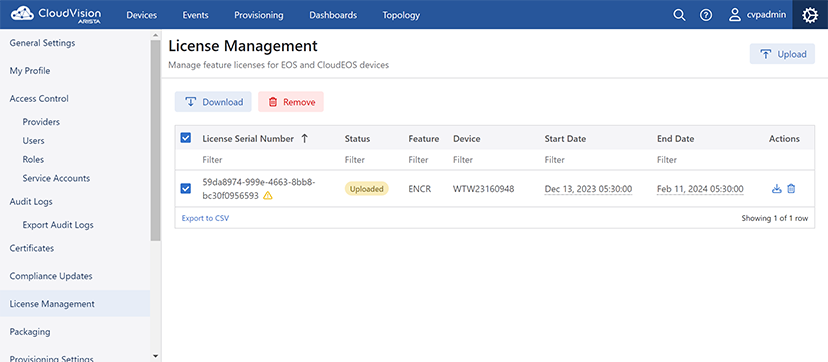
Downloading and Deleting License Keys
Perform the following steps for downloading and deleting multiple license key:
Select all unwanted license keys listed under the licenses table.
Figure 4. License Management - Remove Option
Note: Click Download for
downloading selected license keys to your local system.
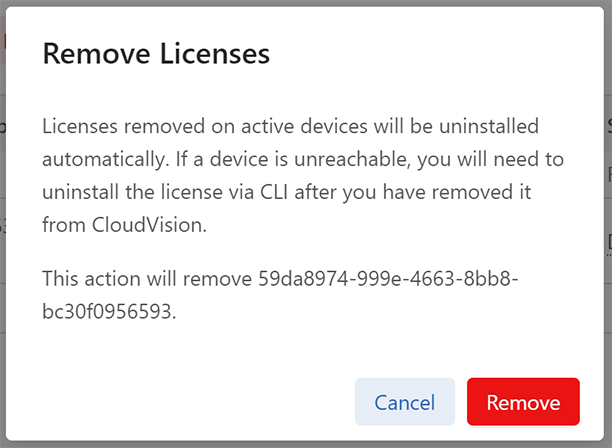
Click Remove.
CVP opens the Remove Licenses dialog box. See the
figure below.Figure 5. Remove Licenses Dialog Box
Click Remove.
CVP uninstalls the selected license keys and erases them from the
licenses table.
Note: Alternatively, you can click on the
trash bin icon next to the unwanted license key for uninstalling the
specific license key.
The configuration guide is no longer being updated. Please refer to the CloudVision Help Center going forward.
Concurrent Login Session Restriction
CloudVision allows users to maintain multiple login sessions simultaneously. However, to
prevent account sharing, administrators can limit the number of active login sessions a
user can have and terminate open sessions if a user has reached their limit and are
unable to log in. You can configure the maximum number of concurrent login sessions that
users can have in General Settings > Session Management.
Note: When configuring Maximum Sessions per User, make sure
Persistent Login is enabled under General Settings > Session
Management.Failing to do so may cause unexpected behavior.
Configuring Concurrent Login Session Restrictions
Note: Only users with Read and Write access in Account and
Session Management can configure login limits.
To verify that you have the authority to configure the login limit, go to
Settings > Roles. Users with Read and Write access in Account
and Session Management can configure login limits.
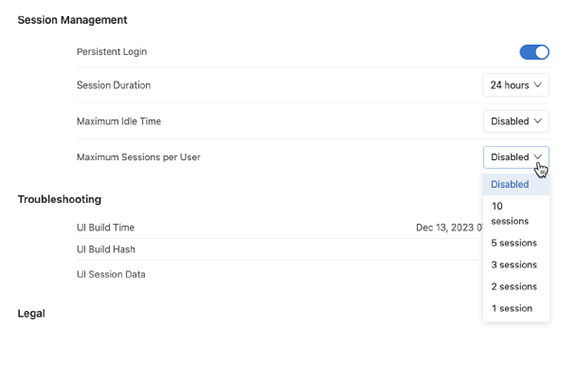
Navigate to General Settings > Session Management and select the
maximum number of simultaneous sessions that users can have.
Figure 1. Session Management - Selecting Maximum Number of Sessions
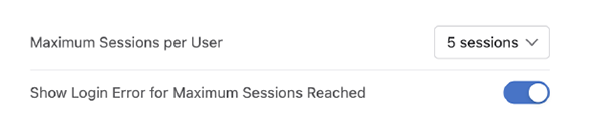
Determine whether or not to show users a relevant login error when their maximum
sessions are reached by enabling or disabling the toggle.
Note: It is recommended to show the login error for
maximum sessions reached, which is enabled by default.
Figure 2. Enabling Maximum Sessions Error
If the toggle is enabled, users with more than the allowed number of open
sessions will be notified that their maximum number of sessions has been reached. If the
toggle is disabled, they will instead be shown a generic authentication failed
message.
Terminating Open Sessions
If a user is locked out of CloudVision or has exceeded the allowed number of
login sessions and is unable to delete one or more sessions, an administrator can clear
all open sessions. This will enable the user to log in.
An administrator, in this case, is anyone with Read and Write access to
Account and Session Management and Read and Write access to User Session
Deletion.
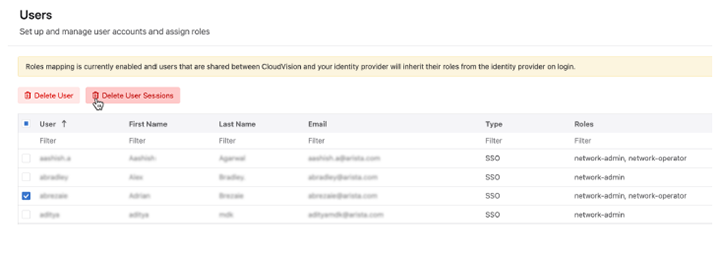
To end all open sessions for a user,
Navigate to Settings > Users.
Enable the checkbox next to the username of any user whose open sessions require
termination.
Click Delete User Sessions.
Figure 3. Terminiating User Sessions
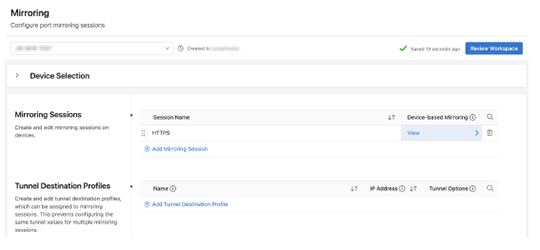
Configuring a Session
A mirroring session is the configuration created for one or more device
interfaces. You will select the devices and interfaces with user tags. This enables you
to select devices, for example, all leaf devices in a particular data center or campus
pod. You will then select whether to send the mirrored configuration over a SPAN
interface or GRE tunnel. Depending on the platform, multiple SPAN interfaces may be
supported.
Note: If you configure a mirroring session that exceeds the CPU
ability of a device, you will be warned when reviewing the workspace.
Configuring a New Session
Select Add Mirroring Session, give your session a name, and select
View.
Figure 4. Add Mirroring Session
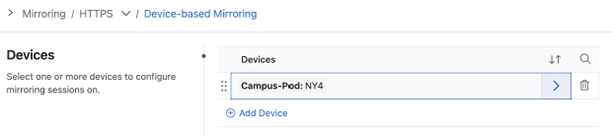
Select Add Device and enter a tag query.
Figure 5. Add Device
Select Add Source Interface, enter a tag query, and select a
direction.
Select either RX, TX, or both to mirror the selected
traffic direction from the interface.
Figure 6. Add Source Interface
For a destination select either SPAN Interfaces or Tunnel.
Either a SPAN interface or a tunnel can be configured but not
both. If you want to change from one to the other, you will need to
delete the existing configuration.
Figure 7. Select SPAN Interfaces or Tunnel
For a SPAN interface, select the interface using a tag query.
Figure 8. SPAN Interface,
Once you submit the workspace and execute the associated change control, the devices
will begin mirroring traffic to the remote host.
The configuration guide is no longer being updated. Please refer to the CloudVision Help Center going forward.
Device Management
CloudVision Portal (CVP) provides a powerful, event-driven,
streaming analytics platform that enables you to monitor the state of all
devices currently managed by CVP.
By configuring devices to stream device-state data to CVP, you can
manage all of the devices in your current inventory of devices to gain valuable
insights into the state of your devices, including real-time updates about
changes in device state.
The device inventory is comprised of all devices that you have imported
into CVP. After a device is imported into CVP, it can be configured and
monitored using the various CVP modules.
The configuration guide is no longer being updated. Please refer to the CloudVision Help Center going forward.
Requirements
Make sure you review the software and hardware requirements for
deploying and using the Telemetry platform before you begin deploying the
platform.
System Requirements
Note: If you upgraded from a previous version of CVP, you must verify that all of the CVP node VMs
on which you want to enable Telemetry have the required resources to use Telemetry. See
Resource Checks for details on how to check CVP node VM resources and perform
any modifications needed to increase the current CVP node VM resources.
Verify the clocks on the switches are synchronized to an NTP server.
If a clock on a device is not synched to an NTP server on the switches and the clock
difference between CVP and the device is larger than 300 seconds, onboarding will
fail.
Streaming latency which must be less than 500ms as per our system requirements.
Streaming latency is the time difference between the TerminAttr agent receiving the state
change on a device and the notification being processed by the CloudVision Analytics
backend after storage in NetDB.Without NTP the relative streaming latency between
devices streaming to CVP can exceed limits and state changes happening on different
switches may appear to be incorrectly ordered within CVP.For more information refer to:
https://www.arista.com/en/cg-cv/cv-system-requirements
EOS devices need to be able to connect to arista.io on port 443 (apiserver.arista.io:443).
Note: CloudVision as-a-Service only needs port 443 to be opened to initiate a secure
connection to an EOS device.
To verify proper connectivity to apiserver.arista.io:443 use the following commands:
Verify proper DNS resolution.
switch#bash nslookup apiserver.arista.io
Note: If this is unsuccessful please check your DNS server configuration.If no
DNS servers are available, add theip name-server
configuration as follows:
switch(config)# ip name-server 8.8.8.8
Verify connectivity to CloudVision Service using the curl
command:
switch# bash
[admin@switch]$ curl apiserver.arista.io:443
curl: (52) Empty reply from server
If
multiple VRFs are configured, first change the VRF
context:
switch# bash
[admin@switch]$ sudo ip netns exec ns-MGMT curl apiserver.arista.io:443
Authentication Requirements
CloudVision as-a-Service supports OAuth 2.0 for authorization. OAuth is one of the most
common methods used to pass authorization from a single sign-on (SSO) service to another
cloud application. While there are many OAuth providers in the market today, CloudVision
as-a-Service supports Google OAuth, OneLogin, Okta & Microsoft Azure AD.
Note that CloudVision as-a-Service is transparent to 3rd party MFA (Multi-Factor
Authentication) Providers. As long as the customer is using one of the above listed
OAuth Providers for identity management, CloudVision Service should be able to authorize
against that OAuth provider.
Only admin email addresses are required when using Google OAuth or Azure AD as a
provider.Select the Sign in with Google or Sign in with Microsoft link
at: https://www.arista.io/cv
Not using Google OAuth or Microsoft Azure AD
If you are using Okta, OneLogin, or another OAuth Provider, the following information is
required to onboard CloudVision as-a-Service:
OAuth Endpoint
ClientID
ClientSecret
Refer to the respective OAuth Provider documentation for information about obtaining this
information.
Your OneLogin or Okta administrator will use this information to add CloudVision to their
authorized applications and adjust user permissions to allow access to the service. If
you experience any OAuth errors, open an Arista TAC support request for assistance.
Provide a the full URL and a screen capture of the output,
Note: Email IDs are case sensitive when used for CloudVision Service login. If the case
is This email address is being protected from spambots. You need JavaScript enabled to view it., it will need to match exactly to the CloudVision Service
login.
Once the CloudVision Service account is set up, an Invitation URL will be provided by
Arista to login to the CloudVision Service.
The configuration guide is no longer being updated. Please refer to the CloudVision Help Center going forward.
Onboarding Procedures
This section contains:
Onboarding Authentication Providers
Onboarding Devices: Token-Based Authentication
Subscribing to CloudVision as-a-Service updates
Onboarding Authentication Providers
Once the CloudVision as-a-Service instance is set up, use the following procedure to
add a preferred authentication provider.
To add a preferred authentication provider:
Navigate to Settings using the gear icon.Verify under the
Features section OAuth Providers is toggled on.
Figure 1. OAuth Providers
Navigate to Access Control and then Providers. To add a new
authentication provider, click the 'Add Provider' button.
Figure 2. Add Provider
Select a provider that your organization uses.
Figure 3. Shared Provider
Note that currently Google and Microsoft are supported as a Shared Providers.
Shared Providers use an Arista-provided set of credentials so no other
information is required from the customer for the onboarding.
Other providers are currently supported as non-shared providers. Additional
required form fields will appear upon selecting these providers. These
fields will need to be filled out with credentials specific to your account
with that provider.
Figure 4. Non-shared Provider
Saving the provider will send a registration request to the CloudVision Service
backend along with the related information.
Once the authentication provider is set up, make sure to add the admin email
address and verify the login process before the Invitation URL expires. To add a
user account navigate to Users and then the Add Userscreen.
Figure 5. Add User
Onboarding Devices: Token-Based Authentication
To onboard the devices using token-based authentication.
To onboard the devices navigate to Devices and then Inventory
and thenAdd Devicesand thenOnboard Devices.
Figure 6. Onboarding Devices
Details on how to create a token, and using that token to onboard the devices
are listed under the Onboard Devices. Please follow the directions to
create a token and onboard your devices to CloudVision Service.
Note: You can use the same token to onboard multiple devices. CloudVision
Service will use the device serial number to identify a device.
Figure 7. Onboarding Devices
Once you successfully onboard the devices you should be able to see them under
the Devices tab.
Figure 8. Device Inventory Screen
Click on the wrench icon () to provision the device. This will take you to
the device-specific page. Selectthe Device Overview tab and then select
Provision Device to provision the device in CloudVision Service.
Figure 9. Device Overview
Note: Prior to Provision Device make sure the user account exists in the
EOS device. For example:
Assuming This email address is being protected from spambots. You need JavaScript enabled to view it. is the email address used for OAuth
authentication you need to have john.smith as a user (for Arista Demo you
will need to use
This email address is being protected from spambots. You need JavaScript enabled to view it.):
sw(config)#username john.smith privilege 15 <nopassword/secret>
If you have TACACS+ configured for authentication, in order for CloudVision
as-a-Service to properly provision the device, the exact user account should
already exist in the TACACS+ Server.
If you have a Radius server for EOS authentication, you need to add the
--disableaaa argument into the TerminaAttr config.
For additional information on migrating an EOS device with a TACACS+/Radius
authentication to the CloudVision Service, please refer to Authentication Requirements.
Subscribing to CloudVision as-a-Service updates
You can monitor CloudVision Service live status through https://status.arista.io. You can also subscribe to CloudVision Service notification via email/text
using Subscribe to CloudVision.
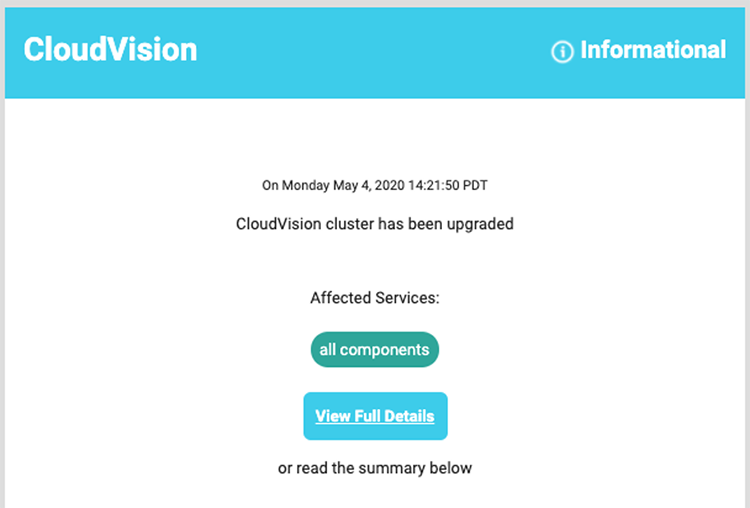
Following are informational and disruption notification examples you would get after
subscribing to CloudVision Service updates: Figure 10. Informational Notification
Bearer Token Login
Use bearer tokens to provide custom applications or third-party applications
login access to CloudVision. This will allow the application to make configuration
changes to EOS devices. Bearer token login can be used with identity providers that
issue bearer tokens and have an introspection endpoint.
Note: Okta and PingIdentity have been tested for use with
CloudVision.
Login via bearer token involves communication between the application, the
identity provider, and CloudVision.
To allow an application to log in via bearer token, ensure that both the
Roles Mapping for Providers and the Allow Bearer Token Login toggles
are enabled under Cluster Management in General Settings.
Make sure that the identity provider has been properly set up in
Providers.
Request a bearer token from the identity provider for the application.
In generating the bearer token, you willneed to make sure that the
user exists in CloudVision and that the token has the required fields for
the relevant role, username, and optionally email address. Depending on the
application, this may require you to log in to the identity provider, create
a bearer token, and then program the token in the application.
Alternatively, you may be able to log in to the application and
request a bearer token from the identity provider via script that is then
returned directly to the application.
Once the application has the bearer token, you willprovide it with the login URL
as a bearer header in the request:
https://<cv-domain>/api/v1/oauth/bearer?org=<org>&provider=<provider>
The URL includes the following components, which must match
the details in CloudVision for the bearer token to be verified and the
access token returned to the application:
<CV-domain>: Enter the domain of your CloudVision
cluster
<Org>: Enter Default
<Provider>: Enter the name of the provider in
CloudVision that issued the bearer token
The application then makes an API call to CloudVision using
the access token to complete the login process.
Note: Bearer tokens generated for CloudVision logins are single
use. Once used, subsequent logins will require you to generate new bearer tokens
from the provider and to retrieve new access tokens from CloudVision.
The configuration guide is no longer being updated. Please refer to the CloudVision Help Center going forward.
AAA Providers
Authentication, authorization, and accounting (AAA) providers create and log in to
CloudVision through any provider. The OAuth and SAMLproviders are pre-configured buts
require additional information to create the provider.
The following sections describe procedures to configure AAA providers:
To create the OAuth or SAML provider, you must be registered with and have
access to the Service Provider (SP) credentials.
Perform the following steps to create and edit SAML Providers:
Click on the gear icon.
Figure 1. General Settings Screen
On the General Settings page, under Features, enable SAML Providers
(Beta) using the toggle button.
Setting up OAuth and SAML Providers in CloudVision
You can setup an OAuth or SAML provider in CloudVision through the Providers
screen. To open the Providers screen, click on the gear icon and navigate to
Access Control > Providers. This screen lists current registered
OAuth and SAML providers in corresponding tables and provides the following
functionalities:
Note: The Shared Provider column lists the providers where Arista has a special
account for CloudVision-as-a-Service (CVaaS).
Adding OAuth Providers
Pre-requisites:
Shared providers does not require the additional information like endpoint,
client ID, and client secret. This functionality is not supported on-prem or on
the custom providers.
The link at the bottom of the Add OAuth Providers window explains how the
selected provider uses OAuth and where you can find the information required by
the form.
You can use the Custom OAuth option if your provider is not listed under
the Provider drop-down menu.
Perform the following steps to add an OAuth
provider:
Click the + Add OAuth Provider tab.
The system opens the Add OAuth Provider screen.Figure 2. Add OAuth Provider Screen
Select the required OAuth provider from the Provider drop-down
menu.
Figure 3. Add OAuth Provider Screen to Configure a Provider
In the Endpoint field, type the provider URL where the Client ID and
Client Secret are used to authorize the client.
In the Client ID field, type the unique public identifier the provider
assigns to the client at the time of registration.
In the Client Secret field, type the unique private identifier the
provider assigns to the client at the time of registration.
Click Add.
The system registers the new OAuth provider and lists it in the OAuth
providers table.
Adding SAML Providers
Pre-requisites:
The link at the bottom of the Add SAML Providers window explains how the
selected provider uses SAML and where you can find the information required by
the form. The only provider that does not have this information is
Launchpad.
You can use the Custom SAML option if your provider is not listed under
the Provider drop-down menu.
Perform the following steps to add an SAML
provider:
Click the + Add SAML Provider tab.
The system opens the Add SAML Provider window.Figure 4. Add SAML Provider Screen
Select the required SAML provider from the Provider drop-down
menu.
Figure 5. Add SAML Provider Screen to Configure a Provider
In the Identity Provider Issuer field, type the Issuer or Entity
ID.
Note: An Issuer or Entity ID is a URL that uniquely identifies a SAML identity
provider.
In the Identity Provider Metadata URL field, type the URL to fetch
identity provider metadata.
In the Email Attribute Name field, type the attribute name for the email
ID in SAML.
In the Authorization Request Binding field, select the protocol binding
used for the SAML authentication request to the identity provider.
Click Add.
The system registers the new SAML provider and lists it in the SAML
providers table.
Removing OAuth Providers
Perform the following steps to remove an OAuth
provider:
On the Providers screen, under OAuth Providers, select the
redundant provider from the OAuth provider table.
Figure 6. Removing OAuth Provider(s)
Click the Remove OAuth Provider button.
The system opens the Confirm screen.Figure 7. Remove OAuth Provider(s) Confirm Screen
Click Remove to confirm the removal.
The system permanently removes the OAuth provider.
Removing SAML Providers
Perform the following steps to remove an SAML
provider:
On the Providers screen, under SAML Providers, select the
redundant provider from the SAML provider table.
Figure 8. Removing SAML Provider(s)
Click the Remove SAML Provider button.
The system opens the Confirm screen.Figure 9. Remove SAML Provider(s) Confirm Screen
Click Remove to confirm the removal.
The system permanently removes the SAML provider.
Setting up CloudVision with Identity Provider
You must setup CloudVision with your Identity Provider.
Starting with the 2023.2.0 release, you can login to CloudVision through an
Identity Provider (IDP) instead of directly through the CloudVision application. When
you log in to the IDP and your identity is verified, then, that verification process is
used to access the CloudVision portal.
Note: This feature is available only for SAML providers and is
disabled by default. When enabled, all CloudVision users of your organization can login
to CloudVision through their SAML IDP.
Enabling SAML IDP Login
The SAML IDP initiaited login can be enabled in CloudVision portal by toggling
(enabling) the Allow Identity Provider Initiated Login for SAML on General
Settings > Cluster Management page as in the image below: Figure 10. General Settings - SAML IDP Login Enable
Setting SAML IDP Login
For SAML IDP initiated login to function with CloudVision, you should define a
default relay state value while setting up the SAML provider in your IDP.
It is expected that your IDP should have an optional field to configure the default
relay state.
For example, while configuring IDP, enter the details in the Relay
State (Optional) field in the following format:
<ProviderID>:<OrgName>:<NextURL>, where:
ProviderID: is the provider identifier that has been set up on CloudVision.
Append “saml” to the name of the provider as below:
Okta: Use oktasaml as the ProviderID
OneLogin: Use oneloginsaml as the ProviderID
Microsoft: Use microsoftsaml as the ProviderID
Launchpad: Use launchpadsaml as the ProviderID
Custom SAML Provider: Use the ProviderID entered while setting up
CloudVision
OrgName: For On-prem users, the organization name is always the default
value. This is the value that you have entered as your organization name. You
can overwrite this value with a custom value later.For CVaaS users, this is
the name of the organization entered at login time.
NextURL: This is the URL that gets redirected to after logging in. This can be
the Entity ID on the IDP followed by
/settings/aaa-providers. This value must be base 64
RawURL encoded.
For example, if the URL is https://www.cvp.arista.io the base 64 RawURL
encoding is,
aHR0cHM6Ly93d3cuY3ZwLmFyaXN0YS5pby9zZXR0aW5ncy9hYWEtcHJvdmlkZXJz and this
encoded value gets included in the Relay State field. You can
leave the URL empty, in which case you are redirected to a default URL, which is the
Entity ID followed by /cv.
For Example, if a user from the organization, Foo is setting up a Microsoft Provider
and wants to be redirected to
https://www.cloudvision.domain/settings/aaa-providers, then the
Relay State should be,
microsoftsaml:Foo:aHR0cHM6Ly93d3cuY3ZwLmFyaXN0YS5pby9zZXR0aW5ncy9hYWEtcHJvdmlkZXJz.
You can also enter the Relay State without the NextURL details as
microsoftsaml:Foo:, where you will be redirected to https://<your
FQDN>/cv, where <your FQDN> is the DNS name you configured for the
cluster.
Logging in with a Provider
You can use your registered providers on the CloudVision login screen to log in
to cloud and on-premise CloudVision deployments. Click on the provider that has been
created to log in through that provider.
Note: The login screen of the CloudVision with Cloud Deployments displays all supported
providers regardless of which ones were created. Whereas, the login screen of the
CloudVision with Cloud Deployments only displays providers that have been created.
Adding Launchpad as a Provider
You can add a launchpad using one of the following methods as per your requirement:
This section applies to non-CV-CUE customers who want to use launchpad as an identity
provider.
To add launchpad as a shared provider for CVaas deployments, request the list of
users to be created in launchpad by emailing to wifi-cloudops-tickets@
Note:
For cv-dev and cv-play, use the following information to configure Launchpad
in Cloudvision:
Perform the following steps to add a launchpad for on-premise deployments:
Log into the tenant/cluster and get the SAML metadata from the desired cluster
by going to the CLUSTER_URL/api/v1/saml_sp_metadata
URL.
Note:
Email the metadata obtained in Step 1 to wifi-cloudops-tickets@
requesting to create the first user account in Launchpad and to get Launchpad
configured with the SAML metadata to trust this CloudVision cluster.
Note: Other accounts for this customer/org can be created by the first account
created for this org by the cloudops team.
Get the IdentityProvider Issuer URL, Identity Provider Metadata URL and the
Email attribute name from Launchpad.
Adding a Launchpad for CVaaS and On-Premise Deployments
Perform the following steps to add a launchpad for CVaaS and on-premise
deployments:
Log in to the CVP.
Click on the gear icon.
On the General Settings screen, under Features, enable SAML Providers
(Beta).
Navigate to Access Control > Providers and click the + Add
SAML Provider button.
Select Launchpad (SAML) from the Provider drop-down menu.
Figure 11. Add SAML Provider Screen to Configure Launchpad
In the Identity Provider Issuer field, type the Issuer or Entity
ID.
Note: An Issuer or Entity ID is a URL that uniquely identifies a SAML identity
provider.
In the Identity Provider Metadata URL field, type the URL to fetch
identity provider metadata.
In the Email Attribute Name field, type the attribute name for the email
ID in SAML.
In the Authorization Request Binding field, select the protocol binding
used for the SAML authentication request to the identity provider.
Click Add.
Under Access Control in the left pane, click Users.
The system opens the Users screen.Figure 12. Users Screen
On the Users screen, click + Add User.
The system opens the Add User screen.Figure 13. Add User Screen
Provide the required information in corresponding fields.
Note:
CloudVision usernames and EOS switch usernames must match for
CloudVision to manage configuration and images on the switches.
Type the email address which you used to sign up with Launchpad in
the Email Address field.


.png)


%20Confirm%20Screen.png)