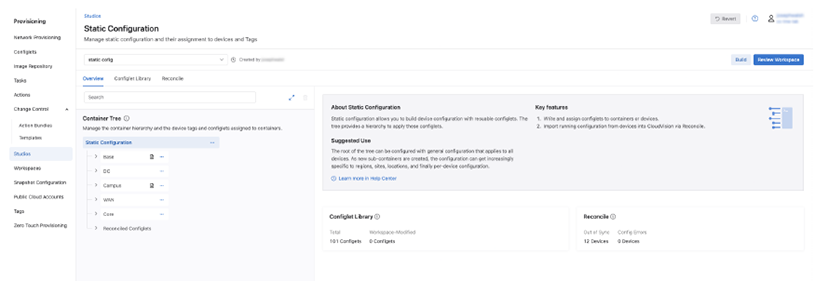
Static Configuration Studio
The Static Configuration Studio is used to manage static configuration for devices, provide configuration not created by any other studio, and reconcile differences between a CloudVision designed configuration and the running configuration on a device. Devices are assigned to containers using tags that can identify one or more devices by hostname, role, or location in the network. Each container has configlets of EOS configuration, which are pushed to the EOS devices.
A configlet contains EOS commands that are written by a user. Within a workspace, configlets are assigned to devices in the studio. Once configlets are assigned to devices, the workspace is submitted, and a change control operation is created. When that operation has been reviewed and approved, the configlets are pushed to the running configuration of each assigned device.
Reconciling a device brings the designed config on CloudVision into sync with the running config on the device. Configuration can be out of sync if a device is, for instance, configured via CLI and any designed config in a workspace on CloudVision will not include the update to the device’s running configuration (running config).
Containers in the Static Configuration Studio
A container is assigned configlets. Each container is also assigned a device tag, which associates the container with all devices possessing that tag. When the change control associated with the workspace changes in this studio is executed, the configuration is pushed to devices.
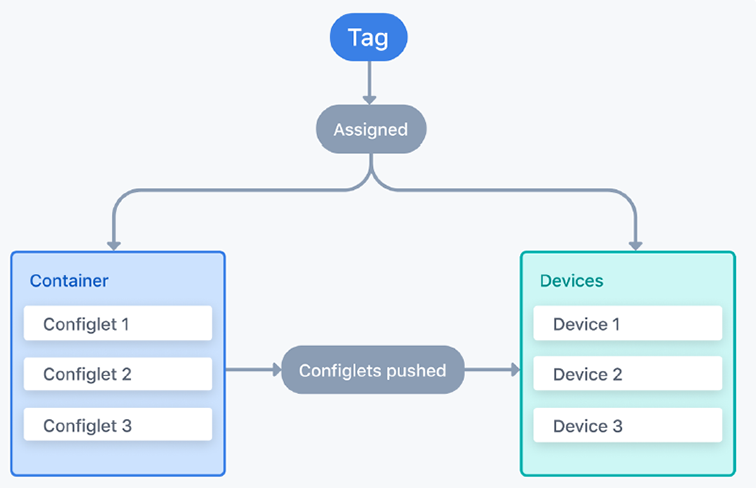
The use of tags to associate a container’s configlets with devices means that a device can be associated with multiple containers. This is because a device can have more than one tag and its different tags can be assigned to many containers.
The following diagram shows two tags assigned to two separate containers. The configlets in both containers will be pushed to Device B because that device is assigned both tags; the other devices will only receive one container’s configlets.

Tags
The tags used in the Static Configuration Studio are user tags assigned to devices. A user tag identifies one or more devices, and the tag is assigned to a container.
There are some built in tags like device: *, which identifies all devices registered to studios; or device: <hostname>, which identifies a single device. You can also create your own custom tags in Tags and assign devices to them.
Typically, you will use the tags created in other studios. For example, the Campus Fabric (L2/L3/EVPN) Studio creates a Campus: <campusName> tag for each network. If a network called HQ is created, all devices in that network will have the tag Campus: HQ. You can assign all devices in that network to a container using the Campus: HQ tag. Similarly, you could use the Campus-Pod or Access-Pod tags to target specific campus pod and access pod devices.
The Hierarchy section explains how you can use the container hierarchy to further refine which device tags are targeted, such as a specific campus pod in Campus: HQ.
Hierarchy
Containers are arranged in a tree-like hierarchy of parent and child containers that control device rules of inheritance. Devices in containers lower down in the tree must have the tags of all parent containers higher in the tree in order for configlets to be pushed to them.
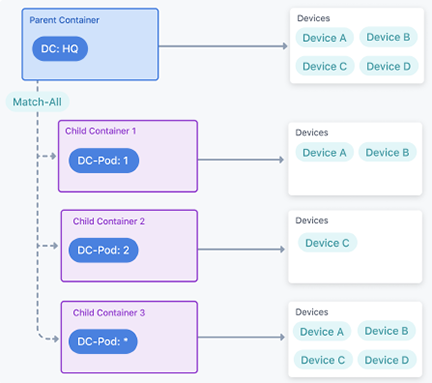
The following image shows a simple tree-like structure of containers relating to two data centers. Devices must be assigned any parent container tags for a container’s configlets to be pushed to them.
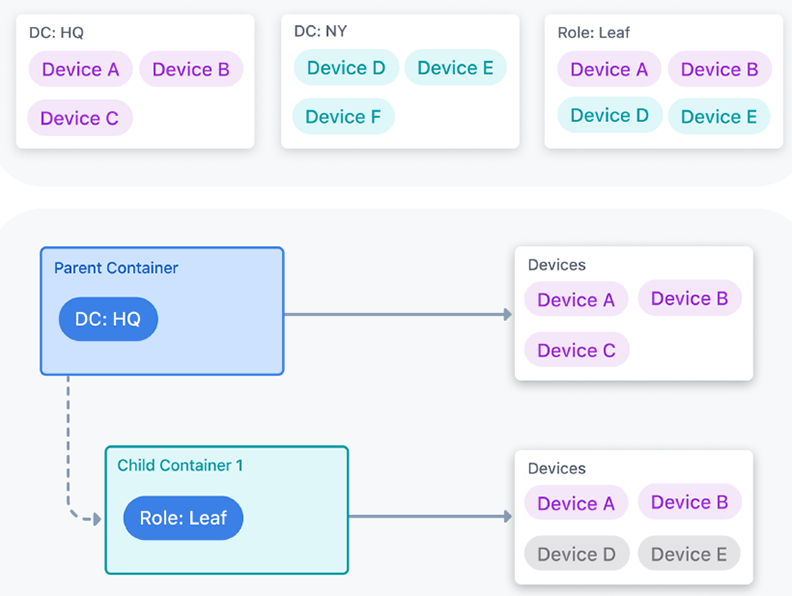
A more complex example shows a data center where specific configlets are pushed to devices depending on the pod they belong to. Another container stands outside the DC:HQ hierarchy, which contains configlets pushed to all devices regardless of what pod or data center they belong to.

The hierarchy can be understood as follows:
-
device:* applies to all devices registered to Studios
-
DC:HQ applies to all devices only with this tag
-
DC-POD:1 applies only to devices that have this tag and the DC:HQ tag.
-
-
While spine devices in both DC-POD:1 and DC-POD:2 have the same Role:Spine tag, the hierarchical structure means that only configlets within either Role:Spine container will be pushed to devices with the parent container tag. Therefore, devices with the tag DC-POD:1 will only receive configlets from the Role:Spine container under the DC-POD:1 container, and similarly, for devices with the DC-POD:2 tag.
By contrast, configlets assigned to the last container, Role:Leaf, will be pushed to all leaf devices because the parent container has the tag device:* assigned to it. This way, devices can be associated with multiple containers and hierarchies.
Configuration Precedence
CloudVision uses several configuration sources. To create and maintain a single designed configuration, a hierarchy exists for CloudVision to determine which configuration source is used to compile the designed configuration. This means that where different sources provide overlapping EOS commands, one source takes precedence over another.
This hierarchy can cause you to see missing or unexpected configuration when using Studios or Network Provisioning. You can use Config Sources in the Configuration of a selected device to view the configuration source to help resolve these issues.
CloudVision begins with the lowest-ranked source when creating the designed configuration and will then overwrite that configuration with a higher-ranked source.
The process CloudVision moves through from lowest ranked to highest ranked is:

Network Provisioning's reconciled configlets are the highest ranked source. Each source has its own internal ranking, which is explained in further detail below.
The Static Configuration Studio is preferred to any configuration sources from Network Provisioning and other studios. It has its own internal hierarchy for how configuration is assigned to devices, can be understood in the following example:
Configuration in child containers takes precedence over any parent containers.
The Access-Pod:* container will overwrite any conflicting
configuration supplied by the Campus-Pod:* and
Campus:NYC containers.
For sibling containers, the bottom container in the tree will take precedence
over sibling containers higher in the tree. The Campus-Pod:Downtown
container will overwrite conflicting configuration from the
Campus-Pod:Midtown and Campus-Pod:*
containers.
Understanding the parent-child and sibling precedences together, the
Access-Pod:Three container overwrites conflicting configuration
from all parent containers and their siblings.
When multiple configlets are assigned to a container, the precedence is ordered from left to right. This means that any conflicting configuration between a configlet to the left and configlet to the right is overwritten by the configlet on the right.
Creating Containers and a Hierarchy
You will need to create a new container when you want to associate a configuration with a specific set of tagged devices. Placing containers in a hierarchy allows you to further refine which tagged devices receive configuration assignments, because the hierarchy of containers forms a relation chain based on tags.
- Add your first container by clicking Configuration Container.
Figure 8. Configuration Container 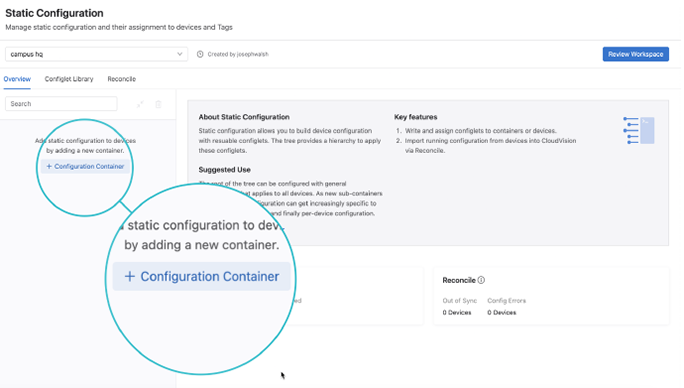
-
Assign a device tag to the container.
The tag acts as a proxy for assigning devices. All devices with the selected tag will have the container’s configlets pushed to their running configuration.
Figure 9. Assigning Device Tag to a Container 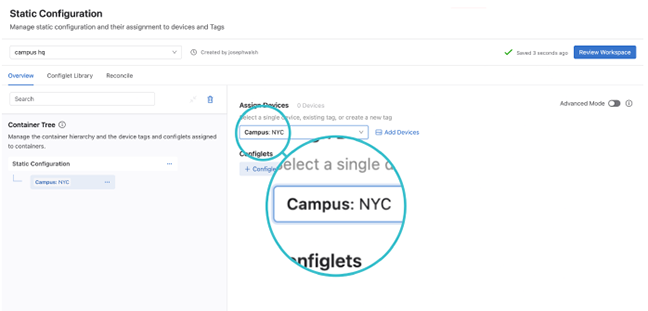
- Continue to add containers to the tree and assign tags to them.
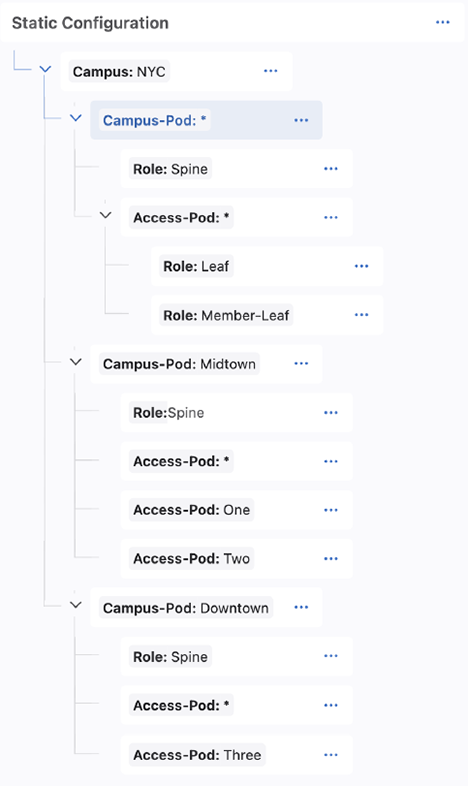
In this example, we have created a hierarchy suited for a small campus, Campus:NYC, designed in the Campus Fabric (L2/L3/EVPN) Studio. It uses the tags created in that studio.
Figure 10. Small Campus Hierarchy 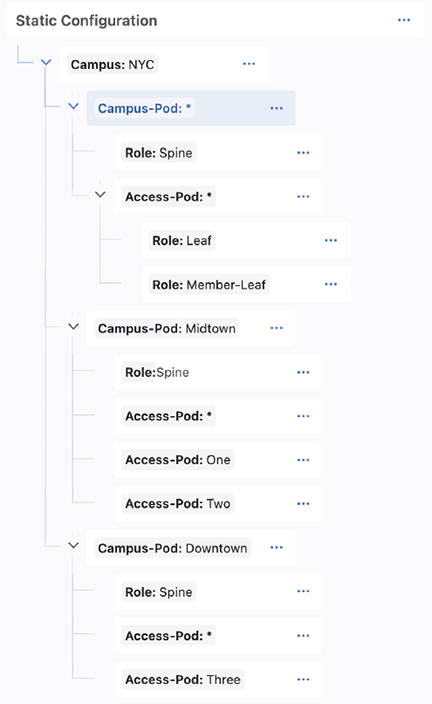
The root level container, Campus:NYC, identifies all devices in that network. Any configlets assigned to this container will be pushed to all devices in that network, because they will all have the Campus:NYC tag.
The Campus-Pod:* container is used for configuration that should be pushed to all devices in any campus pod (i.e. all spines, leafs, and member leafs) in Campus:NYC. The Role:Spine tag within this container will push configuration only to spines in any campus pod. The Access-Pod:* container is used to push configuration to all devices in any access pod and in any campus pod (because the parent container has the tag Campus-Pod:*). The Access-Pod:* child containers, Role:Leaf and Role:Member-Leaf, are used for any leaf device and member leaf device configuration in any access-pod.
The next container branch provides for more specific configuration. Campus-Pod:Midtown is used to apply configuration only to devices with that tags. The child Role:Spine container is used for configuration of spines that are in Campus-Pod:Midtown. The Access-Pod:* applies to all access pods in Campus-Pod:Midtown, and then Access-Pod:One and Access-Pod:Two are used to assign configuration only to devices in those access pods. The same structure is applied to Campus-Pod:Downtown.
Tip: You can drag and drop containers to move their position in the hierarchy. - Add any other hierarchies.
In this case, we have added a hierarchy for a small data center connected to the campus. We can apply configlets to the devices associated with each container. The DC:NYC container is a root container at the same level in the tree as the Campus:NYC tag.
Figure 11. Small Data Center Connected a Campus 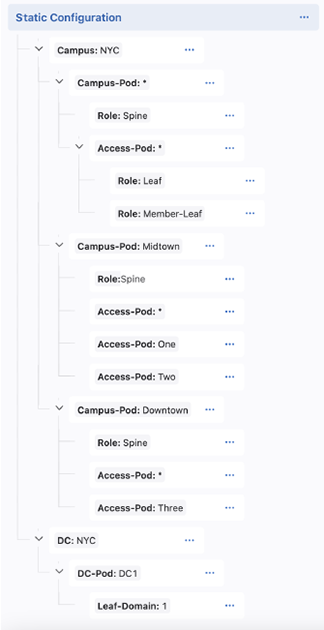
Once you have created your hierarchy, you can add configlets to containers.
Adding Devices to Containers
Devices that already have the tag assigned to a container will have that container’s configuration pushed to them. You will only need to add devices when they do not have the container’s tag or you want to create a device-specific container. A device-specific container is for configlets that only apply to one device.
In most cases, adding a device should only be relevant for device-specific configuration; any new devices configured in another studio will automatically be assigned the tags of that studio.
For example, assigning new devices to an existing leaf domain in the L3 Leaf-Spine Studio will tag those devices with the relevant DC: tag, the DC-Pod tag, and Leaf-Domain tag. However, if you created a new leaf domain, you will need to add a new Leaf-Domain container to your Static Configuration Studio container tree.
Adding a device will assign the device to the tag associated with the container. To add devices to a container:
- Click Options on a container and select Add Device.
Ensure that you select the lowest container in the hierarchy that you want configlets to be pushed to devices. The studio will allow you to also tag the device with all parent container tags.
Figure 12. Add Devices to a Container 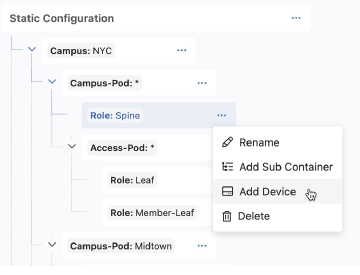
- Select one or more devices that you want to assign to the container.
All devices that do not have this tag will be available for selection. You can search by hostname.
Figure 13. Select Devices to Assign to the Container 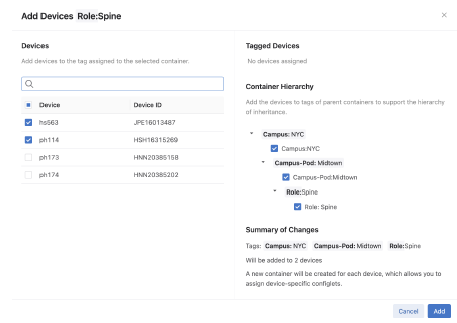
- Select what parent tags to assign to devices.
Ensure that all tags are selected. If you do not select all tags, then the device may not form part of the hierarchy’s inheritance model.
Figure 14. Select Parent Tags to Assign to Devices 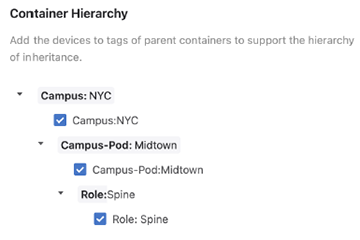
- Click Add.
Configuration associated with the selected container and any parent containers will be pushed to the devices once the workspace is submitted and its associated change control executed.
Configlets
A configlet is a set of EOS commands with a defined scope that form part of the device’s running configuration when pushed to devices. You will define the EOS commands of a configlet in a text editor by creating a new configlet or editing an existing configlet.
If you edit any configlets already assigned to tagged devices, that new configuration will be applied to each assigned device. In this way, configlets provide a way to change the configuration of multiple devices at once.
Adding Configlets to Containers
You will add configlets to containers by either writing a new configlet or selecting one from the Config Library. Any new configlet you create will be added to the configlet library.
- Select a container in the Overview tab.
Configlets already assigned to the container will be visible as tabs. You can select an existing configlet by clicking this tab and editing the configlet.
Figure 15. Select Container in Overview Tab 
- Click Configlet.
- Select New Configlet or Config Library.
Selecting New Configlet will provide a blank textpad to write the EOS commands. Edit the configlet tab to assign a name to the configlet. When completed it will be saved to the Config Library. Selecting a configlet from the Config Library will create a new configlet tab containing the selected configlet. Any edits you make to this configlet will be shared with all other containers to which the configlet is assigned.
Figure 16. Select New Configlet or Configlet Library 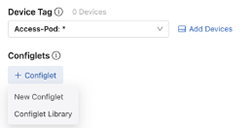
Once completed, you can review the workspace and the proposed configuration changes.
Config Library
All configlets you create in the Static Configuration Studio are stored in the Config Library. This library allows you to view and edit configlets. It also serves as a repository from which you can repeatedly assign configlets to containers.
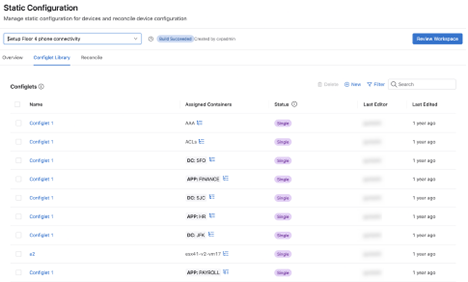
The status of a configlet shows whether it is unused, assigned to a single container, or shared across multiple containers.
Reconciling Configuration
Reconciling is used to resolve differences between the workspace’s designed configuration and the device’s running configuration. This is typically required when a device’s running config has been updated via CLI instead of CloudVision.
Building the workspace will detect if any device configuration is out of sync.
When you reconcile configuration, you will create a new reconcile container with a reconcile configlet that is assigned to all reconciled devices. The reconcile configlet will take precedence over Studio-generated configuration as well as other Static Configlets. If your build fails, and the error message references the reconcile configlet, that may indicate a conflict in configuration precedence. One method to resolve this is to delete the reconcile configlet (or the specific line causing the validation error), rebuild and then reconcile again.
- Click the Reconcile tab.
Devices detected with unresolved running configuration will be displayed.
Figure 18. Reconcile Tab 
- Click Start Build.
This will update the list of devices out of compliance.
Figure 19. Start Build 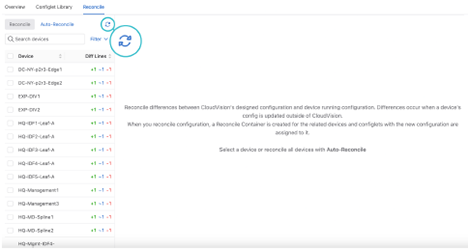
- Select one or more devices.
You can choose which lines from the running configuration to include or overwrite the designed configuration by checking or unchecking the checkboxes.
Tip: You can click Auto-Reconcile to reconcile all devices with one action.Figure 20. Select Devices 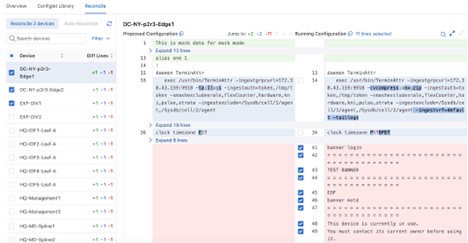
- Select Reconcile.
The workspace will rebuild and a new container in the Container Tree called Reconciled Configlets will be created.
Figure 21. Select Reconcile 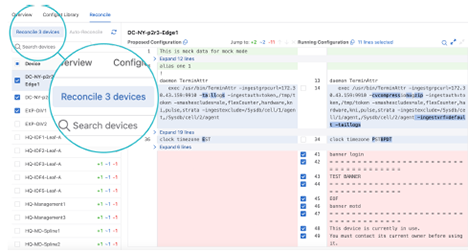
- Click Review Workspace and submit the workspace to change control.
Figure 22. Reconciled Configlets Tree 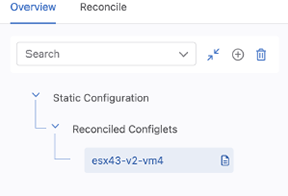
When the associated change control is executed, the running configuration and the designed configuration will be synchronised, bringing the running configuration of the device into compliance.
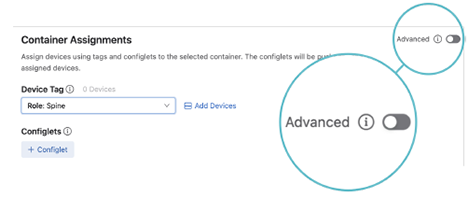
Advanced Mode
The advanced mode provides additional options for configuring your tree. It introduces the concept of match rules, which affect how the hierarchy assigns configlets to devices. It also allows you to assign multiple tags to a container using tag query.
You can enable advanced mode when viewing a container’s assignments.
Select a container, then click the Advanced Mode toggle.
Related Topics
Match Rules
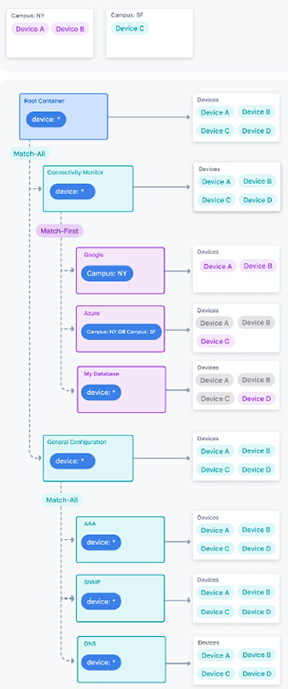
The container hierarchy can be further customized with match rules. The two rules allow you to define how the devices associated with sibling containers have configlets pushed to them.
The match rules operate in a top-down hierarchy from the parent container. The hierarchy of containers is complemented by match rules. These rules further control how configlets are pushed to child containers.
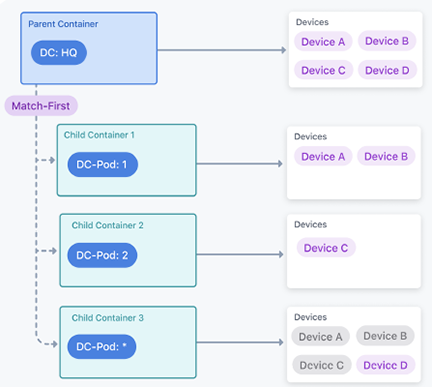
Match First
The match first rule will only push configlets to devices that have not already received configlets from a sibling container.
In the following diagram, Device D has the tag DC-Pod: 4. Only Device D receives configlets from Container 3, because all other devices have already received configuration from sibling containers.
Match All
The Match All instruction will push configlets to all child devices with matching tags.
Match Rule Example
The following example shows the match rules combined with container hierarchy for four devices. There are two campus tags that associate devices with the Google and Azure containers. Match rules allow you to control which configlets are assigned on a per-device level when devices match multiple containers.
Notice how using the Match First Policy allows us to control which configlets are assigned to a device. Device A and B match both the Google and Azure containers due to the Campus: NY tag. But by using the Match First Policy, they do not inherit the configlets in the Azure container because they matched the Google container first. The order of the containers is controlled by the operator, by dragging and dropping them in the Static Configuration Studio UI.
Creating Containers and Hierarchy
You will create a new container when you want to push configlets to a specific set of devices. These devices are identified by a tag, which is assigned to the container.
- Click New Container.
You can add a child container (New Sub Container) or a sibling container (New Container).
Figure 27. Creating New Container 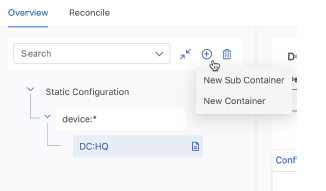
If you are adding a child container, set the match rule in the parent container.
Figure 28. Setting Match Rule in Parent Container 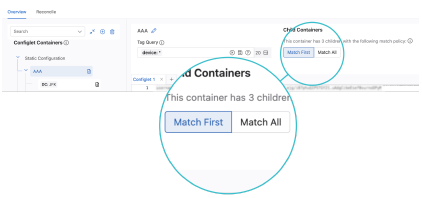
- Select the new container and enter a name .
Figure 29. Naming New Container 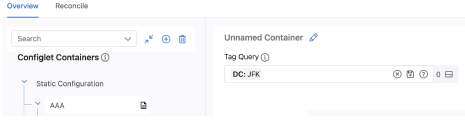
- Assign a tag in the Device Query input.
The tag associates devices with the container and all configlets created in the container will be pushed to the tagged devices.
Figure 30. Assign a Tag 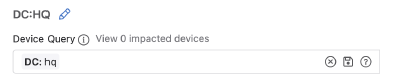
- Write the configlets for the container.
When the workspace is submitted, a change-control is created, and when executed the configlets are pushed to devices with the container’s assigned tag.