Backup and Restore
CloudVision Portal (CVP) enables you to backup and restore the complete CVP provisioning dataset, including containers, devices, configlets, images, and configlet / image assignments. You can use commands to backup and restore CVP data.
Arista provides a simple script at /cvpi/tools/backup.py which is scheduled by default to run daily to backup CVP data, and retain the last 5 backups in /data/cvpbackup/. Backing up and restoring data saves information about the CVP instance to a tgz file, and then restores the information from the tgz file to a new CVP instance. The CVP commands provide all of the functionality required to complete backup and restore operations.
The current CVP release does not support restoring backups taken from previous CVP releases. If you would like to restore a backup from a previous CVP release, install the previous release, restore the backup, and then upgrade to the current release. After you have successfully upgraded to the current release, take another backup so that you can directly restore that into current main release in the future.
For more information, see:
Requirements for Multi-node Installations
The basic requirements for backup and restore operations are the same for single-node installations and multi-node installations.
Using CVPI Commands to Backup and Restore CV-CUE Data
Arista recommends to back up wifimanager regularly and especially before performing any upgrades.
Restore CV-CUE Data
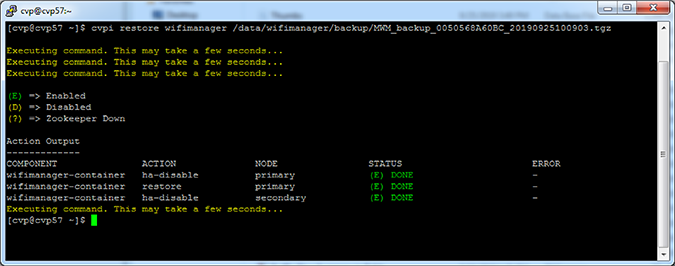
You can restore wifimanager from a backup using the cvpi restore wifimanager </path/to/backup/file> command.

RMA
For RMA or recovery issues, contact 이 이메일 주소가 스팸봇으로부터 보호됩니다. 확인하려면 자바스크립트 활성화가 필요합니다..
Using CVPI Commands to Backup and Restore CVP Provisioning Data
Backup and restore are CVPI functionalities of CVPI components.
The default directory to save and restore backup data files is /data/cvpbackup.
The default directory for backup/restore log files is /cvpi/logs/cvpbackup.
The default directory for temporary files during backup/restore is /data/tmp/cvpbackup.
The following commands are used to backup and then restore the containers, devices, configlets, images, and configlet or image assignments that are defined in CVP.
Backup CVP Provisioning Data
cvpi backup cvp[cvp@cvp108 bin]$ cvpi backup cvpRestore CVP Provisioning Data
cvpi restore cvp cvp.timestamp.tgz eosimages.timestamp.tgzThe cvp.<timestamp>.tgz parameter contains provisioning data
from the DataBase (DB) of the CVP application. The
cvp.eosimages.<timestamp>.tgz parameter contains EOS
images and extensions stored in the DataBase (DB) of the CVP application.
[cvp@cvp108 bin]$ cvpi restore cvp cvp.2019.1.0.tgz cvp.eosimages.2019.1.0.tgzTo check the progress of the backup, tail -f/cvpi/logs/cvpbackup/backup_cvp.20190606020011.log.
CVP backup creates two backup files in the /data/cvpbackup directory for restoration. The eosimages.tgz is generated only when it differs from the currently available copy of the eosimages.tgz, and is an optional parameter for restore if the CVP system already contains the same EOS image.
The cvpi backup command can be run anytime and does not disrupt the cvp application. However, the cvpi restore command will stop the cvp application and disrupt the service for the duration of the restore. If the restore is from a backup on a different CVP system to a new CVP system, it may also be required to on-board the EOS devices or restart the Terminattr daemons on the EOS devices after the restore.
Troubleshooting CVP Restore Failure of Provisioning Data
If the cvpbackup directory does not exist in /data when copying the restore files to a newly built VM, you must create it and assign the ownership to the cvp user and group in either of the following two ways:
-
Login as cvp user and create the cvpbackup directory
Use the su cvp command to login as cvp user and the mkdir -p /data/cvpbackup command to create the cvpbackup directory.
-
Create the folder as root and change the ownership
Use the mkdir -p /data/cvpbackup command to create the folder as root and the chown -R cvp:cvp /data/cvpbackup/ command to change the ownership of cvpbackup directory and its files to cvp user and group.
Verifying the Ownership of cvpbackup Directory
Use one of the following commands to verify the ownership of cvpbackup directory:
-
ls
This example verifies the ownership of cvpbackup directory using the ls command.
[root@cvp-2019 data]# ls -l /data/ | grep cvpbackup drwxrwxr-x. 2 cvp cvp 236 Mar 16 02:01 cvpbackup -
stat
This example verifies the ownership of cvpbackup directory using the stat command.
[root@cvp-2019 data]# stat /data/cvpbackup/ | grep Access
Access: (0775/drwxrwxr-x) Uid: (10010/ cvp) Gid: (10010/ cvp)
Verifying the Ownership of Files Inside the cvpbackup Directory
The following example verifies the ownership of files inside the cvpbackup directory using the ls command:
[root@cvp-2019 data]# ls -l /data/cvpbackup
total 18863972
-rw-rw-r-- 1 cvp cvp 6650171 Mar 14 02:01 cvp.20200314020004.tgz
-rw-rw-r-- 1 cvp cvp 9642441292 Mar 14 02:08 cvp.eosimages.20200314020002.tgz
Correcting the Ownership of cvpbackup Directory Files
Use the chown command to correct the ownership of cvpbackup directory files.
chown cvp:cvp cvp.<timestamp>.tgz cvp.eosimages.<timestamp>.tgzThe cvp.<timestamp>.tgz parameter contains provisioning
data from the DataBase (DB) of the CVP application. The
cvp.eosimages.<timestamp>.tgz parameter contains
EOS images and extensions stored in the DataBase (DB) of the CVP application.
This example changes the ownership of all cvpbackup directory files.
[root@cvp-2019 data]# chown cvp:cvp cvp.20200319020002.tgz cvp.eosimages.20200314020002.tgz