The Access Control Page
To gain access to the Access Control Page, complete the following:
- Click the gear icon on the home page.
Figure 1. Gear Icon 
- Click Access Control in the left menu.
The system displays the Initial Access Control screen.
Figure 2. Initial Access Control Page 
The system displays the Servers section when either RADIUS or TACACS is selected as Authentication source.
Figure 3. AAA Access Control Page 
- If the authentication is local, the authorization must be done locally.
- If the authentication is done externally, the authorization can be done locally or externally.
Table 1. Server Authentication and Authorization Authentication Authorization Local Local RADIUS Local
RADIUS
TACACS Local
TACACS
Note: External servers supported by CloudVision are RADIUS and TACACS.For more information, refer to:Related topics:
Server Ordering for RADIUS and TACACS Servers
Server ordering allows you to prioritize RADIUS and TACACS+ servers and specify the order that CloudVision should follow when attempting login authentication.
Ordering Servers
To order RADIUS and TACACS+ servers:
- Go to Settings and Tools>Access Control and select either RADIUS or TACACS.
Figure 4. Access Control 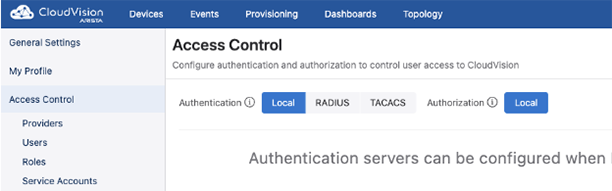
- Click Add Server to launch a modal.
- Enter details for the relevant server including a priority value.
Figure 5. Add RADIUS Server 
-
A valid priority value is between 1 and 100. The highest priority level is 0 and the lowest is 100. Only servers that were added to Access Control prior to the introduction of server ordering will be assigned a priority of 0. The priority of these servers can easily be changed by using the increase priority and decrease priority actions, or by editing the server.
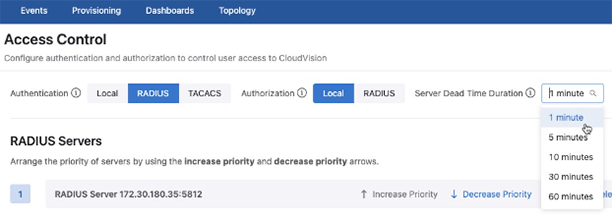
The values listed next to the server IP address in the priority list correspond to the user-configured priority values.
Figure 6. Server Priority 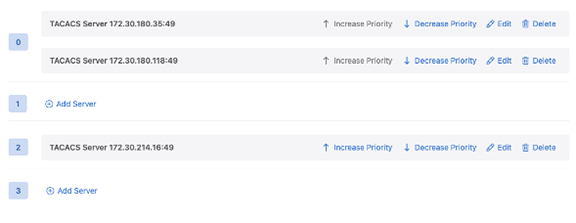 Note: Multiple servers can share the same priority. Servers with the same priority level will be selected at random for login authorization.
 - Use the actions next to a listed server IP address to rearrange the priority of a server,to edit, or delete it.
Dead Time Duration Setting
With the Server Dead Time Duration setting for RADIUS and TACACS+ servers, you can configure how long a server will be considered dead for the purposes of AAA authentication.Previously, CloudVision attempted authentication with live servers first, then dead servers.An unreachable server was marked as dead and remained so until the next successful authentication call with the server.Now, once servers are ordered, you can use the Dead Time Duration setting to skip an unreachable server only until its dead timer expires.
Setting Dead Time Duration
To set Server Dead Time Duration visit Settings>Access Control, and select either RADIUS or TACACS+ authentication.
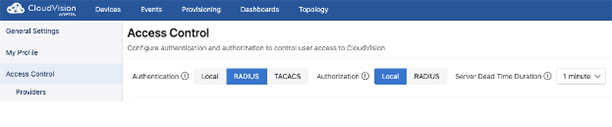
Make sure that servers are prioritized. Then select the appropriate dead time duration from the dropdown. This is a global setting for all AAA servers.
Username Inclusion in the TACACS+ Authentication Start Packet
Previously, CloudVision did not send the username in the start packet for authentication via TACACS+ servers. Toggling the Send Username setting off or on enables you to now decide whether or not to include the username in the initial packet.
Enabling Username Inclusion
- Go to Settings>Access Control and select TACACS authentication.
Figure 9. Select TACAS 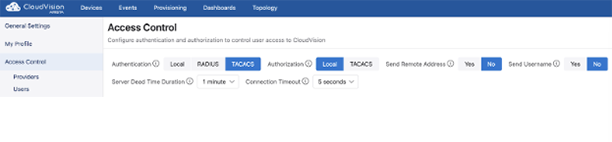
- Select either Yes or No as appropriate, then click Save.
Combine RADIUS Auth Requests for OTP Systems
CloudVision can be enabled to combine the authentication and authorization requests that it sends to a RADIUS server into a single request.
When RADIUS is configured as the AAA provider, CloudVision will send separate authentication and authorization requests by default. This can interfere with One-Time Password (OTP) users, as issued passwords are only valid for one request.
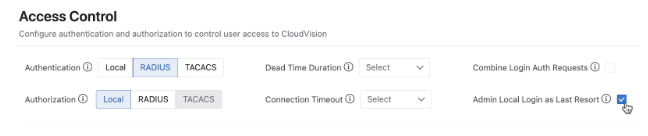
To combine authentication and authorization requests, navigate to Settings > Access Control and enable the Combine Login Auth Requests checkbox.

Admin Local Login as Last Resort
You can allow cvpadmin to use local login as a last resort when Access Control is set to RADIUS or TACACS+. By enabling the feature, the cvpadmin username is allowed to log in using local password authentication when the RADIUS or TACACS+ servers are down or unreachable. This ensures that the administrator retains login access in the event that all users are locked out of CloudVision.
To enable cvpadmin last resort login, navigate to Settings > Access Control and enable the Admin Local Login as Last Resort checkbox.